Monday 25 April 2016

Van Diemen's World Devils: Infantry Squad TO-DONE!


Hi folks,

To commemorate ANZAC day, I have been working hard to get my Van Diemen's World Devils projects finished. The figures are cobbled together from a couple of Victoria Miniatures kits, apart from the Citadel Commissar who just has a fancy slouch hat. Painting them, I couldn't help feeling spoilt by the quality of Citadel miniatures. Victoria Miniatures are a great little company and they offer some amazingly characterful kits, but the figures were damn hard to paint!


The bodies and lasguns are all from the Victoria Miniatures Arcadian Female troops range, which have had their helmets removed and replaced by slouch hats form the Van Diemen's World Devils range. You can read about my terrible woes putting them together in an older post.


If assembling this squad was tricky, painting them was abominable. I think next time I do Astra Militarum I will have to take a bit more time. My plan with these figures was to speed paint them and then add some neat details. What I ended up doing was hours of touch-ups for very little pay off! Few of the edges on these figures were sharp, which made hard-lining/drybrushing less effective, and things like creases in the clothing were not well enough defined to take a quick wash and look good. Finally, whatever skills I had in painting eyeballs were not enough for this job. I can see some eyeball painting practice in my near future :-)

Here are few close-ups


Looking back on it, this little project was far more challenging than some of the others I have finished over the past couple of years. I definitely considered giving up on them a few times, but the fact that they were for a good mate stopped me. Australians like to think that this spirit of giving your all, so that you don't let your mates down, is unique to them. I'm not sure about that, but it has led us to do some courageous things under terrible conditions. On ANZAC day, that is something that we celebrate, as we remember those who gave so much more than a few nights of utter frustration painting eyeballs.

Lest we forget,

M4cr0

Monday 18 April 2016

X-wing: Testing the Ghost


Hi folks,

Last week the Wave 8 X-wing ships hit the shelves at my FLGS, so I helped myself to a VCX-100 Ghost.  For those of you who are unfamiliar with it, the Ghost is the ship used by the main characters in the series Star Wars Rebels. It is a large, expensive, ship with the potential to dish out an incredible amount of punishment.

Wade gave it a test run for me, teaming up with Godfrey and 150 points worth of Rebels: Kanan Jarrus in a VCX-100 (Ghost, "Zeb" Orrelios, Dorsal Turret, Recon Specialist, Fire Control System) Ten Numb in a B-Wing (Autoblasters, B-Wing/E2, Hera Syndulla and Push the Limit), two Prototype A-wing pilots (Stealth Device and Chardaan Refit) and Sabine Wren in an Attack Shuttle (Phantom, Ezra Bridger, Stay on Target).

KuriboGoomba and I chose 150 points of Imperials, which included Rear Admiral Chiraneau in a  Decimator (Ruthlessness), Colonel Jendon in a Lambda-Class Shuttle (Accuracy Corrector, Hull Upgrade, Darth Vader and ST-321), Carnor Jax in a TIE Interceptor (Elusiveness, Stealth Device, Royal Guard TIE and Autothrusters) and a Royal Guard Pilot in a TIE Interceptor (Wingman, Stealth Device, Royal Guard TIE and Autothrusters).


During the first turn the Rebels made a run for the left flank to put early pressure on the Decimator and distance themselves from the Interceptors as much as possible. The Decimator got a long range shot off at the red A-wing, stripping its two shields (and Stealth Device) and causing the blue A-wing to take one damage from Ruthlessness. The return fire picked away at the Decimator's shields.


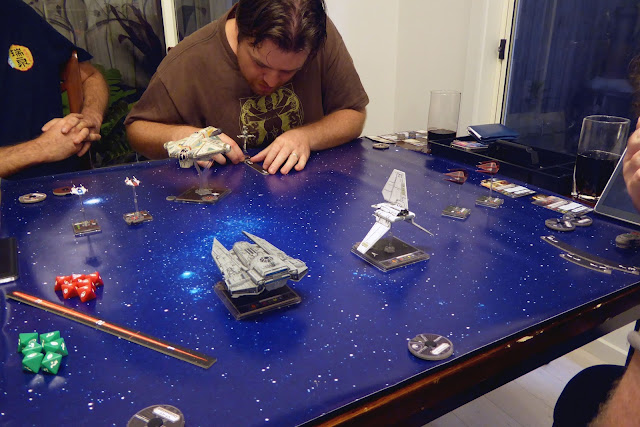
Godfrey does his first X-wing maneuver ever.  "You've taken your first step into a larger world."

The Ghost then lined up the Decimator in its next maneuver phase. At point blank range the Ghost and B-wing teamed up to reduce the big ship to just 6 hull points in a single turn. Ouch! The Decimator continued to focus on the A-wings swinging around behind it, but they evaded the fire. The B-wing took some damage to its shields from the Lambda-Class Shuttle and the TIE Interceptors.


As the two fleets passed each other, the Ghost launched the Phantom to pursue the Decimator. This reduces the effectiveness of the Ghost itself significantly; it can no longer use its rear firing arc or fire its turret on the same turn as the primary weapon. Goomba and I were now aiming to take down the Attack Shuttle as soon as possible. The Phantom stripped another four hull points off the Decimator with a devastating Range 1 volley, but was immolated by the return fire from the large ship. The B-wing managed to destroy the Royal Guard Pilot but was taken out by the Lambda-Class Shuttle.


With the Phantom destroyed, Wade and Godfrey sent the A-wings out to finish the Decimator and maneuvered the Ghost into a position where it could use its only active firing arc. The red A-wing pulled a gutsy maneuver, turning within a hairs-breadth of the Decimator. Gallingly, it was snuffed out for its temerity before it could even take a shot! Carnor Jax added to the Rebel woes by destroying the blue A-wing.


Knowing that Kanan and the Tactician on the Ghost would continue teaming together to make it hard to hit, we sent Carnor in to do his thing. With Carnor within range one Focus and Evade actions can't be made and Focus and Evade tokens can't be spent. This acts as an effective foil for that build of the Ghost. Carnor poured fire into the Ghost causing significant damage, but was reduced to one hull point himself in the process (there goes Stealth Device). The Lambda-Class Shuttle also caused a hit, which Darth Vader used to cause an additional critical hit at the cost of two hull points.


With just the Ghost left, Wade and Godfrey threw caution to the wind and plowed the Ghost into the Decimator. With Zeb Orrelios on board the ships could still shoot each other, even though they were touching, and the Decimator was finally destroyed.


With the Decimator down and both Carnor Jax and the Lambda-Class Shuttle holding on by a few hull points, the Rebels could sniff an unlikely victory. The Ghost pulled a K-turn and lined up on the Lambda-Class Shuttle in an attack run that was almost assured at taking it out. Unfortunately for the crew of the Ghost, I predicted the maneuver and put Carnor Jax into the perfect position to deliver the killing blow, which he did spectacularly!


For his first game Godfrey did very well, especially considering the complexity of the upgrade combinations he had to work with. The Imperial fleet was also pretty lean, compared to the point-sink of the Ghost. It is a beautiful ship to play with, with many different possible builds and interesting special rules. To get the most out of it, though, you need to purchase the Attack Shuttle and keep it docked for as long as possible. That is a 60+ point investment for one ship. I am not saying that it isn't worth it, but you can get a lot of TIEs for 60+ points, which the Ghost will struggle to deal with.

If you have any interesting builds or tips for using the Ghost and Phantom, please leave them in the comments below.

See you across the table,

M4cr0

Sunday 17 April 2016

Experimenting with Lightboxes


Hi folks,

I have been experimenting with miniature photography over the past couple of weeks, which I imagine a lot of you would have done at some point or another (if you haven't, it's a riot). In the past I have set up any models I want to photograph on my gaming board and taken shots in natural light, as the light is quite diffuse already. When that hasn't been possible, I have taken shots on my display shelf, but every time I do that I have to shift about 2000 points worth of Dark Angels out of the way. It was time to make a light box.

There are many, many DIY lightbox tutorials available on the net. This is the one I read before starting: Create an Inexpensive Photography Lightbox. You can also order them online, though prices can vary from "value-for-money" to "time-to-sell-kidney". I needed a big one, big enough to fit a Fortress of Redemption, so I started with a lawn mower box.


I cut the top off completely to create an open side for me to take shots through. I then cut windows into the sides and top for the light sources, leaving a two inch frame. I covered the windows with translucent material, which we had left over from an Elsa costume my wife made for the little one. In case you are new to lightboxes, this material is designed diffuse the light from any source that you direct at it. The material was taped in position with gaffa tape (because it fixes everything). Here is a candid shot my wife took while I was working on it.


I bought two desk lamps that clamp to my table for use with the lightbox, but I am still open to experimenting with other light sources. In particular, the ones that I have seem to cast particularly green light around the edges of their beam, which complicates photography by requiring digital editting (-11% green and blue). I would also like to get a light that I can direct through the top of the box to eliminate any final shadows. I may end up attaching another layer of the translucent material so that the lights can be aimed more directly at the model. I also created a background sheet made from cardboard that has been stained with tea-bags (!) and tan/black paint that I applied using a sponge. I think the colour combination suits the scheme of my blog well, but if you have any other feedback let me know. I need to make a smaller background sheet for small miniatures, but that is tomorrow Marc's problem!


Here are some test shots of my Scythed Hierodule. Over the next couple of days I am going to experiment more with the lighting and internal structure of the box, to try and get even more light bouncing randomly around in there. If you have any advice, let me know in the comments.


See you across the table,

M4cr0

Thursday 14 April 2016

Van Diemen's World Devils: Transport Build Complete


Hi folks,

I was in my man-cave last night, scheming again, when a box of models under my painting desk caught my eye. It contained all of the units for an unpainted Ork army, that my friend Jimmy left after a game many years ago. I was marveling at one of the beaten up Battlewagons when I had a stupid idea... what would it look like if an Imperial Guard unit got some pay-back and looted an Ork vehicle? What changes would they make?

After asking Jimmy permission to commence tinkering, this is the pile of junk I started off with (sorry Jimmy, even the best Ork Battlewagon is a pile of junk), Apple laptop included:


I had a whole bunch of vehicle sprues to work with, including one from a Shadowsword super-heavy tank. I also had the wheel and suspension kit that I previously ordered from Victoria miniatures. The first step was to cut all the pieces that I needed off the sprues and do some important clean-up work on the wagon. This included removing about 40 rivets, filing random armour sections flat and widening the back door and fire-points. I also removed some Ork glyphs and flattened the front grill, as it was way too Orky. The exhaust pipe also had to go, it screamed Ork. Ditto the tyres; "if you have money to spend on your car, spend it on the tyres first."


Once that was done I start the construction phase. I added a new front armour plate using half a Landraider door with a dirty great winged skull on it and some scroll work, primarily because it looked a bit like a mustache. I added some lamps and searchlights, as well as a twin-linked heavy bolter mount from a Razorback. The exhaust was replaced with a chopped version of the lascannon from the Fortress of Redemption kit. This gave it a bit of a steam-punk look, like the Warhammer Fantasy Imperial war machines. 


Colonel Clancy himself was made from a Stormsword crew member with a Van Diemen's World Devils resin head. I also added an open hatch cover, vox antennae and microwave transmission disc.


I closed off the driver's compartment with an internal Rhino door and added a computer console and stowed boltgun. Each open door in the drivers compartment got a heavy bolter implacement. I also added some extra armour pieces from the Shadowsword kit with more pintle mounted heavy bolters for good measure. I placed an ammo stockpile in the middle of the transport compartment, so that it can truly act as a defensible fire-point and closed the back entrance off with a second Landraider door.


I had to do quite a bit of work on the wheels to get them to fit, so at the moment I need to wait for some greenstuff to cure before I attach them properly. Some blu-tac gives you the idea though.


Now all I have to do is paint it...

See you across the table,

M4cr0

Monday 11 April 2016

Van Diemen's World Devils: Commissar TO-DONE!


Hi folks,

On Friday night I set myself the challenge of painting this Van Diemen's World Commissar in 48 hours. During that time I ended up only having 30 minutes to myself! That was only enough time to paint the face and the plasma pistol. This morning I was able to finish him off in just under 4 hours, which is some kind of crazy record for me. So, I can't give myself a bingo stamp for finishing him in the set time, but I can get one for painting a model for a friend. The 48 hour challenge remains frustratingly incomplete; I'll have to buy something else now...


I painted him using the Tamiya camo paints that the manager at my local Hobbyco suggested. Overall,  I think they worked quite well, so I will be using them again on the infantry squad and transport (when I get around to buying one).

This model has some great little details, such as the medal on the left lapel, some subtle bionics and the hat pin. They were all great fun to paint, though I am glad I refrained from drinking any caffeinated drinks this morning when I was painting the stripes on that medal!


I added stippled highlights to the cloak to make it look more like a Drizabone jacket. The base was finished in the same way as Wade's other Imperial Guard, acting as a slight unifying factor. His army is already made up of a selection of different regiments; I'm sure these models will fit in just fine.


Next up I have 10 infantry models to do, followed by a Taurox with a wheel and suspension conversion kit. With two weeks to go until ANZAC day, I am cautiously optimistic...

See you across the table,

M4cr0

Friday 8 April 2016

Van Diemen's World Devils: Commissar Build Complete


Hi folks,

ANZAC day is coming around again here in Australia, which means it is time for me to finish the Van Diemen's World Devils I have been working on. This time last year I was busy building a platoon of female Van Diemen's guard, but I never got a chance to paint them. They have been packed away for 12 months whilst I... plotted.

Anyway, over the next couple of days I am going to hit this project hard and try to knock it over. To start with, I assembled a Commissar to maintain the discipline of any allies present on the battlefield. The model is the most recent plastic sculpt, which I am hoping to paint in the next 48 hours for all the Hobby Bingo players out there. I have added a small bit of detail with the signature slouch hat.

I love the old school looking power sword and grizzled face this guy has. I can't stop thinking about Crocodile Dundee and his dirty big knife:


I am a bit torn about how to paint him; Commissars have a pretty well established colour palette. Part of me wouldn't mind giving him a Drizabone jacket, which is a rich muddy brown. I have a Drizabone (dry-as-a-bone) at home that smells of leather, horse and campfires; it is the quintessence of Australian Outback apparel :-)


I am going to give him a quick spray undercoat and then delay my decision on the paint scheme until tomorrow. I guess if the brown doesn't look good I can always go back over it with black. Wish me luck!

See you across the table,

M4cr0

Wednesday 6 April 2016

Dawn of War Thermoplasma Generator TO-DONE!


Hi folks,

Dave over at Confessions of a 40K Addict has designed a stunning array of terrain templates for miniature wargaming, which are all free to download from his website. Over the past couple of weeks he has been running a terrain building competition based on his collection, which I was keen to have a go at. I am fairly confident with building natural terrain pieces, but the built environment is a mystery to me. I made a few terrible looking buildings in my earlier years but gave up on them pretty quickly!

Trolling through the list of downloads I was drawn to the Dawn of War Plasma Generator. I used to love playing that game and the idea of having a DoW themed terrain piece made me giggle on the inside.

This download came with a warning: Mechanicum Unapproved.


From what I could see the design would fit neatly together, but from reading the posts Dave made about the design, I got the impression it would need a bit of fiddling.

The first step of the modelling process required me to create a laminate of two card layers. I think Dave used three originally, but I was after material a little bit thinner so that I could cut it easier. Thankfully, we had a Rice Bubble box that hadn't quite made it to the recycling bin yet. I pressed the layers between two heavy chairs and left it for 24 hours.


After that, I transferred the template to the card and cut out all the pieces. The laminate felt sturdy enough but I could cut through it easily. The thicker pieces were cut out of some foam board, that I had left over from another project. Generally speaking I don't like using the stuff, but after looking at the texture I thought it may be able to represent roughly extruded metal well, which was a look I was going for.


Next I worked on the core. Originally, Dave used four pen casings to represent the four narrow cores of the DoW Plasma generator, but I thought I could throw in a little upgrade at this point. I have some large, screw top test-tubes from a cute confectionery shop in Sydney that would be perfect for a Thermoplasma generator core, which is what you get when you upgrade the Plasma generator in the game. I tinted the interior with Tamiya Clear Red and the help of a hair dryer, then sawed off the top half and added a cap from another GW kit.


I did some work on the base at this stage, installing an emergency heat-sink. I have used a homing beacon to represent a flashing light and siren that would warn people to move out of the way when the heat-sink was about to go online, which is powered by its own potential coil. The emergency venting conduit was made from bendy straws!


With that finished I was ready to assemble everything. I made one of the uprights removable so that the core could be inserted and removed whenever required; I had some LED shenanigans in mind. Once the structure was built I raided my bitz box for bits that could add some detail, such as the computer interface that would allow the generator to be controlled, extra venting, tools and skulls (MOAR skulls!). The control panel from the interior of a Landraider was ideal for this, though I had to carefully saw it into sections.


With 24 hours to go before the deadline, heavy amounts of teaching work and excruciating pain from a foot injury, this was about the time I started to despair. I was loving the project but seriously considered just putting it away. I gave it one last effort, sticking to my usual Dark Angels colour scheme. The control panel was particularly fun to paint; I made sure it had a big red button to represent the control for the emergency heat sink ;-)


In the final steps I added a couple Dark Angels decals and painted about 80 rivets to break up the green armour. It is only a detail that you see when have the thing in front of you really, but I was much happier with the look of the project after this. I also flocked the base, adding some dirt and rocks to represent the hastily broken ground and two laser cut ferns around the heat sink. Obviously they have been thriving in the slightly elevated temperature there, but will bear the brunt of any emergency venting!


Finally, with just three hours to go before the deadline (here in Australia, anyway), I rigged up some LEDs and installed the core for one final photo. At some stage my wife walked in and said "...it looks like it is on fire...", thankfully I didn't burn the whole thing to a crisp.


Overall it was a highly enjoyable project and I am looking forward to trying out some more templates, especially after seeing some of the other entries in the competition. If you get a chance, head over to Dave's website and check out the competition entries there, they are all fantastic. Even better, download some FREE terrain templates and build something for yourself!

I'll leave you with this last photo that my 4 year old sneaked while I was working on the generator. She has been fascinated by the whole process and has even started photographing her own artworks blogger-style. She took this candid shot whilst I was deeply engrossed with the kind of fiddling I was talking about before :-)


See you across the table,

M4cr0