Friday 31 October 2014

Halloween Special Edition


All Hallows' Marines

Hi folks,

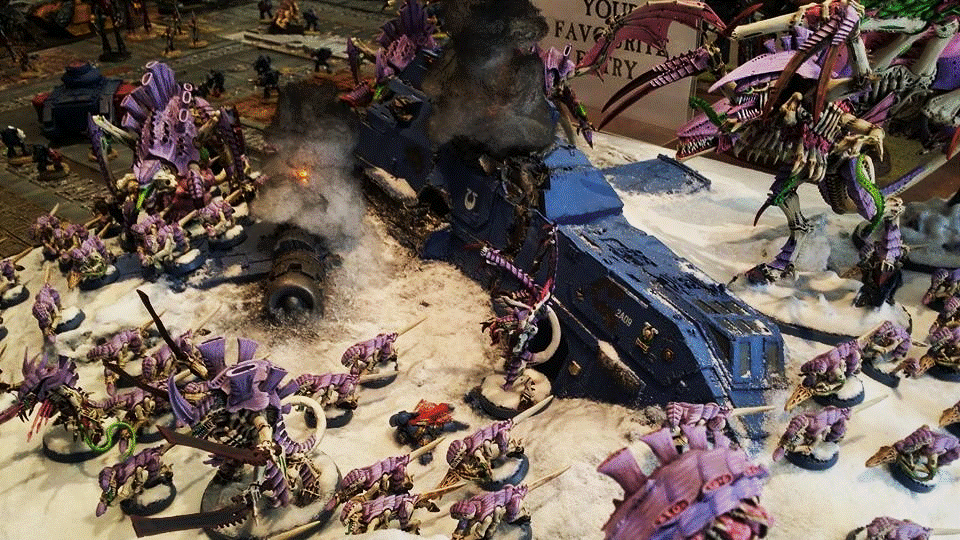
Happy Halloween for all of those people who celebrate it. My local GW sent me the pic above, so I can't claim any credit for it; but damn they look cool, I had to share! Halloween is not a particularly big thing here in Australia, but we have had a few kids come around tonight hunting for treats regardless. To mark the occasion, I thought I would get all ghoulish and make some realistic gore for my Deathleaper base. Before I started, I read this article on Tale of Painters: How to Paint Realistic Blood and Gore. It was a cracker and gave me some great ideas on what to buy and how to start. I purchased myself some Tamiya Clear Red from my local Hobbyco and settled on a colour scheme to go beneath the glaze. Using a spare scrap of guts as a test, I decided to paint the thin ropy bits of gore Bleached Bone, and the larger tubular bits a lighter shade of Lich Purple. I really wanted to see how the different base colours would affect the overall appearance after the glaze.


After the base colours had dried I opened up my bottle of Clear Red. First things first: this stuff has some kick in it. During my other life as a synthetic organic chemist I handled some particularly nasty things, and I have to say Clear Red set of some alarm bells. The potential carcinogen warning it carries didn't bother me too much, I have worked with far worse things, but the volatility and immediate burning in my eyes was something else! Use it in a well ventilated area on a cool day if you can (it's pretty hot tonight in Sydney).


Three out of three Savlar Chem-Dogs recommend: Tamiya Clear Red!
 
I painted the first coat on and let it dry for about 30 minutes whilst I painted the Dark Angels helmet in Deathleaper's claw, then applied a second coat. The tutorial suggested Badab Black wash be added, but I resisted doing this. The purple base colour in some areas adds richness and darker areas to the gore without changing the colour of the "fluid" around it, making it look more bloody in my eyes. I may add some black later to add definition to some parts, but I really don't want to slather the whole thing.


To finish off the night's escapades, I added some blood effects to the neck of the Dark Angels helmet. After the Clear Red has dried I'll go back in and paint a bit of spinal structure in there just to make it look a bit more creepy.


I'm letting the tests dry overnight before I decide what to actually do with Deathleaper's base, I want to see what it looks like when it is completely dry first. I may end up painting all of the base colour in Lich Purple. All going well, I'll be able to finish the base over the weekend so that I can start painting the figure in earnest. I am also close to finishing another batch of Iron Snakes, which I am really looking forward to sharing with everyone.

See you across the table,

M4cr0

Saturday 25 October 2014

Armies on Parade: Victory!


Hi folks,

Today I attended the Armies on Parade competition at my local GW. As I have posted previously, my good mate Sgt Waz has been preparing a display board this year, so it was great to duck in for a while and give him my support. There were nine entries, which is a big increase on the three they had last year. That probably sounds like a small turn out to most people, but we don’t have as many players in this area. I’m hoping that with the right influences the community will keep growing and create some cool things.
The Sergeant’s display was epic, everyone seemed to appreciate the effort he had put into the board and the individual Nids. The pictures don’t really do the fire effect made by the LED’s any justice, for that I would probably have had to take a video! It really did look like the thing was burning. Sgt Waz won Gold for his display, a well-deserved result.


Looks like Deathleaper got his man...
 
There was a very cool Astra Militarum display, with some nice flyers and a Stormsword. I had a chat with the owner and he said that the tank took him a solid day to paint, which is just mental. I have a Shadowsword hiding in my garage that I wish I could paint in that amount of time. He’s had some success with the army list as well, which makes me wonder how I would take out something that big in a normal game (perhaps by using a Shadowsword…) I really liked the blending on the greys in this paint scheme, it looked quite smooth and contrasted well with the yellow. He was also one of the only other entrants to put a big effort into his display board; again, well deserving of the Silver medal.


There was a wicked looking Nurgle/Slaanesh marine army with a well painted Warhound Titan. The owner had put a lot of effort into weathering and corrosion, and the addition of a Slaanesh themed squad added some much needed and appreciated contrast. This was the clear Bronze entry to me, which was confirmed when the votes were counted (it’s nice to know democracy agrees with my personal opinion sometimes).


"You take the ugly one."
"Which one's the ugly one!?"
 
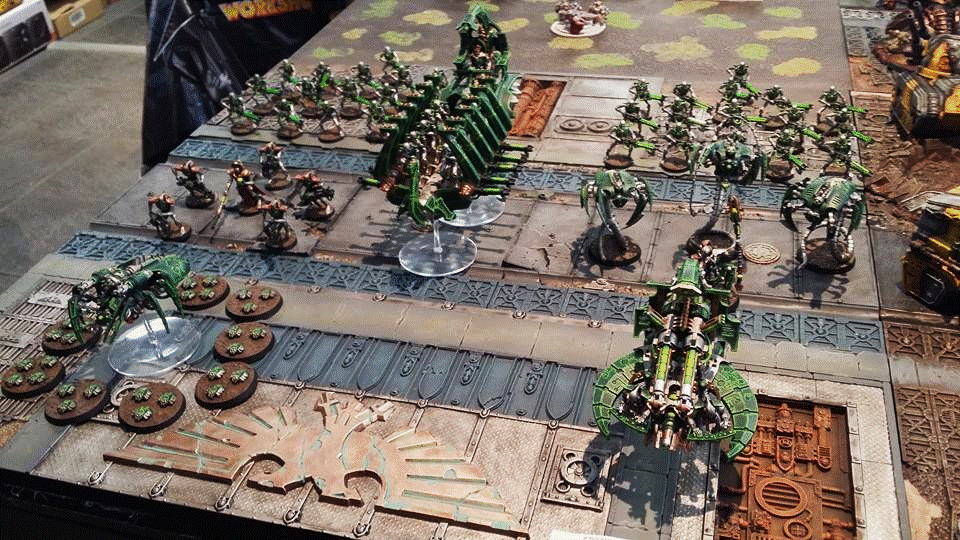
Apart from those three displays there was a well painted Necron force, some more Nids and an old school Crimson Fists force with 2nd Ed. and Rogue Trader era figures (if only there were a few more of them on a spectacular board: COME ON OLD SCHOOL!).


Heresy.
 
Next year I think I’ll give the competition a go, if only to add some diversity to the gene-pool. I hope you enjoy the pics, I’ll try and get some more close up shots at some point.
See you across the table,
M4cr0

P.S. I showed the local GW some love by picking up one of these on the way out. At $90 the kit is going to have to go a long way. Thankfully, I have a few ideas where all those extra bits can go...


Sunday 19 October 2014

Iron Snakes: The Armour of Contempt(or)


Hi folks,

I have spent the past couple of nights getting the rest of my Iron Snakes miniatures prepared for painting. I am not sure if this is out of any real necessity, or just a type of procrastination. The painting of the Sternguard is going well, but I think I just needed to do something different for a while. Having said that, I have still managed to finish the designs on two shields, both of which are a little different to the original design brief.

The snake is depicted from a birds-eye view and has the tip of its tail emerging from the other side of the shield (this was a spur of the moment thing, but it made me smile, so I kept it). The lion I was going to do looked very Lion King, so I canned it. I have replaced it with a stylised scorpion, which was a little horror to paint. I don't know if it shows up at all in the photos, but there is shield detail underlying the scorpion's body that made it sooo hard to maintain a flowing brush-stroke. I'll have to see how it looks on the finished miniature, as I may choose another shield design without the detail in that position and repaint it.


The Master of the Forge has a lot of components that needed to be pinned, some of which I will be gluing at later stages of the painting process. This is really just a dry fit so that I can consider different posing options of the servo harness. I have noticed that the potential coil is bent as well; nothing a bit of hot water and patience won't fix. The pic is a bit dark, sorry! You folks will have to wait for me to start painting in some decent light before you get a clear look.


The character himself is inspired by Ajax, the son of Telamon, from Homer's Illiad and Odyssey. He is described as being of great stature, colossal frame and strongest of all the Achaeans: the "bulwark of the Achaeans". The film Troy didn't do much for Homeric mythology, but it did give us this depiction of Ajax:


Stop. Hammer-time.

Ajax is famed for carrying a colossal shield and being undefeated during the war at Troy, but failed in his bid to possess Achilles' armour after his death (that honour went to Odysseus himself), and fell on his sword broken hearted. In the underworld he refuses to speak to Odysseus for the same reason.

The Contemptor Dreadnought still needs some work, particularly on the extended left arm near the shoulder. Apart from that, I really like the way this Dreadnought is turning out. In case you are wondering, he is crushing a Fallen Angel under his foot. Now that is going to take some fluff to explain...


See you across the table,

M4cr0

Wednesday 15 October 2014

Luthien Campaign Update


Scenario 13: Cat and Mouse
Equipped with three frontline Clan Omnimechs, the Dragon Claws returned to LAW city seeking revenge. Within the city’s sprawling industrial district, they found the remnants of the Clan Smoke Jaguar hunting cadre. Making no attempts at further subterfuge, the elite Draconis warriors engaged with their long range weapons, initiating a brutal battle.
In this battle the forces of the Draconis Combine were represented by a Hellbringer A, Stormcrow B and a Kit Fox B. All of the Mechs had received some damage during the previous battle, but would still benefit from the increased range and damage output that Clan weapons afford.
The Smoke Jaguar force consisted of a Shadow Cat A and a Cauldron Born Primary. The Shadow Cat A received 30 points of damage in 5 damage randomly assigned lots, to represent scars from the previous battle with Takashi. Likewise, the Cauldron Born started with 40 points of damage, including a 5 point hit to the head…
 
Cauldron Born Primary
 
The battle started with the Jaguars inside the city. The Draconis Mechs moved onto the mapsheet from the Rolling Hills end and manoeuvred to engage with their ER Large Lasers and Ultra Autocannons. During the first round of shooting Wade lined up quite a few shots but missed with everything. In return, the Shadow Cat A stripped armour of the Stormcrow with its own ER Large Lasers. The Cauldron Born targeted the much lighter Kit Fox in the hope of reducing the odds. A gauss rifle and medium laser hit put the Kit Fox in danger of being holed the next turn.
 
 
In response, Wade changed his tactics rapidly, aided by a much needed initiative win. The Kitfox moved to block my Cauldron Born sacrificially, leaving the Shadow Cat vulnerable. The Stormcrow charged within physical attack range of the Shadow Cat and unleashed its heavy autocannon and blistering laser arrays, dealing heavy damage. During the physical attack phase, both Mechs attempted kick attacks, which both missed. Both Mechwarriors failed their piloting skill rolls causing the Mechs to fall and take damage.
 
Bwah ha ha! Slapstick!!
 
My Shadow Cat lost its arm in the fall, whilst Wade’s Stormcrow took critical damage to its torso, sustaining two engine hits. Predictably, my Cauldron Born mauled the Kitfox, causing three engine hits and claiming the first kill of the night.
 
 
Kit Fox B = little guy with a big gun
 
 
The next few turns saw my Cauldron Born stalking the Hellbringer, which had found a place in cover to launch long range missile salvoes with impunity. The Stormcrow and Shadow Cat returned to their feet and blasted away at each other, though my little cat was seriously outgunned.
In the last turn the Stormcrow fired everything, jacking its heat scale all the way up to 28 in an attempt to annihilate the Shadow Cat and destroy the Stormcrow in the process, achieving the honourable death the Mechwarrior so craved (well, worth an extra 10 VP anyway…). Unfortunately, the Shadow Cat survived and had a golden opportunity to destroy the larger Mech in the return fire, but missed (curses, so much was hanging on that one shot!). The Hellbringer stepped out of its cover and lined up shots against both my Mechs, hitting with both fusillades. The LRM 20 caused enough engine damage to finish off my Shadow Cat, whilst an ER Large laser shot decapitated my Cauldron Born, thanks to the random hit it took before the battle (CURSES!).
 
 Hellbringer A taking heads
 
Incredible! What a finish to the last Classic Battletech game of the campaign. Wade’s Dragon Claws have their revenge but are still alive to feel the shame of their previous failure. They would be on the hunt for a beautiful death in the final Alpha Strike game. When we counted up the victory points, the Draconis force had scored 60 points for kills but lost 20 of that due to surviving the battle, putting them on 40 VP for the game. The kill I scored lowered that to 10 VP; a minor victory for the Draconis Combine. If the Stormcrow had failed any one of three ammunition explosion rolls, due to the intense heat build-up it had intentionally been subjected to, it would have been a different result. The campaign standings are now +50 VP, which pushes Wade into the zone of a decisive victory. I will need to pull of something spectacular in the Alpha Strike finale to claw back some glory.
See you across the table,
M4cr0

Sunday 12 October 2014

Work in Progress...


I think parenthood is a bit like a job in the army. Great swathes of time are spent being bored whilst working your fingers to the bone, followed by sporadic bursts of utter terror. This week my boy had such a sever temper tantrum that he stopped breathing, fell unconscious and had to be revived by my mother-in-law (I was having a rare lunch out with the wifey). I didn't even know that was a thing. Apparently 2% of strong willed toddlers do it until about the age of 4-6 years, with the main preventative treatment being "to avoid tantrums". A bit like telling a soldier to prevent death by avoiding bullets, yes?

The boy and his dog; the quintessence of "inseparable".

Anyway, here is my progress on a few projects:

Iron Snakes: I have undercoated the torsos, painted the right shoulder pad and have made a start on a few shields for my Iron Snakes. They are taking al little longer than I had at first planned for, which I am not too worried about because of the detail that I am trying to show on each figure. If I keep plugging away at them every week, eventually I will get them all done.


Dark Angels: I have undercoated the Devastator marines and Sergeant parts I need to complete my plasma cannon squad. Most of miniatures will need some touch-ups as well.


Tyranids: I have stripped, primed, undercoated and put the first couple of glazes over some old school Ravenors, which I will be using as the basis for some unique Tyrant Guard conversions. I have also, as I posted previously, converted Deathleaper.


So, a few things on the boil just to make sure I finish on schedule. I am really looking forward to getting those Iron Snakes finished, but I don't want to stuff it up by rushing.

See you across the table,

M4cr0


Tuesday 7 October 2014

Salamanders vs Tyranids


Continuing my lessons on 7th Edition gaming, I teamed up with Sgt Waz to take on his brother’s Nid list. We had a force of Salamanders that included a decked out Chapter Master transported in a Landraider Redeemer, two Tactical Squads in Rhino transports, an Honour Guard unit transported in a Stormraven with a Venerable Dreadnought, two Stormtalon gunships and a Librarian.
The Tyranid force was a roll call of horror. Led by the Swarmlord and his three Tyrant Guard, it included a flying Hive Tyrant with Brainleech Devourers, a Malanthrope, Mawloc, Tyrannofex, Dimachaeron, Hive Crone, Zoanthrope brood and three broods of Termagants.
We played the same mission: 6 objective markers on the board and tactical objectives cards. This time I knew how they worked and went into the game with a far more aggressive playing style.
The Nids set up first and we noticed early on that the Swarmlord and Dimachaeron were both on the same flank. Considering their potent close combat ability, we deployed so as to deny that flank. It would leave some objective markers incontestable in the early turns of the game, but we planned to have some things alive to contest in the end game (preferably when both of those Nids were dead). Our flyers were all kept in reserve, because that’s where they have to start the game. We failed to seize the initiative, so sat back with a packet of bizarre Korean rice crackers (sooo tasty) and prepared to whether the storm…


Turn 1
The Hive Crone and Flyrant combined to take down a Rhino and win first blood. Thankfully the Tactical Squad inside were fairly unharmed and prepared to return the favour next turn. The Dimacaeron, Zoanthrope and Malanthrope with attending Termagant broods took four objective markers between them. The Tyranid psychic phase was ridiculous.


During our turn we pushed the surviving Rhino and Redeemer forward to engage the foe, focusing fire on the Flyrant, Crone and Swarmlord, whittling down wounds.

Turn 2
The Hive Crone engaged the Tactical squad with its Drool Cannon killing a handful, whilst the Tyrannofex took a hull point off the Redeemer. The flying Tyrant destroyed another Rhino whilst the Dimachaeron and Swarmlord began trudging there way over to where their presence was most needed: the opposite flank! A brood of termagants secured the objective vacated by the Dimachaeron, under the watchful synapse of the Zoanthrope Brood.
Redeemer moved into position to take the Flyrant down during the shooting phase, unloading the Chapter Master to charge the Tyrannofex. The first Tactical squad fired at Termagants protected by the Malanthrope, then charged into finish them off. Unfortunately, the Malanthrope had other ideas, gassing 5 marines during the Initiative 1 step with its toxic miasma. The other Tactical squad held back its fire so that it could charge a unit of Termagants and contest an objective. They succeeded the charge distance roll, wiping out the Nids and stealing the objective. The Chapter Master knocked the Tyrannofex down to 1 wound, leaving him safe from any shooting during the next Nid turn: perfect.


Turn 3
The Swarmlord and Dimachaeron closed in on the Chapter Master but couldn’t make the charge range. Meanwhile, the Zoanthrope brood moved within Warp Blast range of the Redeemer and unleashed a focused lance attack, which failed to do any damage. A Mawloc tunnelled right underneath one of our newly scoring Tactical squads and wiped out 8 models; in all of my games I have never seen a Mawloc attack so effectively! Thankfully, we still had two there to contest the marker. In close combat the Malanthrope and Tactical marines continued to slog it out, with the death of one marine to the poisoned attacks. The Chapter Master thumped the Tyrannofex into oblivion with his Thunderhammer and eyeballed the approaching Swarm Lord and Dimachaeron. Time for some epic “lone-Space-Marine-holding-the-midfield-against-two-monstrous-creatures” action.
The Stormtalons roared in on either flank; on the left we had one take down 5 termagants and rout them. Thanks to the previous aggressive move by the Zoanthropes, these termagants were out of synapse and fled off the objective marker. The other flyer took some shots at the Mawloc in the hope of preserving our scoring unit there; we had only one turn to save them before they would be assaulted. With that in mind the Redeemer opened up on it as well, putting a total of 4 wounds on it: still not enough. The Chapter Master engaged his relic armour’s 2+ invulnerable save, charged the Swarmlord and issued a challenge.  The Swarm Lord refused the challenge and sat back whilst his Hive Guard were smashed, leaving only one left standing on a single wound.


Turn 4
The Zoanthropes had another go at lancing the Redeemer but didn’t even succeed in manifesting the power. The newly rallied termagants charged the Chapter Master, to at least hold him in place for the Dimachaeron should the Swarmlord fail in killing him. As predicted the Mawloc charged the two remaining Tactical marines, whilst the Hive Crone did a vector strike on the Stormtalon, destroying it, before flying off the board. The Swarm Lord and the Chapter Master smashed into each other, with the Swarm Lord taking two wounds and the death of the last Tyrant Guard. The Mawloc only managed to kill one of the Tactical marines, forcing us off the objective due to a failed morale test and the Mawlocs equal failure to capture us in sweeping advance. The Dimachaeron tried to smash the Redeemer but failed to penetrate its armour.


During our turn the Stormraven finally arrived from reserve with its precious cargo. The Librarian performed an aggressive drop on an objective marker but scattered way off it. The Honour Gurard deployed in position to save the lone surviving Tactical marine and finish off the Mawloc. The Venerable Dreadnought also deployed in position to attack some Termagants holding an objective. The Redeemer moved into position and blasted some more wounds off the Mawloc. The Venerable Dreadnought and Stormraven unloaded on the Termagants, killing all but two of the little blighters. The surviving Stormtalon on the left flank stayed in possession of the objective marker and pumped fire into the Zoanthrope brood, but failed to make an impression. In close combat the Swarmlord took another two wounds, leaving it with one remaining. The Dimachaeron succeeded in immobalising the Redeemer, and the Mawloc survived a turn against the Honour Guard. The Malanthrope (who by this stage I had maturely labelled “Senor Farty Pants”) killed a marine. The Venerable Dreadnought finished off the Termagants with its close combat weapon. We scored a heap of VP’s this turn, due to a Tactical Objective card that rewarded us for holding twice as many objectives as the enemy.
 
 
Turn 5
By this point the game was really in the balance. Early objective marker captures had netted the Nids a large number of victory points, but they were now holding no objectives. We, on the other hand, had some sweet Tactical Objective cards in our hand that we were now in a position to cash in, if we could just survive the final onslaught.

The Nid turn started with the Hive Crone returning but having no real target. Hoping for another turn or two, it flew towards the surviving Stormtalon. The Zoanthropes failed to damage the Redeemer again and the Dimachaeron moved to engage the Librarian. In close combat the Swarmlord finally killed the Chapter Master, but was left exposed in front of the immobalised Redeemer… The Dimachaeron absolutely murdered the Librarian, capturing the nearby objective with its consolidation move. Senor Farty Pants killed another Marine, whilst the Mawloc was finally killed by the Company Champion’s Thunderhammer.
In our turn, which turned out to be the last turn of the game, we played to our Tactical Objectives above all other considerations. The Redeemer shot the final wound off the Swarmlord, giving us a VP for killing the warlord. The Stormraven (to the soundtrack of Rick Hunter’s Theme: Robotech) launched a volley of missiles at the Hive Crone, chipping away at its wounds. The Stormtalon finished it off with its twin-linked assault cannons and lascannons.
 
 
This gave us more VP’s due to another Tactical Objective card that focuses on killing Flyers. The Honour Guard charged the Malanthrope and the Champion issued a challenge, scoring us another VP (you guessed it) for the “issuing-a-challenge-tactical-objective-card”. At the end of the game, when the Line Breaker points had been taken into consideration, the Salamanders were victorious: 10 – 8 on VPs.

 Final Thoughts on Tactical Objective Cards
The Good:
Tactical objectives force you to be a more dynamic player, encouraging you to do things on the spur of the moment that you usually would not do (…challenge the Swarmlord with a Veteran Sergeant to earn one VP? Yes please).

Your list needs to be mobile and capable of covering a broad spectrum of battlefield roles.
You must come up with tactical solutions to rapidly evolving battlefield situations every turn. For this reason alone they have a valued place in the game, because it gives us a new way to play.

The Bad:
It is very random and may favour one player unfairly during the course of the match.

Conceptually, a lot of the things that end up happening in the game simply do not make sense; it is a step away from narrative based play.


See you across the table,

M4cr0

Thursday 2 October 2014

Hive Fleet Numereji: Building a Better Deathleaper


I have a couple of games of 7th Ed. 40K lined up and I have realised that I don’t have any painted HQ units. I have a choice of three Hive Tyrants, Deathleaper and a Tyranid Prime to finish off, all of which have been stripped of their old paint scheme and require various amounts of modelling to complete.
My 5th-6th Ed. force was led by the Swarmlord and featured Deathleaper, which was great fun, so I have decided to start with them. The Swarmlord has made it onto my 2014/15 To-Do list, but Deathleaper is going to be the first finished out of necessity, so that I can play in smaller games.
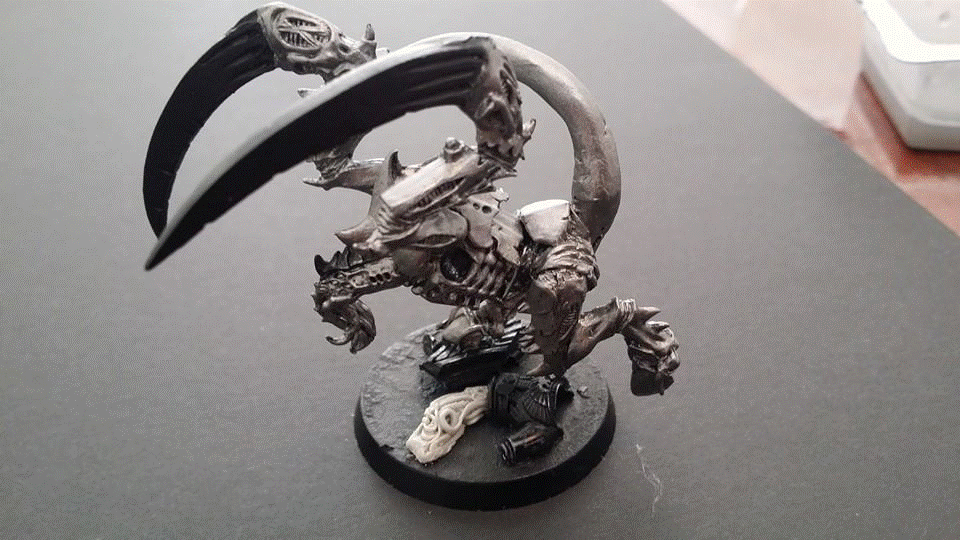
To prepare the miniature I have performed some significant re-posing. In my opinion, the stock standard pose is, well…


I modified the head slightly and reposed the legs to produce a more dynamic look. I also bent the tail to give it a more aggressive appearance. Weapons-wise, I have replaced the scything talons with old 3rd Ed. Ravenor parts, because I prefer the cleaner look. I do like the more contemporary mantis style talons as well, but they just didn’t look right.


The rending claws are going to be from the Tyrant Guard kit, and look wicked in my opinion (the trifurcated Space Marine is a nice touch: thanks Citadel!). The Space Marine viscera (guts) are from the back end of an Aliens style xenomorph head from Chapterhouse Studios (I think…). I don’t have much experience with painting gore, so it is going to be an interesting project. To help with that I have borrowed some Tamiya Clear Red to tint with, it will just be a case of getting the underlying colour layers right.
Next step: laying down glazes to bring out all that detail (…and hide stuff I don’t like!)

See you across the table,

M4cr0

P.S. The Mad Mek over at The Mad Mek's Workshop just posted some photos of his new Big Mek conversion (check it out, it is wicked). It reminded me of something, but I couldn't for the life of me remember what...

Then I remembered this...


Fantastic! I'm not sure if anyone outside of Australia has heard of Gotye, but he has been pretty big here for a while now. Great clip and a great Big Mek: enjoy!