Friday 19 January 2018

A Knight's Tale: Perseus Intrepidus TO-DONE!


Hi folks,

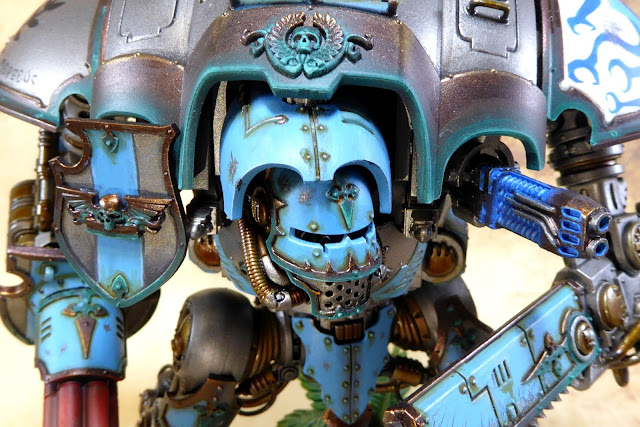
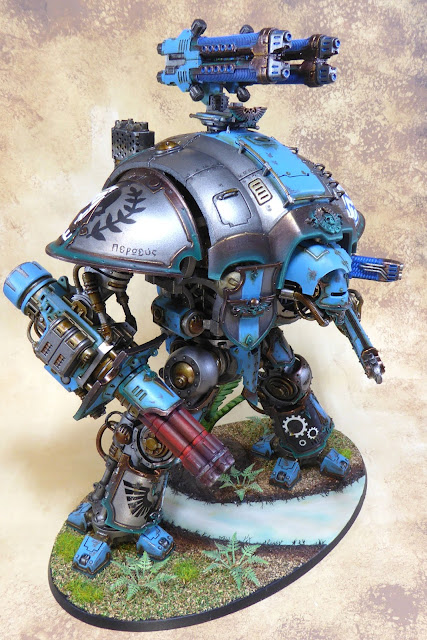
Today I added the finishing touches to the Imperial Knight Warden Perseus Intrepidus. For those of you who would like to know, the final touch was a minute wash of sepia around the left rivet about the eyes, which had somehow stoically avoided being washed all this time! I also repainted the plasma-blaster, which had been bugging me a bit.


Sooo many rivets...


There isn't too much more I can say about the painting of this model, that hasn't already been said in other posts. It is by far my greatest accomplishment in this hobby, and I have been at this game for a while now. Still, Perseus wouldn't exist, at least not in this guise, but for a very specific set of circumstances and folks in the 40K community. Some of you may know part of the story, but probably not all of it. If you are not into stories, feel free to skip and just look at the pictures; I hope you enjoy them as much as I did taking them!


I added more weathering to the Reaper Chainsword.


The Medusa has five snakes, one for each plasma weapon.


My first exposure to the 40K universe was playing Epic 40K with a friend in 6th grade. I say the word friend loosely; I was really just a person for him to win games against, using the models his stepfather bought for him. I learned later that the army lists he wrote for me were always less points than his, sometimes by 50%. I distinctly remember using an Imperial Knight Castellan that punched way above its weight in our games. I resolved to get myself one, if I could ever afford it.


The Hellfire Plasma Cannonade.


I painted the inside of the exhaust, which was looking decidedly sprue-grey in the last photographs.


When the Imperial Knights and Wardens were released by GW I realised the time had probably come, on an even larger scale than I ever thought possible. Of course the Crusader variant was the closest to the Castellan of my boyhood memories, so I gravitated towards it. I was going to get myself one for Christmas a few years ago, when my dog Gypsy started getting sick. The surgery she required wiped us out financially, but I gave up the chance of owning a Knight gladly if it meant keeping my little shadow.


The following year Dave Weston (thankyou thankyou thankyou) from Confessions of a 40K Addict ran a terrain building competition. The prize was, of course, an Imperial Knight Warden. I love participating in community events like these, so I thought I would give it a go and be a part of it all. I didn't really have any hopes of winning, but if I did, well...

My Dawn of War Thermoplasma Generator did win the competition, despite some incredible entries by other members of the community. I was so excited when I received the prize, but also pretty nervous. I felt very much responsible for doing a good job with it, in honour of the other contestants. I opened up to the community about the project and got some great ideas from people. Thanks especially go to +squareoaky stewart for his ideas about House Feardrakken, which gave me the inspiration for the paint scheme. Other inspiration came from my simple, obsessive, love of plasma weapons! One of my last acts was painting the snake on the base as a Bandy-bandy, as suggested by my mate over the ditch, +D Power.


So, there you have it. I threw everything but the kitchen sink at this Knight, every painting technique I know and idea I could think of. Some... didn't turn out so well, but I'm glad I gave them a go. Thanks to everyone who spurred me on and provided critical feedback during the process, it was greatly appreciated. Thanks again to +Dave Weston  for gifting me this incredible model; it was an epic journey and looking at it now on the shelf brings it all back again. Hopefully, it will take some heads on the table top as well, perhaps whilst defending a Thermoplasma Generator ;-)


See you across the table,

Marc


Thursday 18 January 2018

A Knight's Tale: Avenger Gatling Cannon and Reaper Chainsword


Hi folks,

So, technically, I have finished painting my Imperial Knight Warden. Excuse me while I dance around like an idiot for a minute. About 10 minutes ago I finished drybrushing the overheating Avenger Gatling cannon, finally using that contrasting red that I have been saving. Before having a go at it, I watched a whole heap of YouTube clips of miniguns firing at night and at various stages of overheating. You may not know it, but there has been some conjecture about the best way to paint heat effects on weapons as such as these, with most painters putting the hottest parts in the wrong place. This article on Tibbs Forge is an excellent source in that regard.  I focused primarily on the following photograph when painting the effect:


You can see that the coolest metal is towards the end of the barrels and the hottest part towards the heat source. I tried to reflect this in my paint job, with the added complication of the varying thicknesses of the barrel housing in the Avenger model. So, the closer to the actual barrel (deeper), the hotter I painted it. There is one section that I assumed would be naked barrel, which I painted the brightest of all.


I also noticed in all of the pictures and YouTube clips that the red glow was a touch pastel in appearance. I added a touch of purple into my reds to try and match this. I also used a mixture of purple and red brown on the coolest ends of the overheating barrels, with I highlighted by brushing actual Leadblechers.


In comparison, the Reaper Chaisword was far simpler to paint. I added some extra weathering and scratches into the sword blade, which I assume would take an awful battering in combat situations.


Tomorrow I will be adding a very small amount of weathering to the decals on the legs, adding some static grass to the base and painting a Bandy-bandy snake ;-)

...then I am doing the final assembly and calling him To-Done!

See you across the table,

Marc


Sunday 14 January 2018

A Knight's Tale: Shoulders and Plasma Cannonade


Hi folks,

With a break in the weather I have been able to make some more progress, focusing mainly on the shoulder armour and Hellfire Plasma Cannonade. To help with the Medusa symbol on the right shoulder I made two simple stencils, one of the face and one of the mouth of the snake. I started by making a detailed sketch of the silhouette, then transferring the image to some tracing paper. I could then cut out the shape of the face to use as a stencil. Originally I wanted the face to be white (negative space), so to transfer the image to the shoulder I stipled Spacewolf Grey around the edges. I then used very watered down paint to mark out where the snakes would be. I needed the paint to flow very freely and not add a significant amount of texture, in case I needed to start again or paint over it.


When I was happy with the composition I started blocking in the snakes with solid colour.


To make the snake appearance consistent, I made a small stencil for the head, which I used four times. The head down the bottom was free-hand, as it needed to be smaller to fit in the space. I quite liked the design with the face being white, but it was clear when I put it on the Knight that the colour combination wasn't going to work.


I blocked it in using the same light blue as the rest of the scheme, and that seemed to appease the paint-Gods (there is also something just a little bit Daft Punk about it...). A touch of weathering finished it off.


I haven't decided whether or not the other shoulder is finished yet. I think I need to sleep on it. I was tossing up whether to paint the forward section light blue and use a white decal in that spot, but this would compete visually with the Medusa symbol. I settled on a skull and laurel design that I added using free-hand, but it left the section closest to the front awfully empty. I filled it with the Knights name... in Greek. It may or may not stay that way; let me know what you think.


The Hellfire Plasma Cannonade took me a day to paint by itself, on and off. I originally had all of the plasma weapons painted with a green glow but, again, when mounted they just didn't fit the scheme very well. There is not much contrast in the blue that I have used but it matches the plasma weapons of my Iron Snakes and mirrors the colour of the snakes on the shoulder armour: 5 snakes for 5 plasma barrels :-)


Next I will be working on the Reaper Chainsword and Avenger Gatling cannon. The plan is to paint the chainsword quite plainly, but the cannon is going to have overheating barrels. I have been saving my reds and oranges for one special dose of contrast; I am interested to see if I can make it work. So many times during this project I have tried something different and then had to carefully reconsider in light of the entire body of the project. The Avenger is going to be the final hurdle in that regard, I predict. Just call me Nostradamus ;-)


See you across the table,

Marc


Saturday 13 January 2018

Iron Snakes: Chapter Master Seydon Build Complete


Hi folks,

When I was planning this conversion I had another flick through Brothers of the Snake to try and build a picture of Seydon in my head. The two passages that stood out for me were:

"Chapter Master Seydon was just a shadow: robed, mysterious and towering. His cloak was made of broken, polished, wyrm-horn pieces, linked together like a jigsaw puzzle by gold wire. Slow respiration throbbed form the exchanger tanks under his cloak... He was a good meter taller taller than Priad".

Later on, after a battle against the Orks, there was this:

"His jigsaw cloak of polished wyrm-hide pieces had been ripped and torn, and loose fragments dangled from unravelling golden threads. His great lance, Tiborus, lay across his knees."

I also thought it would be fun to try and pay homage to the cover art of the book as well, because I have always loved it:


To give the model that extra height, I chose to base it on the Primaris Captain. I used an old resin True Scale Space Marine backpack, to which I added some regular vents (just visible in the picture). The head is from the Space Marine Captain kit; I thought the rebreather reflected the description of his laboured respiration well. I found an Imperial laurel piece, trimmed it down and added it behind Seydon's head. The base is a Spartan 40 mm base from Scibor, which I will attach after painting.


I chose the Stalked pattern bolter to match the picture and added a small Spartan shield from Scibor.


To match the text, I cobbled together a lance to represent Tiborus. The hand was too small to work on separately, so I left one large piece of sprue attached. The shaft was from a Dark Elf spear, which I cut into two pieces and drilled out for pinning. I cut the blade of the sword out then drilled out the hand. The two halves of the lance shaft were pinned to each other, through the hand. The lance head itself is a sword from a Wood Elf kit; it's patterns are very similar to the ones on my Techmarine's lance. After the pieces were secure, I cut away the last piece of sprue.


At the moment I am leaving both arms off so that I can paint the details on the body easier. I also needed to paint the shoulder pads separately, because I couldn't imagine free-handing the Iron Snakes symbol any other way. They still have some weathering to go, but here is a quick WIP.


The timeline for painting Seydon is "sometime before February". Because February is Squaduary and I am going to be all over that like three Thunderfires on a backfield blob.


See you across the table,

Marc


Monday 8 January 2018

Aliens Themed Ravenors Tutorial


Hi folks,

Well, it is too damn hot where I am at the moment. A few days ago, a suburb 30 minutes away recorded the hottest temperature on the planet for the day (47.3 degrees centigrade, or 117 fahrenheit). Painting is almost impossible, which means it is time for some construction. On my to-do list I have a unit of Aliens themed Tyranid Warriors, which I thought I could get done given a solid couple of hours of tinkering. The Tyranid Warrior miniatures I have range in age from the dawn of 3rd edition to just last year. Needless to say, the old models have had a few (horrible) layers of paint thrown at them. They have also been battered with multiple conversions, weapons and biomorph swaps.

Considering that I am trying to build up a Jormungandr swarm, I decided on a more drastic plan to convert all of the figures into Ravenors ("Groundbursters"). I took some WIP shots as I went along, just in case someone else wants to have a go some day. The plan was to create some figures that could be used as Ravenors armed with Rending Claws and Spinefists, whilst still making a nod to the Aliens xenomorph aesthetic. Functional and frightening.


Step 1: Pull apart the Tyranid Warriors.

Putting them in the freezer overnight helped me to snap off anything that was superglued, otherwise I used a pair of pliers to remove as much of the arms and legs as I could. To clean it up further I bored and excess waste out with a Swiss Army Knife blade. To do this I hold onto the flat of the blade, not the red handle, as the pressure can cause the blade to fold on your hand otherwise.


Step 2: Cut the Tail

I cut the tail with a razor saw just underneath the last armour plate. The angle at which you cut determines the orientation/pose of the Ravenor when it is glued to the base, so I kept that in mind when I was cutting. I saved the tails for some ground bursting shenanigans later.


Step 3: Fill the Holes

I filled in the leg holes with green stuff; I had no plans to add a third pair of limbs here, despite what the typical Tyranid morphology dictates.


Step 4: Prepare for Pinning

I cut the neck of the Tyranid Warrior flat and drilled a hole so that the head could be pinned into place.


The heads I have used for this conversion are from Chapter House Studios. They are compatible with the GW Tyranid figures, but only marginally. Scalewise, they fit Warriors and Ravenors just fine, but they really need to be pinned in place. For one of the heads, even finding a spot to pin is a challenge.


I find the sweet spot for a pin is right here. I file it flat then drill a hole.


Step 5: Assemble the Body 

Pin the head to the body using a pin, green stuff and super glue, then blutac it upright to set. There is nothing worse than trying to juggle gluing weapons in and having the head fall off.


Here is my stash up by the end of this step.


Step 6: Attach the Weapons and Base

I glued the lower body to the torso and added the rending claws and spinefists. I immediately glued the whole assembly to a base, so that I wouldn't have to hold it or fiddle around with blutac again.


Step 7: Add the Tale to the Base

I glued the tail to the base pointing backwards, but closer to the front of the base. This is to give the suggestion that the Ravenor is coiled up with part of its body underground. Some basing shenanigans will be required to accentuate this effect.


Step 8: Group Shot!

Bathe in the glow of the photography lamps. Here is my finished brood of 9 Aliens themed Ravenors. Next I'll be undercoating them with Leadbelchers (if I haven't already), as soon as the weather is not... Venusian.


Step 9: Go to the Beach with your new Puppy!


I hope you like my little "Groundbursters". Hopefully over the next couple of days the temperature will drop so that I can finish my Imperial Knight!

See you across the table,

Marc


Thursday 4 January 2018

Jormungandr vs Primaris: Thoughts on 8th Ed.


Spot the croc...


Hi folks,

It has taken me a while to get play a game with the new Tyranid Codex, but I finally managed it. Having played 40K for 7 editions, I have collections that are aging in one way or another, particularly when it comes to competing in the current meta. My Dark Angels army, for example, is very much a 3rd Edition gun line, which has trouble competing with modern collections. The answer to this is to either throw money at the problem and/or get creative. I had a good idea that my Tyranids would be in a similar position, having collected the bulk of my army for competitive play around 4th and 5th Edition, just before flyers were released. The best way to find out is to play games, so I took on Sgt Waz's Primaris with a Jormungandr list pieced together with the stuff that I have. Instead of writing a turn-by-turn battle report, I have put a few thoughts together based on the game and implications for my hobby plans this year.

During the course of the game, there were several points where The Trooper and I just looked at each other in despair. Sgt Waz did a great job of showcasing the interplay between new units, fire power and stratagems, giving us a lot to think about. His list was infantry based; the closest he got to a vehicle was two Thunderfire cannons. He left Guilliman at home in favour of Marneus Calgar and a suite of HQ characters; a Primaris Lieutenant, Librarian, Ancient and Apothecary, a marine Captain and two honour Guard for Marneus. The list included several combat squads of Intercessors, 5 Hellblasters, 6 Aggressors and a Devastator squad armed with Grav Cannons. Two scouts squads were included to teach me a lesson about area denial. Compared to the current meta, the list was not exactly what you would call optimized, but it had synergy, buckets of wounds and fire power. A dedicated gun line facing a tunneling close combat force; I smelled trouble already.


My list included the Swarmlord with three Tyrant Guard, a Neurothrope, 3 Zoanthropes, three Hive Guard, three Tyranid warriors with devourers and Boneswords, a Broodlord and 8 Genestealers, 20 Termagants with devourers, a Trygon Prime, Mawloc and Scythed Heirodule.

Lesson 1: Just putting together the list, I was wishing that I had more Zoanthropes for the buff to Mortal Wounds, more Hive Guard to give them some extra resilience and more Genestealers, again for the buffs. I have 40 old school genestealers in a box somewhere...


Deployment

Sgt Waz set up his army in a blob of precisely spaced out ranks to the right side of his deployment zone, with the Thunderfire cannons right at the back, Marneus and the Ancient in the middle and the rest of the HQ units on the flank. The scouts were deployed 9" the front and left of the blob, to push any deep striking units out 9" beyond that.

Lesson 2: here was my first lesson in area denial. A Jormungandr list is mostly about tunneling units into the teeth of the enemy, but this deployment would make that suicide. I could absolutely wreck the scout squads, but that would still put me too far away from the blob to make an impact before the serious shooting starts. In hindsight, I need small throw-away units or some backfield shooters to eliminate the area denial units, before I start tunneling the good units in. The only unit capable of doing this in my army for this game was the Hive Guard; Sgt Waz knew that too.

I deployed my Swarmlord, Tyrant Guard, Hive Guard and Tyranid Warriors in cover. The Neurothrope, Zoanthropes and Devourers would be tunneling in with the Mawloc, whilst the Broodlord and Genestealers would be tunneling in with the Trygon Prime.


Lesson 2: this would cost me 4 CP at the outset, leaving me with 3. This is a good investment as long as it pays dividends! Ideally, I need to see if I can increase my starting number of CP. That will mean some Ripper bases, I think. In contrast, Waz started with 9 CP and the ability to regenerate spent points. Which he did. Consistently. 

We played a Retrieval Mission using the Dawn of War deployment. We set up four objective markers, two on each side of the board. Players in control of an objective marker at the end of the game would earn 3 victory points. Victory points would also be earned for Slaying the Warlord, Line Breaker and First Blood.

Lesson 3: Play the mission. If I had played to the mission more actively during the game I could have offset some of my lists weaknesses by drawing the Primaris marines out and capturing objectives with powerful units at the end of the game. The main reason I didn't do this is because of the two Thunderfire cannons.


Turn 1


Sgt Waz didn't move all that much during the first turn, only advancing his right flank (Captain, Primaris Librarian and Apothecary, Devastator Squad) to move onto an objective and open up a firing lane for his grav cannons. The Thunderfire cannons destroyed my Hive Guard unit; there goes first blood.

Lesson 4: The Hive Guard were targeted because they threatened his scouts, which were providing area denial.


I ran the Heirodule up the middle of the board as a distraction and advanced the Swarmlord and Tyrant Guard, so that he could spur on the Heirodule next turn. The Trygon (left flank) and Mawloc appeared (right flank), bringing their squads with them. It was about now that I realised that I should have removed the scouts first. Sgt Waz used a strategem (Auspex I think), to fire his Grav Cannons at the Mawloc, which took me by surprise and caused a lot of wounds. During the psychic phase I used the Neurothrope and Zoanthropes to kill the Devastators, but as they were within range of the Ancient and his standard, the majority of them got a second round of shooting before being removed from the board. So I was getting shot in my own movement phase AND my own psychic phase. During the shooting phase I killed the first squad with my scout squad and then used Single Minded Annihilation to put 4 wounds on the Captain (one short of killing him outright.... grrrr).


Lesson 5: it is not good enough to know a unit's capabilities anymore, you also need to know how they interact with strategems and buffs.


Turn 2


Sgt Waz advanced the first two ranks of his blob (Intercessors and Aggressors) to attack the Termagants, killing most of them. The Captain and Librarian advanced on his right flank to charge the Zoanthropes with the support of the Apothecary. The rest of the army fired on the Heirodule, causing a couple of wounds, and the Genestealers, killing 5. The Mawloc also died during the shooting phase, having provided the distraction I wanted. The Captain failed his charge and would have to weather another round of Smite, but gained some wounds with the help of the Apothecary.

I unleashed psychic hell on the Captain and... removed a wound. I then charged him, as it was going to happen anyway and I would rather hit first. The Heirodule advanced and, after failing to buff it with onslaught, fired an acid attack at the Intercessors, killing two. Again, they took a final shot at the Termagants, wiping them out. Infuriated, the Heirodule charged them and the Aggressors, and started wrecking face, but for every model taken down I was taking powerfist hits thanks to the Ancient. Sgt Waz was getting those rolls when he needed them. My Zoanthropes didn't make any in-roads against the Captain, but they didn't die either.


Related image


Turn 3

The Ultramarines withdrew from combat with the Heirodule and shot it, taking it down to three wounds. On his right flank, Sgt Waz maneuvered his HQ units to support the Captain, whilst the right flank prepared for the arrival of the Swarmlord, Trygon Prime and Broodlord, shooting down the rest of the Genestealers and taking the Broodlord down a couple of wounds.

I moved the Heirodule so that it could charge the remaining Intercessors and Aggressors comfortable, I also advanced the Swarmlord into position to move the Trygon twice and buff it with Onslaught. The Broodlord also bolted forwards as far as it could in preparation for charging. During the shooting phase I shot the Aggressors with the Heirodule's acid attack, using my final CP to re-roll one of my snake eyes. Again, any marines I killed turned fired off some shots before they fell, putting wounds on the Nids preparing to charge. The Nids all made their charge but the Broodlord and last Tyrant Guard died to overwatch fire. The Swarmlord and Trygon cut a bloody swathe through the first three ranks, whilst the Heirodule had taken too many wounds by this stage to be truly effective. Now only a lone Zoanthrope was alive on the right flank, but he was still holding it up!

Lesson 6: I had to give myself a few options when I charged, announcing that I was attempting to charge multiple units on the chance that one would get wiped out by the Swarmlord before the Trygon got a chance to attack. By announcing charges against multiple units I drew extra overwatch fire, but was able to pile in after one squad completely collapsed early under the blades of the Swarmlord. 


Turn 4 

Sgt Waz didn't have much moving to do at this stage, simply positioning Marneus to charge the Swarmlord and his guard to charge the Trygon. I weathered a blistering turn of fire, passing a whole bunch of invulnerable saves. The Captain finally killed the last Zoanthrope in close combat. Marneus, however, didn't do so great. His honour guard marines were close enough to absorb most of the wounds, but they both died miserably. Marneus also took some wounds. The Heirodule also fell to some lucky Bolt rifle stock hits.

My turn consisted of the Psychic and assault phases, which ended with the death of Marneus and every other unit in contact with my Swarmlord and Trygon


MVP


Turn 5


Sgt Waz's final two ranks consisted of Hellblasters and two Thunderfire cannons. They remained stationary and shot both the Swarmlord and the Trygon to pieces. It was a complete wipe!


Final lessons: With some careful list choices, and a bit more strategic thought, I can see how my list would be fun to play. The buff to armour save from being Jormungandr did make an impact, but I can maximise it by having some backfield units protected by a Malanthrope. A Tyrannofex and an Exocrine, instead of the Scythed Heirodule, would have caused Sgt Waz a whole world of trouble. You can't just sit back and do nothing when they are pounding you. Also, if I am going to come in from reserve with a bunch of costly units, I really do need to dictate where they arrive better. Some cheap units of Ravenors will be a welcome addition. To tap into area denial myself, a few cheap units of spore mines will work wonders. Additionally, a Unit of Biovores will help with those annoying characters in the middle of the blob, such as the Ancient (allowing dead things to shoot me!) and the Lieutenant (who did nothing but allow other models re-roll failed to-wound rolls all game). I already have plans to add some Space Marine Lieutenants to my Dark Angels list. With a jump pack, one should even be able to keep up with my faster units for a while.


That's a wrap! The game left me with lots of things to think about and I have already started working on improving the list. Let's see how I go next time :-)

See you across the table,

Marc