Showing posts with label Luthien Campaign. Show all posts

Wednesday, 17 June 2015

Luthien Campaign: Final Battle (...and the end of an era)


Hi folks,

A few weeks ago Battletech Tuesday was dedicated to the final climactic battle of the Luthien campaign. Over the course of a year, Wade, KuriboGoomba and I had played 13 heavily modified games inspired by the scenario book. The vast majority of games have been nail-bitingly close and the campaign victory points standings have swung like a pendulum. Recently, the Draconis Combine had just edged ahead, despite the death of Takashi Kurita (I'm still proud of that one!). In the penultimate battle, Wade achieved a minor victory, placing him in the zone for a decisive victory over all.

The Clan forces were represented by a Dragonfly (piloting 4, gunnery 4), a Warhawk C (piloting 3, gunnery 2) and a Timberwolf Primary (piloting 2, gunnery 2). Both the Warhawk and the Timberwolf have been absolute scourges during this campaign, so we simply had to include them in the finale.

The Inner Sphere force was lead by Theodore Kurita in a Clan Warhawk Primary, hard won on the planet Wolcott. Backing him up was Morgan Kell of the Kellhounds in a modified Archer, who has a special ability that allows him to use his own targeting system to scramble enemy targeting systems. Rounding out the force was a Mercury and Mongoose from the very first scenario, and two hijacked Clan mechs from another scenario; a heavily damaged Stormcrow B and a Hellbringer A missing some head armour.


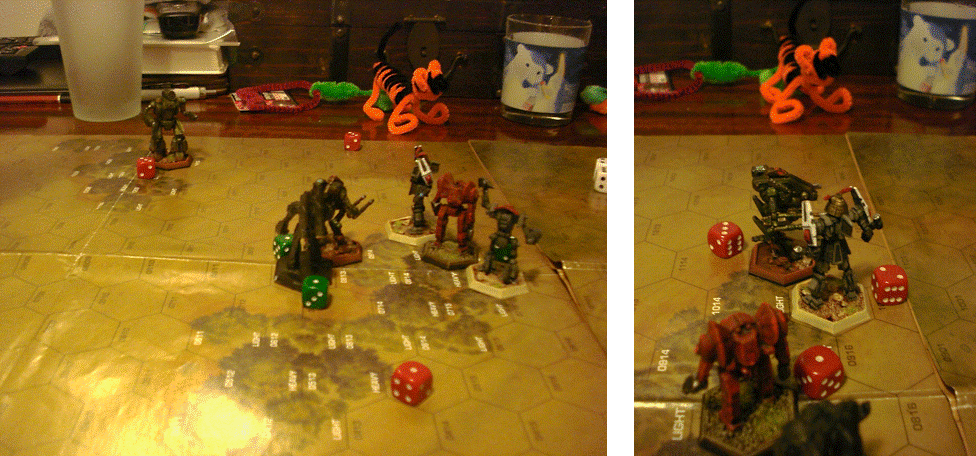
My daughter insisted that Stormfly and Toothless watch the game :-)

To open up the account, KuriboGoomba unleashed the Warhawk's PPC's on the damaged Stormcrow, with the hope of taking it out before it could get a shot off with its Ultra AC 20. The final shot from the salvo vapourised the Mech's head, which is the best luck that Goomba has had all year (usually he is the opposite of a good luck charm; sorry champ!).


The Dragonfly begins its reign of terror. Unfortunately, it is not the only light Mech with pulse lasers bouncing around.

In retaliation the Draconis Mech's pounded the Timberwolf as it moved to target Theodore's Warhawk. My Dragonfly jumped behind the Warhawk as well and the whole Clan force focused its fire for a turn. Once again, Goomba came up trumps with another stunning head-shot. Theodore Kurita, heir to the Draconis Combine, joins his father in the afterlife. Despite a heavy to-hit modifier, the Archer smashed the Dragonfly with a swarm of LRM's.


Wade lines up his shot on my Timberwolf's cockpit.

Hoping to silence the Archer that was efficiently stripping all of my Mechs of there armour indirectly, I raced the Timberwolf forward. The last time these two met, the Timberwolf disabled Morgan's Archer with his final desperate shot, so you could say there was bad blood between the two. Many (all?) of my Mech record sheets bear the scars left by that bloody Archer's indirect fire. Even within minimum range, the Archer slammed another two LRM 20 volleys into my Mech. In an effort to protect their last surviving hero, the other Draconis Mech's opened up as well, causing three mortal engine hits. In return, the Timberwolf mauled the Archer, knocking out its LRM launchers and bringing it to the brink of destruction. A speculative shot on the nearby Mongoose immolated it instantly.


We reach that point in the game where all the light Mechs shoot each other in the back.

As the Hellbringer exposed itself to fire on the Timberwolf, I again snuck my Dragonfly in behind to try and take it down. Despite causing several critical hits through exposed internal torso structure, the Dragonfly failed in its attempt and finally succumbed to the fire of the Mercury right beside it.


...and stay down.

Amazingly, the Hellbringer survived another three turns of fire from the Warhawk. Finally, the Mech went down, as Goomba split his fire to take down the Mongoose in the same turn. For a Mech with paper-thin armour, that Hellbringer took an incredible amount of punishment and held the midfield for close to 2 hours of the game. The last of Takashi's Dragon Claws had finally found his beautiful death. The return fire took off one of the Warhawk's arms, halving its remaining weapons.


The end.

At the end of the game we had an Archer that had sustained heavy damage and lost its main weapons systems, being stalked by a heavily damaged Warhawk armed with a single remaining Large Pulse laser. Considering the time and the lack of Draconis presence on the board, the mercenary Archer opted to withdraw, denying me vital victory points for killing the hero. It was somehow fitting that these two champions of the campaign survived to the bitter end.

Tallying up the points a few days later, it became obvious that the game was a draw (-5 VP). When applied to the campaign points tally, it was just enough to drag back the Draconis score to a minor victory. Considering that both the Coordinator and his heir had been killed during the course of the campaign, this seemed like a very appropriate result.


Final Campaign Victory Points Tally: +45 VP

Result: Minor Draconis Combine Victory!


What an amazing experience this campaign has been! My sincere thanks and congratulations go to Wade, for facing me across the table so many times over the past year. It was a hard-fought victory bought with the blood of the ruling family of House Kurita, various beers in responsible amounts, Kam Ying (Rainbow Steak FTW!) and Best of the 90's playlists. Thanks also to KuriboGoomba for being my stand-in while I put the kids to sleep and for reaping an incredible toll during the last game. Love your work and happy 20th Anniversary of Battletech ;-)

Se you across the table,

M4cr0

Wednesday, 15 October 2014

Luthien Campaign Update


Scenario 13: Cat and Mouse
Equipped with three frontline Clan Omnimechs, the Dragon Claws returned to LAW city seeking revenge. Within the city’s sprawling industrial district, they found the remnants of the Clan Smoke Jaguar hunting cadre. Making no attempts at further subterfuge, the elite Draconis warriors engaged with their long range weapons, initiating a brutal battle.
In this battle the forces of the Draconis Combine were represented by a Hellbringer A, Stormcrow B and a Kit Fox B. All of the Mechs had received some damage during the previous battle, but would still benefit from the increased range and damage output that Clan weapons afford.
The Smoke Jaguar force consisted of a Shadow Cat A and a Cauldron Born Primary. The Shadow Cat A received 30 points of damage in 5 damage randomly assigned lots, to represent scars from the previous battle with Takashi. Likewise, the Cauldron Born started with 40 points of damage, including a 5 point hit to the head…
 
Cauldron Born Primary
 
The battle started with the Jaguars inside the city. The Draconis Mechs moved onto the mapsheet from the Rolling Hills end and manoeuvred to engage with their ER Large Lasers and Ultra Autocannons. During the first round of shooting Wade lined up quite a few shots but missed with everything. In return, the Shadow Cat A stripped armour of the Stormcrow with its own ER Large Lasers. The Cauldron Born targeted the much lighter Kit Fox in the hope of reducing the odds. A gauss rifle and medium laser hit put the Kit Fox in danger of being holed the next turn.
 
 
In response, Wade changed his tactics rapidly, aided by a much needed initiative win. The Kitfox moved to block my Cauldron Born sacrificially, leaving the Shadow Cat vulnerable. The Stormcrow charged within physical attack range of the Shadow Cat and unleashed its heavy autocannon and blistering laser arrays, dealing heavy damage. During the physical attack phase, both Mechs attempted kick attacks, which both missed. Both Mechwarriors failed their piloting skill rolls causing the Mechs to fall and take damage.
 
Bwah ha ha! Slapstick!!
 
My Shadow Cat lost its arm in the fall, whilst Wade’s Stormcrow took critical damage to its torso, sustaining two engine hits. Predictably, my Cauldron Born mauled the Kitfox, causing three engine hits and claiming the first kill of the night.
 
 
Kit Fox B = little guy with a big gun
 
 
The next few turns saw my Cauldron Born stalking the Hellbringer, which had found a place in cover to launch long range missile salvoes with impunity. The Stormcrow and Shadow Cat returned to their feet and blasted away at each other, though my little cat was seriously outgunned.
In the last turn the Stormcrow fired everything, jacking its heat scale all the way up to 28 in an attempt to annihilate the Shadow Cat and destroy the Stormcrow in the process, achieving the honourable death the Mechwarrior so craved (well, worth an extra 10 VP anyway…). Unfortunately, the Shadow Cat survived and had a golden opportunity to destroy the larger Mech in the return fire, but missed (curses, so much was hanging on that one shot!). The Hellbringer stepped out of its cover and lined up shots against both my Mechs, hitting with both fusillades. The LRM 20 caused enough engine damage to finish off my Shadow Cat, whilst an ER Large laser shot decapitated my Cauldron Born, thanks to the random hit it took before the battle (CURSES!).
 
 Hellbringer A taking heads
 
Incredible! What a finish to the last Classic Battletech game of the campaign. Wade’s Dragon Claws have their revenge but are still alive to feel the shame of their previous failure. They would be on the hunt for a beautiful death in the final Alpha Strike game. When we counted up the victory points, the Draconis force had scored 60 points for kills but lost 20 of that due to surviving the battle, putting them on 40 VP for the game. The kill I scored lowered that to 10 VP; a minor victory for the Draconis Combine. If the Stormcrow had failed any one of three ammunition explosion rolls, due to the intense heat build-up it had intentionally been subjected to, it would have been a different result. The campaign standings are now +50 VP, which pushes Wade into the zone of a decisive victory. I will need to pull of something spectacular in the Alpha Strike finale to claw back some glory.
See you across the table,
M4cr0

Thursday, 4 September 2014

Luthien Campaign Update


Scenario 12: Ronin

Following the death of Takashi Kurita, Theodore Kurita forbade the Dragon Claws from seeking revenge. He knew that he would need the elite troops to defend Luthien, so could not afford to have them die in a vainglorious suicidal charge. To ensure their compliance, Theodore held the Dragon Claws Mechs under armed guard prior to the final defence of the city. Unwilling to accept this stain on their honour, some of the Mechwarriors absconded with suits of Kage Stealth armour. Knowing that they needed Mechs to win the vengeance they sought, they set a deadly ambush for a Star of Smoke Jaguar Mechs. Their objective was to trap the Clanners within a narrow canyon using explosive charges to block the entrance and exit. Once the Mechs were boxed in, they would use their Battlearmour’s jumping capacity to hijack them.
 
 
In this scenario the Smoke Jaguar force consisted of a Hellbringer A, a Mad Dog Primary, an Adder Primary, a Storm Crow B and a Kit Fox B. The Draconis force consisted of 12 individual Kage Armour suits and 6 explosive charges set in the canyon walls. Wade wrote down the position of his units which would remain hidden until revealed. I had to enter the eastern edge of the mapsheet and exit a very narrow space to the west. Given that Wade only had a few minutes to place his units, in retrospect, he did an exceptional job. He efficiently identified a small group of choke points that completely changed the topography of the canyon and made my job very difficult right from the start. Additionally, this scenario was brought to you by a responsible quantity of Trooper Ale. Up the Irons!


As soon as the Clan Mechs entered the map Wade started detonating explosives. The Stormcrow B was blasted but managed to stumble through the rubble. With that avenue blocked I manouvered around the other side of the canyon with the Adder and Hellbringer, but received similar punishment. The Hellbringer revealed two Kage suits with its Active Probe, which immediately jumped onto the Mechs and initiated a swarm attack. Despite several attempts to dislodge the battlearmour (sigh… so many double ones), both Mechs were successfully hijacked.
 
 
The Mad Dog and Kitfox scaled the canyon wall using one of the only possible routes, killing a Kage suit on the way. The Stormcrow used its superior speed to distance itself from another Kage suit and open the opportunity to exit the map during the next turn. This would earn me some victory points and deny Wade another Clan mech. On the way it was hit by two demolition charges which caused moderate damage. The Kit Fox was also hijacked (another set of double ones!), meaning I was now outnumbered by my own Mechs.


After finally wrestling control of the Puma, Wade unleashed its twin ER PPCs on the Mad Dog, stripping the armour off each torso. My return fire the following turn was brutal, punching straight through the light Mech’s centre torso and destroying it completely. The Hellbringer attempted to enter the fray but failed a piloting skill roll and fell in some canyon rubble. The Kit Fox twisted torso and unleashed a withering fusillade with its Ultra AC 10, scoring four critical hits across the Mad Dog’s left and right torso. This resulted in an ammunition explosion (5 shots of LRM 20: a whopping 100 damage) and a single engine hit in the other torso. With three engine hits the Mad Dog went down, leaving me with just a Stormcrow in a highly compromised position.
 
 
In the final turn the Stormcrow was ambushed by three hidden Kage suits. In keeping with my luck throughout the night, I failed every possible roll to save myself. This culminated in the hijacking of my final Mech.


During the game I scored -30 points for destroying the Adder, -10 points for denying Wade the Mad Dog and -5 points for taking out a Kage suit (should have been way more of them!). Wade scored 90 points for hijacking 3 Mechs. This gave him a decisive victory with 45 points. Campaign-wise, this gives the Draconis Combine a 40 point advantage heading into the last Classic Battletech game. Next game we’ll see Wade seeking some revenge in my stolen Mechs, in the scenario “Cat and Mouse”.

See you across the table,
M4cr0

Wednesday, 6 August 2014

Luthien Campaign Update


Scenario 11: A Samurai's Death

During the previous Luthien Scenario, Coordinator Takashi Kurita’s choler overwhelmed him and he led his Dragon’s Claws unit in a suicidal charge. The initial shock of the assault carried the unit through any immediate Nova Cat resistance, but they soon found themselves well beyond friendly supply lines or fire support. Knowing that they were surrounded, Takashi ordered his men to make their stand on the outskirts of LAW city. The Mech’s under his command hid between the abandoned towers and prepared to meet eternity. Shin Yodama, piloting his battered Phoenix Hawk, knew that he had failed in his duty to his friend Theodore. He resolved to take as many invaders down with him as possible, blotting out the stain on his honour with Clanner blood. The leading edge of the Smoke Jaguar assault tracked the Dragon’s Claws movement into the city and sent a hunting cadre to eliminate them. The resulting battle would echo in eternity.
The Draconis forces were represented by the surviving Mechs from the previous scenario: Takashi Kurita in his Grand Dragon (essentially undamaged), Shin Yodama in his Phoenix Hawk (heavily damaged and missing an arm), a Hatamato-Chi (Zombie-Chi!) and a Hatchetman (essentially undamaged). These Mechs would receive a -2 bonus to physical attacks and a +1 penalty to ranged attacks. They would also receive bonus points for enemies taken out with physical attacks and for not surviving the battle. They started the game hidden anywhere on the map.
The Clan force was a collection of Smoke Jaguars’ finest, an Ebon Jaguar Primary (represented by a Nova), Huntsman Primary (represented by a Hellbringer C) and a Shadowcat Primary (represented by a Kitfox). The Huntsman, with its Beagle Active Probe, would be handy for smoking out the hidden Draconis Mechs. Along with the other jump capable Mech, the Shadowcat, it could jump from alleyway to alleyway and even scale buildings. The Ebon Jaguar was just there to soak up fire and sling out gauss shots. Knowing the damage some of those Mechs had sustained in the previous battle, I was confident that it would not take too many gauss shots to cut down the opposition.
The game opened in fairly spectacular fashion, with the Zombie-chi being destroyed by the first shot to touch it, an ER Medium laser fired by the Ebon Jaguar. Shin Yodama had a pretty bad time as well, taking a gauss shot that holed his Phoenix Hawk’s centre torso completely. That left a plucky Hatchetman and the Coordinator in his Grand Dragon to preserve the honour of the Draconis Combine.
 
 
The Hatchetman engaged the Huntsman in a duel across the roof tops, which included several “death from above” attempts (below). The battle ended when the Hatchetman struck the Clan Mech in the head with its hatchet, then poured pulse laser fire in the hole. Damn, that was a brutal kill.


The Hatchetman got its beautiful death a short time after, thanks to a crushing mid-air gauss rifle shot from the Shadow Cat, which prevented the successful execution of another death from above attack.
 
 
The Grand Dragon challenged the Shadowcat and they traded fire for a few turns, until it was opportune for the coordinator to break the honour rules. The next turn both the Ebon Jaguar and the Shadow Cat bracketed the Coordinator with their gauss rifles and brought the Mech crashing down.  
The Jaguars scored -90 points for their kills, whilst the Draconis forces clawed back 40 points through NOT surviving the battle and a further 30 points by taking out the Huntsman with the aid of a physical attack. The final score was -20 points, which puts the campaign standings on – 5 VP. With only two Classic Battletech games left and one Alpha Strike game, I can sense that this campaign is going to finish the way it started, on a knife’s edge.

Tuesday, 1 July 2014

Luthien Campaign Update


Scenario 10: The Cat and the Dragon

Having smashed their way through all the defences thrown at them, the Nova Cats finally succeeded breaking into the Kado-Guchi Valley. They were expecting stiff resistance, but got more than they bargained for in the form of the Dragon’s Claws, a unit of veteran Mechwarriors commanded by Coordinator Takashi Kurita. Knowing that his father may opt for a suicidal charge reminiscent of the ancient Terran Samurai, Theodore Kurita entrusted his aid, Sho-sa Shin Yodama, with the responsibility of holding Takashi and his warriors in check. To help him, explosives were hidden beneath Takashi’s cockpit. Yodama had the triggering mechanism in his Phoenix Hawk, providing him with some measure of leverage over the cantankerous old warrior. Historically, Yodama was successful in reining Takashi and his warriors in, providing an unwavering defensive line that ultimately held back the invading Clans.

The Nova Cats were represented by a Mad Dog Primary and a Summoner Primary. The Mad Dog happens to be KuriboGoombas favourite Mech (dyed in the wool Ghost Bear, that one) and I love Summoners. The Draconis force consisted of a Phoenix Hawk piloted by Sho-sa Shin Yodama, a Grand Dragon piloted by Coordinator Takashi Kurita, a Hatamato Chi and a Hatchetman.


Every turn Yodama and Takashi had to make an opposed piloting skill roll to prevent Takashi from going berserk and charging the nearest enemy Mech, trying to take it down in physical combat. His Genyosha bodyguards would follow him into close combat, which would be an absolute riot.
One way to win this game is to destroy the Phoenix Hawk first, then lead the rest on a merry chase. The hard part is nailing the Phoenix Hawk, which can jump around out of sight pretty easily. Goomba and I didn’t really talk about tactics. To be honest, we have been playing Battletech together for that long, we don’t really need to talk anymore, tactics just happen.

Or… Goomba just charges into the teeth of the enemy and my new objective is “rescue Goomba”.

Goomba charged his Mad Dog forward in an attempt to split the Draconis forces with the forest in between. This would prevent them all from focusing on a single Clan Mech. Wade took advantage of the Mad Dog’s proximity to jump the Phoenix Hawk behind and unleash fire into the weak rear armour, gunning for a cheap kill. The Pho-hawk managed to score a critical hit but didn’t make a significant impact. It did, however, leave the Mad Dog unable to turn its back on any enemy Mechs for the rest of the game. I covered him, taking off the Phoenix Hawks arm, which would usually trigger it to withdraw. We weren’t using withdrawal rules this time around though, to represent the utterly cutthroat nature of the battle. The Mad Dog pounded the Hatamato Chi, but also took some serious damage in return.


Interestingly, Takashi beat Yodama’s piloting skill roll early on, despite heavy modifiers. I jumped my Summoner in and drew the Genyosha Mechs away to take the heat off Goomba. We focused fire on the Hatamato Chi for several turns whilst avoiding the worst of the physical attack whirlwind we had unleased.


Unfortunately, the Mad Dog took a hip and lower leg actuator hit which slowed it down. The Hatchetman, which we had blocked out of the equation by keeping it perpetually on the wrong side of the forest, closed in and began hacking into the Mad Dog. Goomba did everything he could to keep pressure on the Hatamato Chi, which really should have gone down by now… After several turns of punishing close combat the Mad Dog lost its leg and took a critical hit to its LRM 20 ammo bin. With its other arm required to prop itself up, the Mech had no way of taking shots. It was effectively dead.


With the rest of the Lance focusing on me, I spread solid LB-10X AC and ER PPC shots between the weakened Phoenix Hawk and the Hatamato Chi. I stripped both of their armour and switched to cluster munitions for the kill. But. They. Just. Wouldn’t. Die.

After turn after turn of trading fire, I had one last shot to take them both down. The ER PPC missed and the LB 10X AC only hit with 3 cluster shots (I was banking on the average, 6). I still managed to score 3 critical hits on the centre torso, but couldn’t pull off the kill. In return, concentrated (lucky) fire took out one of the Summoners legs and we called it a night.

As the smoke cleared we had a close look at the record sheets and found that the Hatamato Chi had sustained a staggering 259 points of damage. It will forever be known as the Zombie Chi! The Draconis Combine force was awarded a minor victory, bumping the campaign VP's in favour of the defenders (+15 VP). In addition to this, Takashi had broken his leash and dragged the whole Draconis defensive line down with him. This will have huge repercussions in terms of the campaign, as it will now diverge from the canon history quite radically. Fantastic!
Stay posted for the next scenario: A Samurai’s Death.
See you across the table,
M4cr0

Monday, 9 June 2014

Luthien Campaign Update


Well, to kick things off I have a quick life update. Work is hard! I have about a week of utter madness left, then I can start posting more regularly again. Secondly, my camera is about to die, so the pictures in this update are over-exposed. My mobile phone actually takes better pictures at the moment! Add to that the following chestnut, the first time I posted this update the formatting of my whole blog changed. Take two:

Scenario 9: In the Dark
Khan Furey ordered a force to destroy the largest ore mine on Luthien in an attempt to stifle the Draconis war effort. Situated in the heart of the Nijunen Desert, the mine was defended by Tai’sa Alexi Nagumo and the 143rd Luthien Defense Regiment. The attackers, the 225th Jaguar Battle Cluster, approached their target under the cover of darkness, but were brought to a standstill by the spirited defense of the 143rd. Eventually the Combine regiment withdrew, having suffered heavy losses, leaving the mine to the ungentle hands of the bloodied Jaguar Battle Cluster.


 Wade and I actually played this game twice, as the Draconis forces were wiped out convincingly in the first game, despite a ridiculous tonnage advantage. The Clan force consisted of a Warhawk C and a Timberwolf Primary piloted by my top Mechwarriors from the campaign (piloting and gunnery 2). The defenders included a Battlemaster, Highlander and Warhammer, followed by a Warhammer IIC late in the game. We threw the last one in just to see what would happen, but it got trashed too. Of the 48 points of combined head armour and internal structure in Wade’s force, I removed 65 with the Warhawk’s PPCs and Large Pulse Lasers. The Timberwolf stomped around caving in all the buildings and that was the game (when it wasn't in a weird rear arc conga-line, below). We had a good laugh about it and decided that elite Clan Mechwarriors should never be allowed in Mechs with pulse lasers and targeting computers again.

The second game was much closer, thanks to a lot of scenario tweaking. We used some house rules to represent the combination of darkness and the interference caused by the high metal content of the environment. The attacking force consisted of a Gargoyle C, a point of Elementals and a Hellbringer A. The defenders included an Archer, a Thunderbolt, a Battlemaster and a Warhammer. The defenders and the mine buildings were placed as blips on the gaming board, which had to be revealed at close range, or with the Hellbringer’s Active Probe or Search Light.

The game started off with the Gargoyle moving forwards under cover and the Hellbringer storming forwards to reveal some blips. What it found was a Lance of angry Draconis Mechs that absolutely mauled it over two turns of intense fire. With its star-mate down, the Gargoyle had the whole game on its shoulders.

Now, I harbor no fondness for the Gargoyle. To be truthful, I included it specifically because I thought it was crap and would help to balance the game, so to find myself in this situation was very interesting. I moved the Gargoyle up and dropped off the Elementals in position to harass the Archer, then used its ER Medium lasers to take down the first mining building. With a CF of 40, the armament of the Gargoyle seemed perfectly suited for demolition work (42 damage with the mediums or 40 with the Ultra AC 20).

Ignoring and outmaneuvering the slower Draconis heavies, the Gargoyle shifted from sinkhole to sinkhole, pounding the buildings into dust. I managed to miss one ER Medium shot on one of the buildings, but the Elementals picked up the slack, bringing the building down with laser fire. By the time the Elementals were taken out they had caused a lot of annoyance and the Gargoyle was busy withdrawing through the Lance of overheating Draconis mechs. It lost an arm, took engine hits and head hits, but just kept moving. For the first time in the game I opened up with the Ultra AC 20, hitting the Battlemaster twice and knocking it flat. This bought me enough time to get close to the board edge. Wade had one last shot to take it out, but just couldn’t manage a kill. After the Gargoyle stepped off the last hex, we called for the butcher’s bill. On the Clan side of things, a Hellbringer and an Elemental point had been lost. No Draconis Mechs had been destroyed but the mining complex was completely destroyed. This combination of conditions amounted to a draw (-15 VP). The aggregate campaign score now sits at -10 VP.

Alpha Strike Shenanigans
Here are some pics of a pick-up Alpha Strike game we played. It was originally going to count as a Luthien campaign battle, but we are still trying to figure out a points system that works. In this game, despite the forces being equal according to the Beta points system, the Draconis force looked very thin before the game (and even thinner after I had a go at it with my Jaguars).

Early on in the game the Draconis heavy tanks rolled down the left flank and caused a lot of pain, whilst acting as effective spotters for a support Lance in cover behind a rock pillar. After they were taken out, a pair of Incubi (Incubuses?) got in behind the pillar and really messed that Lance up, supported by a Dragonfly and a Nova I jumped in to support Joel’s damaged Star.
The Dragonfly also took out a Rifleman from a nearby Fire Lance, with it Lance-mates (a Highlander, Warhammer and Marauder) moving into cover and pouring fire on anything they could see. My Timberwolf and Summoner managed to take out the Marauder, but the other two were a real nuisance. I finally took them out in the end game with concentrated fire from every Mech I had with LOS.
On the right flank my Warhawk took a lot of punishment before being left to some heavy infantry, which chewed through the last points of internal structure.
My Hellbringer and Stormcrow (seeking partial cover below) formed the tag team from hell and wiped out a Lance of Draconis close combat Mechs between them. I never thought I would say this, but that Hellbringer was MVP for sure!
Sooo, three Lances of Draconis Mechs, two heavy tanks and several infantry points taken out for the loss of a Kit Fox and a Warhawk… doesn’t seem very balanced to me. I love the fact that my Hellbringer smashed face, but not under these circumstances.
Time for a rematch I think…watch this space…
See you across the table,
M4cr0

Wednesday, 26 March 2014

Luthien Campaign Update


Scenario 5: The Battle of Katsura River Valley

Historically, two companies of 2nd Genyosha and a company of 3rd Otomo mechs were sent to strike the rear of the advancing Smoke Jaguar invasion force. They moved along the river bed to avoid detection before engaging the 32nd Jaguar regulars. All of the Kuritan mechs were heavily damaged but they left eight Clan mechs face down in the sand.

To represent this we both took 155 PV of mechs. The Clan force was commanded by an elite mechwarrior in a Timberwolf Primary (Skill 2), and included a veteran mechwarrior in a Warhawk Primary (Skill 3), a Mad Dog Primary, Summoner Primary and a Stormcrow B. The Combine forces included 2 lances of Otomo mechs and a heroic Genyoshan mechwarrior in an Atlas (Skill 1).

We agreed that the mission objective of the Clan force would be to exit the right side of the board. Each mech that achieved this would receive its PV in VP. The VP for IS mechs destroyed was halved to balance this (1x instead of 2x). The Clan force would enter the board from the left side and attempt to cross the river by a randomly determined bridge (from left of pic below: 1-3 left, 4-6 right).
 
 
The Timberwolf, Mad Dog and Stormcrow B entered towards the left and made for the closest bridge. During the course of the game I set up 3 turns of great firing in an attempt to thin the defenders, but rolled horrendously. Three sets of snake eyes at 6+ and 8+ to-hit bury your chances pretty quickly in this game! With numerical superiority the Draconis mechs dealt significant damage even at higher to-hit numbers. The Timberwolf was destroyed whilst the Mad Dog and Stormcrow B escaped after 5 turns, having only stripped a Dragon of its armour between them.

The Summoner and Warhawk entered to the right of the board edge and were ambushed by a lance of mechs (Hunchback, Cicada, Jenner and Trebuchet) supported by a Catapult. The Warhawk had a golden chance at 6+ to bury the Jenner but missed. The Warhawk took the brunt of the firing for a few turns and fell. The Summoner went on to destroy the Hunchback and Catapult (trying to claw back some VP here), but succumbed to the Jenner at the bottom of Turn 6, one jump away from escaping.
 
 
The game was over in two hours and when we counted the VPs it was obvious that the Combine forces had achieved a major victory. It’s nice to be historically accurate (and I had shocking luck), but we both agreed that the Draconis mechs were under costed. Using a formula posted by iamafan on the Classic Battletech forum, I calculated a 100 point difference between the two forces, which would have made a significant difference. Next game we are going to use this alternate formula for PV and see if it is a more even game. Overall, we decided to give the Draconis force a score of +25 according to our campaign victory conditions.
 

Scenario 6: The Hounds Teeth

Despite victories against the Smoke Jaguars, The Combine units struggled to contain the Nova Cat advance. With blatant disregard for the Jaguar attack plan, the Nova Cats pushed deep into the Waseda Hills, attempting to reach the Imperial City before the Smoke Jaguars. They pushed towards the Kado-Guchi Valley unsupported. ComStar intelligence had suggested that the area was defended by militia, but the Cats ran into three regiments of Wolf’s Dragoons and Kell Hounds who stopped the clan advance cold.

Wade took a potent but slow Wolf’s Dragoon force, which included a mandatory Catapult armed with an Arrow IV artillery system. Backing it up was a Hunchback armed with the customary AC20 and some pulse lasers. It had dropped a medium laser for a TAG. He also had a Griffin (one of my favourite mechs) armed with an ER PPC and LRM 20.

Knowing I had to get some points or risk falling irrevocably behind in the campaign, I picked some real bruisers for my Nova Cat force. A Mad Dog B (3 Medium Pulse Lasers, 2 Streak SRM 6s for short range and 2 ER Large Lasers and an LRM 20 with Artemis fire control for long range), a Nova A (2 ER PPCs and a Medium Pulse Laser) and two points of elementals. The elementals were worth very little under the victory conditions but could do a lot of damage.
The game started off with some serious long range sniping from both my Mad Dog and the Catapult and Griffin. Even when using the standard Arrow IV rounds, Wade had a knack of sticking the shots, managing to scatter on my Elementals on 3 occasions! The Hunchback waded in and dealt some damage with its AC20, whilst simultaneously tagging my Mad Dog for Arrow IV homing rockets. I returned fire, tearing strips off the Hunchback with my Streak SRMs and Pulse Lasers, until it finally took enough engine hits to go down.

The Griffin successfully evaded fire whilst my remaining Elementals harassed the Hunchback and Catapult. Meanwhile, my Nova was jumping from cover to cover trading ER PPC barrages with the Griffin. Having finished off the Hunchback, my Mad Dog trudged over and managed to box the Griffin in, putting the last nail in the coffin. After running out of Arrow IV ammo, the Catapult withdrew from the field essentially undamaged. Both Clan Mechs were still standing, though the Mad Dog had sustained a massive 136 points of damage. The major victory gave the Clans a reprieve in the campaign standings with -50 VP.


Scenario 7: River Monitor
Armed with dodgy Com Star intelligence, the Clans assigned the capture of the Arisaka Munitions Complex to a Freebirth Cluster. The militia defending the complex were highly motivated and determined, deploying a naval vessel in a concealed position in the reeds of the Shaidan River. The infantry destroyed the bridges across the river using mines, pinning the Clan Mechs in place whilst the Minikuchi River Monitor vessel and attending ground forces pounded them into submission.
 
 
I chose to take a Hellhound, Vapour Eagle and Horned Owl for this battle. I figured the jump capability would increase my options if the bridges were destroyed. The multiple large pulse lasers/medium pulse lasers would mitigate the cost in accuracy due to jumping, whist the Hellhound and Vapour Eagle were packing Inferno SRMs to stifle the IS damage output.

Wade had a Warhammer in command, backed up by a Phoenix Hawk and a Wolverine (WVR-7K). He also had three platoons of rifle infantry on the bridges and a 75 ton River Monitor ship armed with two AC 20s and three SRM 2s. Finally, Wade set up three 15 point mines on the bridges. One bridge was set to take a 15 damage hit, with the closest bridge to the attackers rigged for a 30 point hit. My objective for the game was to capture the bridges and the munitions complex, whilst Wade needed to deny me access to the complex by blowing the bridges and taking down as many Mechs as possible. In the pic below you can see the access the ship would have around the complex.


As the game began I engaged in some long range sniping with my large pulse lasers, targeting both the Warhammer and the infantry platoons. I wanted to eliminate them which would prevent Wade from triggering the charges. Unfortunately, I got a little too close to the river and Wade revealed his trump card. The Minikuchi reared its head and pounded my mech with its two AC 20s. The configuration of the map gave the ship complete access to the hexes around the munitions complex, making it very hard to approach.

With the mines finally primed, Wade detonated them dealing heavy damage to the bridges. With his eyes on the prize, the rest of the units in his force began laying down fire to finish off the bridges. Two collapsed in rapid succession. In an attempt to draw fire away from my objectives, I jumped straight into the heart of the complex. The Horned Owl lit up the Wolverine from behind, but it twisted torso and hit back hard with its arm mounted large pulse laser (I can’t believe it out-pulsed me!). I took a few too many engine hits in that exchange.

A mech down, I went all-out against the Warhammer, taking off one of its legs. A follow up kick caved in the other leg and we declared the Warhammer destroyed (by that stage it had no arms either). I also managed to destroy a few infantry platoons whilst staying out of the LOS of the Minikuchi. Unable to capture the complex, I withdrew into the city to draw the remaining Draconis mechs out. I was hoping to destroy them in the cover of the city, beyond the reach of those AC 20s, but we soon agreed to end the game due to time getting away from us. The Draconis ended up with a score of +35 points, a minor victory tarnished by the loss of their commander.
 
Scenario 8: Black Thunder Extraction
Wade rocked up with six awesome little trucks painted, so we just had to use them for something. There is a mission in the Luthien campaign book that revolves around a unit of DEST stealing a Union class dropship from right under the Smoke Jags noses. This scenario would explore the fate of the extraction vehicles as they try to escape the area after the DEST team escapes in the Dropship. The Draconis forces would consist of a Warhammer and a Lancelot, as well as the 6 trucks (20 armour points and a machine gun). The defenders consisted of a Stormcrow B and a Mad Dog Primary. The Dracs would get points for each escaping truck, surviving mechs and destroyed enemies. The Clanners were simply out for revenge (set up below: responsible quantities of bourbon may have also been enjoyed at this juncture. Thanks Howie!).


Early on the truck convoy split in two, whilst the clan mechs sprinted to flank the guardian Warhammer and Lancelot. The Lancelot copped an awful amount of punishment from the Stormcrow, which got a good Ultra AC 20 shot in through the rear armour, taking it down. The Mad Dog and the Warhammer duked it out, when the Mad Dog wasn’t popping trucks (or just kicking them to pieces). I made the mistake of letting Wade know he only had to hit my Mad Dog one more time and he would probably win, considering the position of the remaining trucks and damage on the Stormcrow. The next round of shooting I scored three critical hits on his Warhammer’s centre torso AND a head hit. The first CT critical hit pay dirt: 200 machine gun rounds. Good night. Warning to all, if I say you will probably win next turn: start reaching for the ejection lever!


Obviously, the Draconis forces suffered a major defeat this game. Very little thought went into planning the mission, so it was nowhere near as balanced as I would usually make it. Still, Battletech is like pizza: even when it’s bad, it’s good. We decided this scenario would negate the one-sided result of the Alpha Strike game, adding -25 points to the campaign tally.
So, here we are, 8 scenarios in, with an aggregate score of +5 (still a draw). Stay tuned for the next scenario update, which will be shorter now that the back-catalogue is published: In the Dark.

Sunday, 16 March 2014

Luthien Campaign Update


For the past couple of months, my mate Wade and I have been playing through a Classic Battletech campaign based loosely on the Luthien scenario book. The games have been incredibly close and hard fought, with many memorable moments to chew over in the aftermath. Most of the games have gone right down to the wire, with decisive moves made in the last turn or the last 10 minutes of the game. Here are the first couple of battle reports to get things started. I know some of my mates have already read these, but for posterity I wanted to have them all in the one place and provide a central location for new reports. Over the next week I should have all of the reports posted, so that I am up-to-date before the next game. It is scheduled to be an Alpha Strike match pitting a Clan Binary vs a DC Company. This is how it started…
 

Scenario 1: Hunting Cats

In this scenario, Draconis reconnaissance elements attempted to infiltrate the Smoke Jaguar landing sites. The defender was an Ice Ferret armed with an LB-2X AC and 2 ER Medium lasers. The attacking units included a Mercury, a Mongoose and a Rifleman. The Ice Ferret spent several turns evading fire and causing damage with its medium lasers. It was finally crippled, which triggered the arrival of a star mate in a Shadow Cat (Gauss Rifle, 2 ER Mediums). The Draconis Mechs attempted to withdraw with the intelligence they had gathered, including the appearance of a new, unidentifiable Mech. The Rifleman was destroyed with a devastating gauss rifle hit (below), whilst the scout Mechs escaped. The final result was a nail biting draw (-10 VP).


Scenario 2: Sleeping Dogs Lie

This scenario enacted a Draconis raid on a crippled Clan star of Omnimechs, having softened them up with explosive booby traps. The Clan forces included a crippled Dire Wolf (Gauss Rifle, 3 Large Pulse Lasers and 2 Streak SRM 6 variant). It had sustained 80 points of damage, including a 10 point hit to the head which had rendered the pilot unconscious. The other Mechs were a Timberwolf Primary and a Stormcrow (Ultra AC 20, 6 ER Mediums variant). Both had sustained 40 points of damage, but the pilots were conscious. The Draconis forces included an Archer, a Battlemaster, a Warhammer and a Phoenix Hawk. The Dire Wolf pilot regained consciousness on the first turn (7+) and attacked the Warhammer at punch hit with his Gauss Rifle and Large Pulse Lasers. The Timberwolf also engaged the Warhammer, decapitating it with two “lucky” ER Large hits. The Battlemaster pounded the Stormcrow, which failed to make an impression with its Ultra AC 20. The Archer blew off the Dire Wolf’s head with a salvo of LRM’s. The Timberwolf continued to dominate in direct fire combat, eventually taking down the Battlemaster. The Archer rained damage on both Clan Mechs. The Stormcrow was quickly crippled and forced to withdraw, only to be shot to pieces the next turn. The Timberwolf was also forced to withdraw, but lost a leg (a legacy of the damage it started with), so could not leave the board. Stuck without an indirect fire support spotter for the Archer, the Phoenix Hawk jumped out of cover but was mauled immediately. The Archer responded by finishing off the Timberwolf, which crippled it in return before falling for the last time. The final result was another close draw (+10 VP). It was agreed that the Timberwolf mechwarrior had performed valiantly, and would be the subject of a “prisoner exchange”. The Archer mechwarrior reduced his gunnery by 1.

 
Scenario 3: Fish in a Barrel

In this scenario both sides arrived in waves. The Draconis forces began the game with an aerospace advantage, but were under-gunned compared to the Clan force. They fielded an Archer, a Cyclops and a Stalker in reserve. The Clan force were without aerospace support for 1 hour of game time, but fielded a Warhawk Primary and a Summoner Primary, with a Mad Dog primary in reserve. The game began with the Cyclops running into heavy cover to avoid the Warhawk. The Archer began a barrage of LRM’s, whilst the Summoner hunted the Archer down single-mindedly. The Archer was hit turn after turn until it was left sprawled in the dust, whilst a lucky airstrike forced the Warhawk to withdraw with a gyro hit. It walked backwards whilst unleashing PPC barrages. It managed to finish off the Archer at range, as the Stalker appeared from the Draconis deployment zone to destroy the Summoner over two turns of horrendous close range fire. A lucky Clan airstrike forced the Stalker to leave the battle. The Cyclops mechwarrior made the critical error of breaking for better cover to escape the punishing attacks of the newly arrived Mad Dog, and was drilled through the rear torso armour by the Warhawk at extreme range, touching off an ammo explosion (140 points of damage, no case). The end result was a minor victory for the Clan forces (-20 VP).
 
 
Scenario 4: A Murder of Crows

In this scenario a trapped Clan Stormcrow (LB 10X AC, Large Pulse, 2 Medium Pulse variant), attempted to escape the clutches of a Draconis ambush. Facing down a Shadow Hawk, a Thunderbolt and a Kintaro was going to be a tall order. To win, the Clan side needed to destroy at least two mechs and escape, whilst the Draconis forces received points for surviving mechs and taking out the Stormcrow. The Stormcrow and the Kintaro slugged it out for a long time, which bought the other Draconis mechs time to get in closer, all the while launching LRM salvos indirectly using the Kintaro’s firing telemetry and Narc mssile beacon. The Stormcrow finally destroyed the Kintaro in a massive ammunition explosion, but fatefully sought refuge in partial cover. The Stormcrow was messily decapitated by medium lasers on the Thunderbolt. The end result was a minor Draconis victory (+40 VP).

So, four games in the campaign was poised on a knife’s edge, with an aggregate score of +20 (a draw according to our campaign victory conditions), leaning slightly towards the Draconis Combine. Stay posted for the next four games, which will see the Kuritan defenders blow the campaign wide open, only to allow the Invading Clans to claw their way back, albeit excruciatingly painfully.

See you across the table,
M4cr0