Wednesday 27 May 2015

My First Miniature (1996 vintage!)


Hi folks,

A very thoughtful post on Fairweather Hobbyist about the experience of painting your first miniatures reminded me of a special discovery I made a few months ago. I was rummaging through the deepest recesses of my dankest bitz box, and I found this little guy:


Poor fella had no boltgun or base, but I soon fixed that up...


I painted a 10 man squad of these marines back in '96, after reading issue #195 of White Dwarf. It contained special rules for Sergeant Centurius, a Legion of the Damned special character, who quickly became my favourite way to kill Eldar (there are many...). I loved the Legion of the Damned artwork and set about trying to paint them, with a big emphasis on the word try.


On second thoughts, the scheme I picked was probably not a wise choice for a complete novice, but it does gives me all kind of warm fuzzies; 15 year old me was already trying to paint free-hand bones and flames on marines.


I painted these guys using the Chromacryl paint tubes from my local newsagent. That stuff was thicker than toothpaste, but I thought I was pretty clever; saving money for some Terminators of course. There was no highlighting in those days for me, or ink washes. The closest I got was painting over something black and wiping most of it off with my fingers. I can distinctly remember how nervous I was painting these figures, having no idea how to do it but desperately wanting them to look good.


Chromacryl: burn it with fire.


I had one other friend who started collecting at the same time as me and we both blindly stumbling into painting. We rarely spoke about the techniques we were developing, as we were both self conscious of our efforts I guess. We just kept trying new stuff. Most of it didn't work, but every now and then we would discover something amazing. I persevered with the Legion of the Damned figures for about 12 months, until some people called cheese and I turned (almost...) all of them into Dark Angels. I just painted straight over the top with Citadel Dark Angels Green. To this day, I still strip miniatures and find those flames hiding underneath. Ironically, GW published the rules for a complete LotD army in a White Dwarf a short time later [sigh].

Finding this Legion of the Damned marine brought the whole journey back to me, all of the thrills and frustrations and lightbulb moments. The older I get and the longer I play this game, the more I have come to realise that there is no end to learning how to paint. We all have to start somewhere and learn along the way, and the boundaries of our art keep expanding. The way we share our skills, triumphs and defeats these days makes a huge difference to the novice painters who come blindly stumbling through our doors.

For what it is worth, even after 20 years, I still feel like I am a novice. Though perhaps a novice with some tricks up his sleeve...

See you across the table,

M4cr0

P.S. I also found the folded paper cut-outs I used to use before I had any miniatures...


Monday 25 May 2015

X-Wing: Death Star Trench Battle


Hi folks,

With Battletech Tuesday on hiatus while we get the new campaign organised, the guys I game with have had a chance to dabble in a few other random interests. A few nights ago we play-tested a custom Death Star trench run for the X-Wing miniatures game, set just after Garven Dreis orders the remaining Red Squadron ships to prepare for their attack run.
The game was highly enjoyable, even though we stopped and started frequently to discuss and develop the rules of the scenario. The scenario rules we used, and the reasoning behind the design decisions we made, follow on after the battle report. 
For those who don’t want to invest that much time in reading the technical side of things: the scenario was damn hard for the Rebels.  

 
Battle Report


Black Squadron moves in formation towards the Rebels. Dark Curse drops straight into the trench to take any early runs head-on. Wedge and Luke split off to the left flank, Biggs drops into the trench and the Y-wing splits right. Even with 6 TIEs it is hard to cover that many threats without at least one of them getting through to the exhaust port...


Luke and Wedge fire at two TIE fighters but they are saved by some solid defensive rolls. Over two turns of close maneuvering Luke is destroyed, Wedge is wounded and an "eyeball" is vaped. Wedge head back for the trench to support Biggs, who pours ineffective fire into Dark Curse as they fly towards each other at full speed. The Y-wing continues to sneak around the right flank.


Biggs sets himself up for a shot on the exhaust port whilst Wedge runs interference. Wedge pulls a K-Turn which incurs two attack dice from the trench, which manages to destroy him. After sneaking past a turbolaser turret with the help of effective ion fire, the Y-wing drops into the trench and lines up against the exhaust port as well. A lucky TIE fighter scores a critical hit, preventing it from making any target locks, making it impossible for the Y-wing to destroy the Death Star (denied!)


Following the death of Wedge, the Millennium Falcon drops in and scatters the TIE's. It begins pouring out fire but the TIE's manage to evade everything thrown at them. The Y-wing is destroyed by another turn of accurate fire.


Biggs missed his shot with the proton torpedoes, which should have ended the game. We decided to play on and allow him another go at the port, which he dive bombed over two turns and made the necessary critical hit. "Great shot Biggs! That was two-in-a-million".


The Trench Run Scenario
We used rules which reflect what occurs in the movie as closely as possible, which created a very strange gaming experience. More specifically, what is good for the movie makes for a demoralising game for the Rebels… unless of course they win very quickly due to a blisteringly arbitrary win condition. Prepared for this in advance, and being the group of guys that we are, we had a lot of fun and laughs. The scenario needs tinkering before I would unleash it on anyone else though.


1: The Rebels
Here is a rundown of the Rebel force. Luke Skywalker with Calculation can spend a focus to change one eyeball result to a critical hit. One of these hits is required to hit the thermal exhaust port and win the game, so I thought this would be a nice touch. Wedge is a TIE killer; with thoughtful placement, Outmanoeuvre and his special ability, watch the TIE’s agility advantage evaporate.  The Millennium Falcon acts as the 2nd Rebel Wave, which arrives when 50% casualties are incurred. Biggs… well, we all know why Biggs is there… 


The Gold Squadron BTL-A4 Y-wing was there to represent the lone Y-wing you see escaping with Luke, Wedge and Han when the Deathstar blows up. We didn’t give it an astromech as the Y-wings clearly didn’t have them at the battle of Yavin.


2: The Imperials
The first wave of Imperials consists of 5 Black Squadron TIE fighters and Dark Curse. As a 2nd wave we had Darth Vader with Predator and an Advanced Targeting Computer (keep twisting that dial Darth…). His wingmen Mauler Mithel and Howlrunner both had Wingman and Targeting Computer (let’s all twist dials!).


3: The Death Star Trench
  • Any ship with its base overlapping or at movement range 1 of the trench at the end of a turn may forgo its manoeuvre next turn, and instead "enter the trench". The ship is placed in the trench at the point nearest to it's last position and gets a free reorientation of facing. 
  • Any manoeuvres in the trench, other than straight moves, incur a 2 die attack. 
  • Any ships involved in a collision perform a random manoeuvre during the next turn.
  • Ships outside the trench cannot draw line of site to ships inside the trench and vice versa.

4: The Thermal Exhaust Port
  • Rolls 4 dice in defense to represent the difficulty of the shot. 
  • The Death Star can only be destroyed by proton torpedoes.
  • Any ship, apart from Luke Skywalker’s X-wing, wishing to fire upon the exhaust port must maintain a target lock for at least 2 rounds. They can make no attacks while they maintain target lock (can only defend, and use focus or evade tokens). Luke Skywalker may instead spend a focus token. 
  • Rebel ships must fire their torpedoes at range 1 and score an uncancelled critical hit to destroy the Death Star.

5: Turbolaser Batteries (we used 2 in this game)
  • 3 Hull points.
  • During the skill level 0 step of the activation phase, rotate each turret to choose firing arc. 
  • Should it choose to fire, a turret rolls 4 attack dice against all ships at range 2-3 in its firing arc.
  • The defender doubles his/her agility value against these attacks. 
  • Action. Reduce the agility of a ship within range 1-3 by 1 (to a minimum of 1). You cannot fire this turn.

Points to Ponder

Wade made a good point at the end of the game; there are two ways to approach this scenario as the Rebel player. You can go for the objective, in which case you will either win quickly or the TIE swarm will catch up with you and pull you apart. Alternatively, you can ignore the objective and thin out or destroy the TIE swarm like a normal game, in which case you may as well not have the objective. Setting a time limit will remove this choice, as this forces the Rebel player to gun for the exhaust port, but this still leaves the game in a precarious position: win as quickly as possible with a "1 in a million shot" or (far more likely) miss and face the TIE swarm from hell.

For what it is worth, I suggest:
  • Reducing the points assigned to the Imperials. Darth and friends didn't even make it onto the board, as they weren't needed. Seriously, there is no fat in an Episode IV Imperial force...
  • Allowing the Rebel ships unlimited proton torpedo shots. They need them.
  • When the Falcon arrives, bring it on within range 3 of the Rebel ship closest to the exhaust port, so that it can begin supporting the Rebels immediately.
  • Reduce the defense dice of the exhaust port (2 perhaps). Getting an uncancelled critical hit is hard enough.

See you across the table,

M4cr0

Saturday 23 May 2015

Iron Snakes: Ancient Nestor Progress


Hi folks,

I have had a little bit of time to tinker with my Contemptor Dreadnought the past couple of days, focusing on the sarcophagus/torso and head assembly. As with the Iron Snakes special characters I have been working on, the added detail makes for difficult decisions when it comes to limiting the pallet.


One of the things I noticed when I was painting it was that the head blended in too well with the back of the head assembly, it was camouflaged by the lack of contrast in the metallics. To overcome this I repeated the glow effect from the waist grill behind the helmet. I liked the idea that the whole dreadnought could be energised to the point that a glow emanates from the interior. As I use this blue glow for the plasma cannon as well, I knew it wouldn't stretch the pallet too far.

My first instinct was to paint the scroll work in an off-white colour, like the purity seals, but it made the whole torso look too busy. Considering there are whopping great big purity seals right next to the sarcophagus, I decided to redo the scroll work in bronze and verdigris. 

The lamps and the plume where both painted in shades of grey to match the Sternguard that I have already painted.


I'll probably do the plasma cannon arm next; I am a bit nervous about how all of the spot colours are going to come together, so the sooner I banish that feeling the better it will be.

I am heading into a fairly harrowing time at work; assessment, marking and reporting 80% of my students with a three week turn-around. I'm hoping to get some neat stuff done to keep me sane during this time but I apologise in advance if the blog is a little bare for a while.

See you across the table,

M4cr0

Saturday 9 May 2015

Saturday Night Shenanigans


During the week I was away supervising a school camp. It was a great experience, but the 18 hour days have taken a toll; I am pretty wrecked. When I returned, I organised a little gaming session with the usual suspects: Jimmy, KuriboGoomba, Heinz, Wade and Del.

We started off with a three-way game of Pirates of the Spanish Main, followed by two missions of Imperial Assault. Wade recently blagged a whole heap of pirate ships on eBay for a steal, and kindly shared his doubles with me. He also got a whole heap of new captains, crew and unique treasure which we were keen to try out, including a treasure piece called The Black Plague...

My little fleet consisted of HMS Lord Algernon captained by Calico Cat; a ship that slow benefits from a captain that allows it to double its movement, and a 10 shot 2+ broadside is incomprehensible.


Meow.


I also took the Wycliffe, which is resistant to ramming and packs three mean cannons. The other guys had fleets with smaller ships, including some very maneuverable ones.

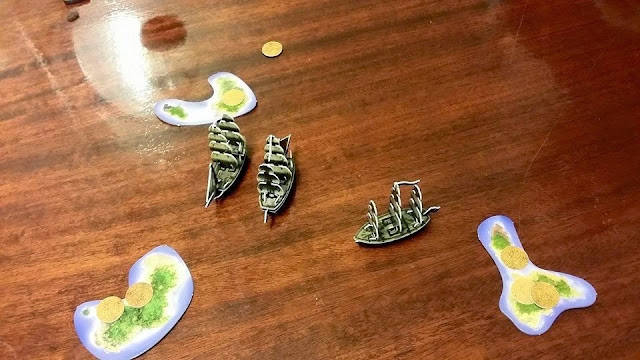
Early on in the game, we focused on pillaging the islands closest to home. I used the Wycliffe to transport gold back to my home island, whilst the Lord Algernon acted as the ultimate deterrent. Doing so, I quickly scored 10 pieces of gold out of the 50 on the board, needing just 15 more for victory.


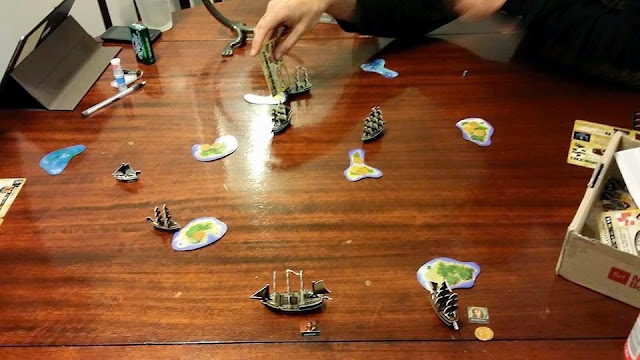
Yarrr, put yer back into it ye scurvy dogs.


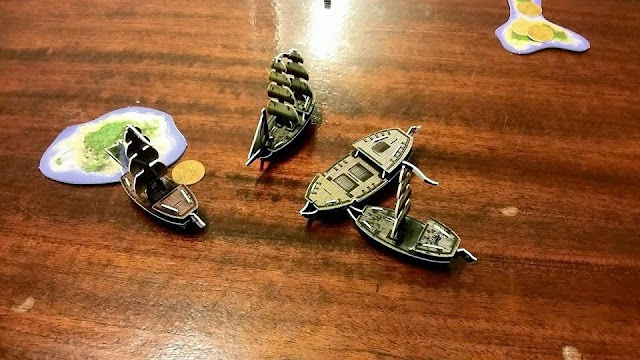
Sensing that they would need gold from each others islands to compete with me, KuroboGoomba and Wade quickly engaged each other. Wade maneuvered his ships spectacularly well and raked Goomba's raider with dual broadsides.


Dual broadsides: a captain's nightmare.


At the same time, Goomba managed to find the plague on one of the islands and immediately sought ways of spreading to everyone. Soon he had contrived for it to be on his fastest ship and he powered towards the Lord Algernon: blaaaaargh!


Goomba resorts to biological weapons. I resort to sailing away as fast as possible...

Having put myself into a comfortable lead through the threat of incredible force, the guys decided to team up against me with ships that were immune to my long range cannons (two Batavian Bats). This put me in an unwinnable position, which I had hoped to avoid. Even with the support fire of the Wycliffe and an effective Marksman, I couldn't prevent the Lord Algernon from being made derelict. Bloody pirates!


Proof that there is no honour amongst thieving pirates.


I did as much damage with my short range cannons as I could, but it wasn't enough.

After disabling my best ship and destroying the Wycliffe, Goomba and Wade took stock of what they had left and decided to call the game a draw. They were content that the biggest ship was sunk and everyone else was starting to arrive for Imperial Assault.

The group of guys I game with have been playing through the campaign in Imperial Assault on a fortnightly basis. We have an interesting situation whereby we have a few too many players but not everyone can make it to every session. As a result we swap in and out between missions, or play as allies instead of heroes on occasion. I have already missed the first two scenarios, so it took me a bit of time to settle in with my Bothan Agent. By the end of the session though I got into a good rhythm of finding the best firing positions, combining buffs and relocating to avoid assaults; maintaining that vital 4 square range.


In the first scenario we were joined by Chewbacca and a bunch of comatosed Wookies. Our mission was to prevent the Imperial troops from capturing the Wookies by protecting them and unbinding them if they have been previously restrained.


I sniped quite a few Stormtroopers and managed to wound their Commander, forcing him to seek cover. Goomba charged his rebel soldier in and tried to use his weapon's blast to take down multiple enemies, but he was very unlucky with his rolls. Jimmy, the GM, has a depressing knack of rolling the maximum result for any roll he needs, whilst we were knee-deep in ones. We had a lot of trouble finishing off enemies, which are quite capable of doing maximum damage regardless of the fact that they are on their last wound. We came very close to losing this one, but clawed back a great victory through careful tactics.

In the next scenario we needed to access three terminals around the playing board to obtain information about General What's-his-name (Weiss). I started the game by taking a sneaky/jammy firing position against an E-Web gunner and giving him hell.


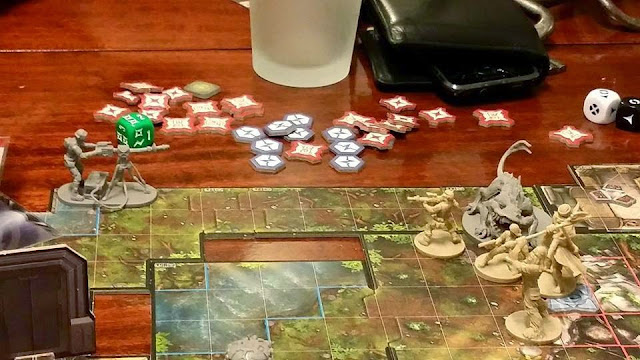
Our failure to finish things off was taking its toll. Time to upgrade our weapons; we need more dice!


Still, I couldn't knock off that last wound and was assaulted before I could finish him off. Thanks to some exploding probe droids and ridiculously good rolling by Jimmy, we were soon playing to not lose. The Imperials would win if all of the characters were wounded, which was looking quite achievable early in the game. We split up so that we could not concentrate his efforts or catch more than one of us with exploding probe droids.


On no less than 5 occasions, Jimmy rolled the equivalent of a 6 for defense. We equaled that with 1's.

Somehow in the midst of all that, Del's smuggler and Heinz's Jedi managed to activate two terminals, unleashing all manner of nastiness on the characters in the open. They were the last unwounded characters at the start of the second last turn and we threw everything into defending them. In the last turn, when it appeared that we would make it, I advocated for some really conservative play that turned out to be unnecessary. I think next time I will go at it a little harder and support players when they stretch themselves.


This can only end well...


All in all, a very fun homecoming. I'm looking forward to playing through some more scenarios and sleeping for more than 3 hours at a time ;-)

See you across the table,

M4cr0

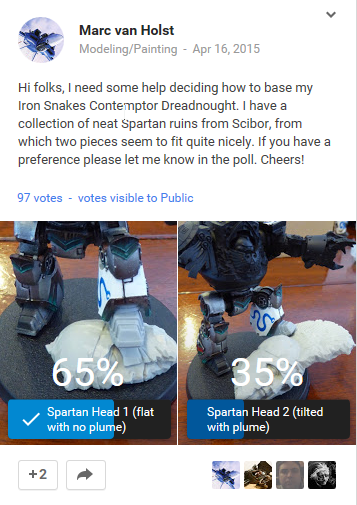
P.S. I did a mad 4 hour mission into Sydney to visit all the major gaming stores today. I managing to find a Y-wing and Millenium Falcon for my X-wing collection and a Carcossone expansion for my wifey. I also bought some Space Marine Centurions for my Iron Snakes...


Saturday 2 May 2015

Iron Snakes: Ancient Nestor Base Complete


Hi folks,

I have been working on a base for my Iron Snakes Contemptor dreadnought today, a job which has been on my mind for far too long now. A few weeks ago I posted two potential arrangements on Google+ and the internet spoke loud and clear. The less OT ruins were preferred by most people (65%), which I was quite happy with, though I do lament the fact that it doesn't have a helmet plume.


The next challenge was choosing how to paint the ruins. In particular, the foot planted squarely on top has some nice light/dark contrast that I don't want to draw attention from. It was suggested that I just do a very plain dirt base, but after playing around with that idea it was clear that it would not fit with the rest of my Iron Snakes/Dark Angels bases. After a bit more digging around I remembered this picture from my LOTR CCG collection:


I liked the pale colour with the tinges of green in places to suggest growth, the fallen leaves collecting in the recesses and the way the ferns break up the interface with the ground. So... how to do that...


Step 1: Black spray undercoat.


Step 2: 1:1 glaze of bleached bone and skull white, with a small amount of scorched brown to make it warmer.


Step 3: After drying, I repeated the glaze and blended in the edges with Administratum Grey. I also added a few dabs of 3:1 Administratum Grey/Warpstone Glow to the lower surfaces of the face.
 

Step 4:Ok, so this wasn't really one step, it was more like 7 steps. The places where I was going to put flock on the ruins I painted with a 1:1 mix of Scorched Brown/Administratum Grey and blended it in to the surrounding base colours. I then put a dab of PVA in the crevasses and recesses and dropped some winter grass flock on top, which I also put around the base close to the ruins. The rest of the base was covered in a 2:1 mix of winter/spring glass. In some places I added some lighter coloured static grass. Finally, I added two laser cut ferns to add some texture. 


In case you were wondering, these are my secret weapons; laser cut miniature plants from Noch. Best $20 I have spent on terrain ever.


Well, I hope you like it as much as I do. It was great fun tinkering away with it for the past couple of hours. Next update, I should have the torso completed on the dreadnought itself.

See you across the table,

M4cr0