Saturday 27 February 2016

Japanese Garden Themed Terrain: TO-DONE!


Hi folks,

Last night I added the final touches to my Japanese Garden themed terrain piece: a bunch of laser cut vegetation from Noch. Along the path leading up to, and away from, the bridge, I placed some small, compact red blooms.


Around the bridge I placed some reeds. I was going to embed the reeds in the water, but I had so much trouble with the test-run that I decided not to. Resin that was setting inside the reeds was forcing the leaves apart, taking away that characteristic reed shape of the plant.


On top of the water I glued some laser cut lilies, which I had also trimmed to fit the shape of the pond.


Leading up to the cherry tree I added a large yellow bloom, followed by the cherry tree itself. As with the laser cut ferns I have used previously, a small ball of green stuff was added to the base of each plant and used to aid keep each plant in place whilst the glue dried.


There is just one element missing form the diorama that I would like to include: some kind of a small shrine. I have no idea where to place it though, and it will take a while to order in the little piece that I need, so for now I am saying this project is finished. It will be heading over to Wade's place for use in 40K and Ronin games.


This terrain piece happens to be on my 2015/16 To-Do list, so it's time to whip out the big green stamp:


See you across the table,

M4cr0

Wednesday 17 February 2016

Iron Snakes: Master of the Forge Build Complete


Hi folks,

I don't know when I developed a love for Techmarines, I think it may have been when the Chaos Gate PC game came out in '98. Since then I have tinkered with quite a few models and even played a Dark Angels Techmarine in the Deathwatch RPG. So when it came to picking a character to lead my Iron Snakes detachment, it was a pretty easy decision. Constructing a Techmarine that looks like he belongs to the Iron Snakes Chapter, well... that was a little harder.

Here's what I started with:


Nine pins and one hour later I had a servo harness that I was confident wouldn't fall apart:


I tinkered with the arms a little bit to get the pose right and removed the crux terminatus from the right shoulder pad. The empty space that affords will be filled up with an Iron Snakes Chapter symbol. At this stage the parts are still detachable so that I can paint them properly.


I am going to paint this guy as soon as my Dark Angels projects are finished, which will give me some time to figure out how I am going to do that harness. I thought the regular Sternguard had a lot of components to consider but this guy is off the charts ;-)

Hobby Bingo stamp woohoo!


See you across the table,

M4cr0

Monday 15 February 2016

Hobby Bingo!


Hi folks,

A bingo score card popped up on my Google+ feed a couple of days ago and it gave me kick of inspiration. I have a lot of projects to work on at the moment, particularly for my 2015/16 To-Do list, but I am having a hell of a time finishing any of them. Returning to work is partially to blame, even though I love my job. For the most part, I am just lacking motivation. So, time for some bingo:


A lot of these categories interest me! For example, I would love to try and replicate the paint job of some of you guys! I think I'll keep that up my sleeve for the next round ;-) Instead I  have settled on a path that will see the most of my ongoing projects finished.

Make a diorama: I am up to the wet effects stage of my Japanese Garden themed terrain piece. Again. The product I am using takes 48 hours to harden, so this step will take about a week to complete. Assuming all goes well, I should be able to flock it all in one hit, then add some laser cut foliage.


Convert a mini: While I am waiting, I am going to have a krak at converting an Iron Snakes Master of the Forge; a character I have named Odyssean. The inspiration for the character is this quote from Plutarch's book "On Sparta":

"When asked whether it would be prudent to build a defensive wall enclosing the city, Lycurgus answered, 'A city is well-fortified which has a wall of men instead of brick.'"

Instead of fortifying terrain, he will unlock the option of siege mantles for a single Sternguard squad (which I prepared much earlier).


Buy a mini, paint it, including base, within 48 hours: My first thought was 'permission to impulse buy: granted'. I am working on some Van Diemen's World troops for Wade and I think they would look great being delivered into rapid fire range by a Taurox Prime. Well, except for those awful tracks! To add a bit of awesome sauce to the model I have ordered a wheel and suspension kit from Victoria Miniatures. I am aiming for this kind of look:


As soon as the conversion kit arrives I will buy a Taurox kit and start the timer :-)


Paint a mini as a gift: Oh man, I should have started this a few weeks earlier. Ah well. I am about half-way through painting some Ghost Bear Mechs for KuriboGoomba, so they will double as an offering to the bingo card. They are also on my 2015/16 To-Do list, so I guess that will be three birds with one stone.


...and finally:

Repaint a badly painted mini from Ebay: For this I will be speed painting some Biovores that I got in the Dark Ages. They will be a speed-paint job, as I really wasn't planning on painting these guys anytime soon at all. They are kinda cute though...


That's my plans for the short term; let's see how fast I can get them done!

See you across the table,

M4cr0

Monday 8 February 2016

X-wing: Converting Corran Horn's E-wing


Hi folks,

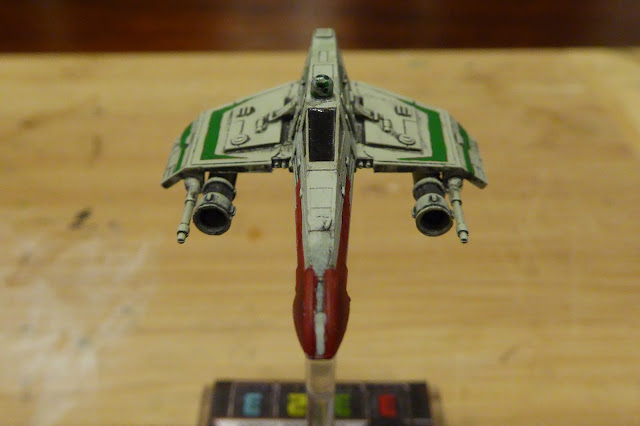
The E-wing is a ship that I have always been fascinated with. I think it was the first new starfighter to be introduced in the Star Wars EU back in the day; I can remember reading about Luke flying one and missing his old X-wing, despite the E-wing's superior maneuverability. When it was released in the X-wing miniatures game I was thrilled to finally get hold of one, except for one little detail...

...that cannon:


Until now, I have resisted the temptation to do any X-wing repaints. I have plenty of other painting projects to do and X-wing was supposed to be a break from that. In the case of the E-wing, I really couldn't stand that cannon on top of the canopy, so I decided to do something about it. Here is the process:

1) I shaved the cannon off the hull with a sharp hobby knife. Watch your fingers if you plan on doing this, it took quite a bit of pressure. The cut part curled, so I had to bend it back gently with the aid of some hot water.


2) I added a small ball of green stuff (two-part modelling putty from Games Workshop) then pressed the cannon under the the fuselage. The amount of putty I used was intentionally excessive, so that it would fill up any gaps caused by the uneven join between the cannon and the fuselage.


3) I trimmed the excess putty with a sharp modelling tool and added some superglue to make the addition permanent.


4) The next challenge was to add an astromech behind the canopy: Whistler! I could think of a few ways to do this, but I settled on trimming a Krak grenade from my 40K bitz box. As you can see the size is pretty close to the astromech on an X-wing and it saved me rolling tiny balls out of green stuff.


Here it is before I got out the paint brushes:


5) I spent a bit of time mixing some paint to match the colour used on the E-wing. A combination of Ushbati Bone, Warp Stone Glow and Administratum Grey got me pretty close. This was used to cover the red stripe on the side of the fuselage and to do some touch-ups. Warpstone Glow was used to change the colour of the wing details and Mephiston Red was used to paint the nose-cone. I have no idea what colour it is supposed to be, Corran Horn's card is cut off at that point so I just went with my gut!


That's it! The scale of these miniatures is so small, I really had my heart in my mouth during the whole process. Compared to some of the other repaints I have seen, this one retains a lot of the elements of the original figure. This is good for my fleet, as it doesn't stand out, but I can imagine other people will want to change the pallet a bit more extensively. All I can say is good luck and may the Force be with you ;-)

See you across the table,

M4cr0

Saturday 6 February 2016

Japanese Garden Themed Terrain Part 3


Hi folks,

A couple of weeks ago I had one of those days where every single thing that I did turned into a puddle of poop. One of those things was my Japanese Garden terrain piece. After taking even more care to do things by the book than I did during the test run, the resin I was using to provide the water effects didn't set properly and looked horrendous.  It reminded me of one of my Dad's favourite sayings, which was usually dispensed after I had broken some amazing Lego spaceship: "Well, if you did it once, you can do it again." 

After waiting for over a week I recovered the bridge (with a chisel!) and threw the rest in the bin. I have recently started rebuilding it, but it is a very long process. Tonight I managed to paint the little fish, which is a big milestone:


This time around I have built up the shores of the pond with modelling clay that has been sealed with PVA; I'll be putting the grit mixture over the top of this. It should make the pond deep enough to properly hold the water effect product I am going to use this time, Modellwasser from Noch. It cost six times as much as the two-part resin I had originally experimented with, but I can't trust that stuff anymore, it is too unreliable.


I also picked up some extra laser-cut plants for the piece; I figured that if I am going to re-do the whole thing, I may as well take the chance to improve the original concept.


It will be interesting to see if I can attach the reeds before pouring the water effects, so that they are embedded and more realistic. I'll have to do a test run before I potentially ruin the project for a second time! The water lilies will be put on last, when the water effects have completely set. I am particularly happy with scoring these, as I was dreading painting them on the surface by hand.

Tonight's job is to re-attach the bridge; wish me luck!

See you across the table,

M4cr0