Saturday, 28 February 2015

Iron Snakes: Squad Lakodeme Banner Complete


Hi folks,

Yesterday I spent a couple of hours painting the squad banner for Squad Lakodeme freehand. Overall, I am pretty happy with the result, though it was a bit of a nightmare at the time.Yesterday was the last day of summer here in Australia and it was a stinker in Sydney. Very humid conditions and high temperature with lots of bugs flying around. While I was painting the white stripe on the banner, the biggest fly I have ever seen landed on the end of my brush and then flew straight into my face!


The banner has the Greek symbol Lambda on it, which stands for Lakodeme. It ties in nicely with the round shields I have been using to kit-bash my Storm Eagle and Contemptor Dreadnought. They also have Lambda on them, which stands for Lacedaemon (Sparta). I'm sure you can see the relationship there...

The banner itself is quite spartan in design (!), so that it doesn't draw attention from the shields I spent a lot more time painting.


The marines are starting to come together quite nicely now. Once the Apothecary is complete I'll do some last minute touch ups and take some high resolution close-up shots; these are just a teaser. Sooo close now....

See you across the table,

M4cr0

Sunday, 22 February 2015

Iron Snakes: Squad Lakodeme Progress


Hi folks,

I have been working on my Iron Snakes Sternguard with siege mantles over the past couple of nights, focusing on the combi-plasmas, plasma guns and shields. After photographing the parts, I think I will do another round of highlights on some of the weapon details; they just aren't sharp enough for me yet. I have tried to mute the OSL on the plasma coils, mainly to justify not painting any on the shield embrasures. The shields look better clean and white, I don't want any extra blue in there to confuse things.


MOAR plasma.

I have created something of a rod for my own back, by deciding to add an apothecary and squad standard bearer to the unit. Having an apothecary fits nicely with the reference literature I have on the Chapter, as does the squad standard bearer, but it will add another two nights to the project. Anything that adds time to the project at this stage makes my eye twitch ;-) Still, the apothecary should save a few marines from overheating plasma weapons!


I hope he has lots of burn salve...


Wifey bought me some really neat ancient ruins that fit the style of the miniatures well (thanks Wifey!). When I finish the squad off I'll see if I can do some interesting digitally altered shots with them.


Veteran Sergeant Thanatos and a fellow marine defending the temple of Cetus.


I have decided to name them Squad Lakodeme, from Dan Abnett's Brothers of the Snake. Lakodeme is not one of the "Notable" squads and is only mentioned in passing:

"Mikos of Lakodeme, victor of Penses and Tribulation Rex, nursed a terrible stomach wound."

This is good for me, as it provides a lot of room for artistic and conceptual licence. I have been brewing some background material for them from the perspective of a belligerent Inquisitor being held captive by the Dark Angels... more about that when I have finished painting!

See you across the table,

M4cr0

Wednesday, 11 February 2015

Battletech: Tuesday Shenanigans


Hi folks,

In two weeks time I will be wrapping up the Luthien campaign, along with my mate Wade, with one final apocalyptic showdown. This game was originally scheduled for the start of January but I was sick and missed the whole gaming day, much to my eternal shame. To get back into the swing of things, because we haven't played for a couple of months, we had a warm up slug-fest on Tuesday night.

For those of you who haven't played Battletech before, it is a game where you control one or more 20-100 ton Battlemechs in a game of armoured combat. You maneuver your forces by spending movement points (walking, running or, sometimes, jumping). Weapons have different special rules, maximum ranges and range increments, each causing a specific amount of damage and generating heat. Damage is dealt to random locations (usually) and recorded, along with heat, on a record sheet specific for your Mech.


My Highlander IIC taking a pounding to the left torso.


Once you have stripped the armour off your enemy, you can start hitting critical locations of the internal structure, including weapons, articulating joints, engine, gyroscope and ammunition stores. The temptation is to go all-out with your weapons ("an alpha strike"), but heat management is vital. I have shot many Mechs to pieces after they shut down due to over-zealous shooting phases.

We both took some heavy hitters for this game; I had a Timberwolf Primary (75 tons), which is a long range laser and missile platform, and a Highlander IIC (90 tons), which can snipe with its Gauss rifle/missiles at long range but also has a close range brawler's load out.


Highlander IIC and Timberwolf Primary


Wade took a Warhawk Primary (85 tons), which is a long range particle cannon spam can, and a Warhammer IIC (80 tons), which adds another two particle cannons to the mix, but also excels as a close range brawler. Particle projector cannons (PPCs) are the most powerful energy weapons in the tech level Wade and I usually play, but also produce the most heat when fired. Wade had 6 of the damn things.


Clockwise from left: Warhammer IIC, Warhawk Primary, Highlander IIC and Timberwolf Primary


Early on in the game I tried to use the depth of the canyon to hide from the Warhawk whilst focusing fire on the Warhammer IIC. I was able to do a lot of damage this way, but lost a few crucial initiative rolls. This allowed Wade to see my movements before he moved his last Mech. The Warhawk was maneuvered perfectly and combined fire with the Warhammer IIC to destroy my Timberwolf's right torso, stripping it of half its weapons. I was forced to present a target (my Highlander IIC) to the Warhawk, whilst backing my Timberwolf away to remove it from pulse laser range. After disabling some of the Warhammer IIC's weapons from long range, I charged in again with the half-a-Timberwolf and finished it off by hitting an ammunition magazine. The resulting explosion caused enough damage to remove it from the game. Exposed, the Highlander IIC took a pounding to one torso. Wade seems to randomly drill locations over and over again in a very non-random seeming way! With the Warhammer IIC out of the equation I turned both of my Mechs towards the essentially pristine Warhawk. Taking it down without losing one or both of my Mechs was going to take a lot of luck.


2 vs 1. Well... actually...  it was more like 0.9 vs 1 by this stage. Both of
my Mechs were being held together by happy thoughts alone.


I hid my Timberwolf for a turn, as I felt that it only had one turn of punishment left in it and I wanted to make it count. I predicted that the Warhawk had three turns of fight in it, unless some fluky shot tipped the balance. The Timberwolf bolted out of cover and nailed the Warhawk with some shots, managing a lucky gyro hit (two of those will drop a Mech). The Highlander IIC dealt a hideous amount of damage up close, causing two engine hits (three of those will drop a Mech). Intending to finish the game there and then, Wade unleashed the Warhawk's entire arsenal on both Mechs, splitting his fire. The Highlander was hit by two PPCs  but survived. One of the shots on the Timberwolf missed, so it also barely survived. The heat produced, however, caused the Warhawk to shutdown and its ammunition to cook off. The neural feedback to the pilot knocked him unconscious, which, combined with the lucky gyro hit, caused the heavy Mech to fall over. Prone, unconscious and shut down: excellent.


There can be only 1! Well... actually... it was more like 0.45 by this stage.


The next turn, I moved the Highander IIC into position and unleashed hell. The Warhawk never got back up.

The final result did not reflect how close the game was; my Mechs were both severely damaged by the end and just one hit away from the grave. It was very cathartic to get a game in after such a dry spell and the disappointment of prior missed opportunities.

If our gaming history has proven anything, Wade will be swinging the victory bat next game, which will make for a challenging end to our Luthien campaign.

See you across the table,

M4cr0

Thursday, 5 February 2015

Iron Snakes: Storm Eagle Progress


Hi folks,

As soon as I received my Storm Eagle from the guys at Christmas, I began referring to it as the "Trojan Horse". For those unfamiliar with Homer's works, the Trojan Horse was a large wooden horse the Greeks used to deliver soldiers into Troy by subterfuge, thereby ending a ten year siege.

There have been many depictions of the Trojan Horse in classical and modern art, ranging from the decidedly gummy to the downright sinister:


A grim/dark Trojan Horse from the movie "Troy".


For my Storm Eagle I went with a more classical look, which has more of the appearance of a chess piece in my opinion. I used the artwork below as a reference to make a simple paper stencil, which I could use to transfer the basic shape onto the fuselage of the model. I don't usually make stencils for this sort of the thing, but I was finding the Storm Eagle very hard to hold steady whilst simultaneously getting the dimensions right.


The first step was to tape the stencil to the fuselage as securely as possible, which was difficult due to all of the irregular surfaces. I used green tape which doesn't damage the paint job when you remove it; it does not adhere very strongly.


Next, I pressed the stencil down with the fingers on my left hand whilst I painted over it with my right. I used a large flat brush and fairly dry paint (Enchanted Blue), as I didn't want it to "bleed" under the stencil.


Having removed the stencil, you can see how rough the shape was, but at least the dimensions were correct. The next job was to add a second coat of blue to improve the coverage, add some detail and use white to sharpen up any weak lines.


I extended the neck of the horse down towards the landing gear housing, added another section to the head plume/mane as well as a line between the plumes. This last bit of detail was to make it look less like a living horse and more like a construct. I also added an eye, to make it consistent with the other freehand work I have been doing on the shields (though this makes it look more like a living horse again). I showed it to my muse, who is an avid horse rider, and got her nod of approval. That's good enough for me!


Here is a final look at the Storm Eagle as a whole. I need to repeat the symbol on the other side, but after this test I am fairly confident I can pull it off. Nothing else is anywhere near as difficult as this symbol on the fuselage, so I am feeling very positive about the project now. It's only a matter of time before I'm dropping plasma behind enemy lines...


See you across the table,

M4cr0

Sunday, 1 February 2015

Iron Snakes: Verdigris


Hi folks,

I haven't had much time to myself over the past couple of weeks, so my glacial rate of painting is even slower than usual. Work is back with a vengeance; at the moment I am teaching nuclear chemistry to my seniors and it requires a lot of preparation. Likewise, my social calender is bursting like an over-ripe watermelon. Yesterday I went to a Greek Orthodox Christening which was far more elaborate than my wedding was 10 years ago.

Nevertheless, I have managed to finish the plain siege mantles for my Sternguard (they will be getting a name change soon...). Quite a few people have commented on the corrosion effect I have used, so I thought I would show the technique step by step, in case people want to try it out. Over the past 20 years there has been a big move towards the realistic depiction of weathering and corrosion in the 40K hobby. These days, some miniatures are weathered so much you wonder how they are still functional ;-) The shields start very dark, so bear with me for a while; I have lightened them up as much as I can!


The real thing: verdigris on ancient Greek helmets

To begin with, verdigris is a form of patina you can find on copper, or the alloys of copper (such as bronze or brass). Patina itself is a word used to describe any layer that forms on a surface due to exposure to reactive substances in the environment (be they atmospheric or geological), whether it be rock, metal, wood or anything else you can imagine. Verdigris, when it forms near the sea, is usually a layer of copper(II) chloride.


Copper(II) chloride

My Iron Snake veterans have a very good reason to spend lots of time at sea (more on that later...), so it is feasible that they would have some verdigris forming on the bronze portions of their armour (let's assume the bronze is purely decorative, I don't see it stopping a bolt gun round).

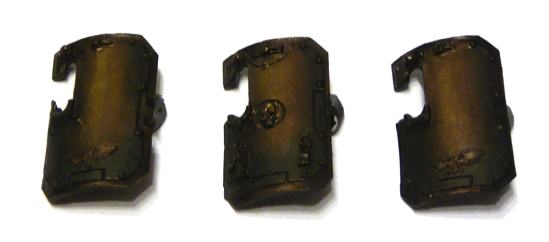
Before the following pictures were taken, I prepared by siege mantles by undercoating them using Chaos Black spray, followed by a layer of Warplock Bronze. A black wash was gradually added to the left and right edges until the very edge was completely black, with a gradient towards the middle (it gets lighter and lighter). I then dry brushed Warplock Bronze back into this gradient to blur the interface. I mixed some Auric Armour Gold and Warplock Bronze in a 1:1 ratio and drybrushed it on the centre-line of the shield. Again, I drybrushed Warplock Bronze into the gold mix to blur the interface. All of this basically accentuates the curvature of the shield. Next step:


3:1 Mournfang Brown/Kabalite Green
 
I dull down the bottom quarter of the shield with a 3:1 Mournfang Brown/Kabalite Green mix. Later on in the process I drybrush Warplock Bronze back into this to blur the interface, using circular brush strokes.


1:1 Mournfang Brown/Kabalite Green

I add 1:1 Mournfang Brown/Kabalite Green to about 2/3 of what I just dulled down. To neaten it up, I wet blend the original mix back in.


1:3 Mournfang Brown/Kabalite Green

I add 1:3 Mournfang Brown/Kabalite Green to about 1/2 of what I originally dulled down.


Straight Kabalite Green

I drybrush straight Kabalite green over the top, blending in some of the previous mix to neaten it up. You can see the middle shield got a little more than the others, but this kind of inconsistency isn't much of a problem; it could just be an older shield ;-)


1:3 White Scar/Kabalite Green


I drybrush a 1:3 White Scar/Kabalite Green to provide a rough highlight. I knock this highlight back with a Kabalite Green glaze. You can see that I tilted the shields a bit further in this photo and caught the reflection off that Auric Gold on the centre-line.


3:1 White Scar/Kabalite Green

I pick out the extreme edge of the detail by hard-lining with a 3:1 White Scar/Kabalite Green mix. These shields had a couple more hours of detail left before they were finished, but the verdigris at this stage is complete. So there you have it!

Good luck with your own weathering projects; I look forward to seeing them.

See you across the table,

M4cr0