Sunday 26 January 2020

Irons Snakes: Storm Eagle Progress 3


Hi folks,

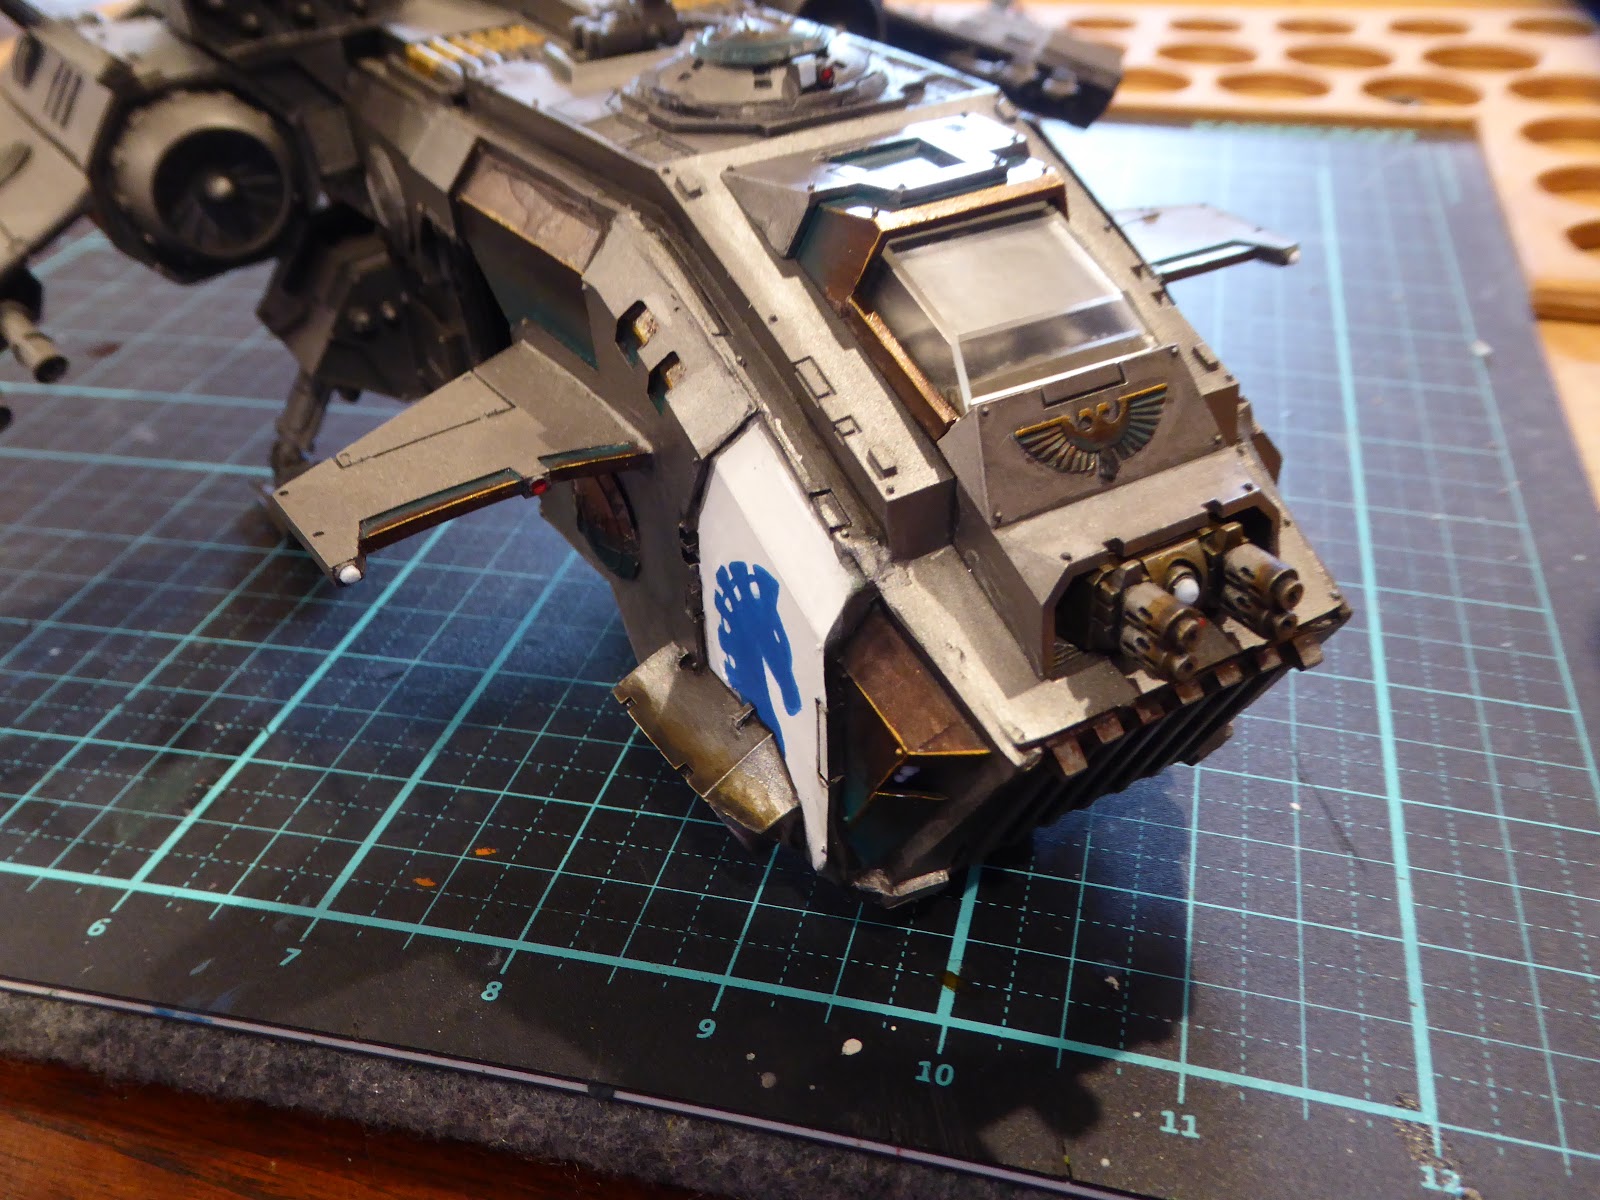
I bought these Iron Snakes themed Rhino doors from Chapterhouse Studios over 7 years ago, back when they were still operating. Thankfully, I never got around to making the Rhino I was going to do, as they fit the side doors of the Storm Eagle perfectly. That's a big win for procrastination.

Today I sat down to paint them and took some shots to illustrate the process. What I really wanted to show was how bad something can look before it ends up looking good! I am very happy with the finished product, but there are stages during the process where it really doesn't look like everything is going to be ok. This is a fact I would have loved to have learned back when I started painting miniatures 25 years ago. Many of the painting mistakes I made back then were due to the use of fearfully employed and rushed fix-up techniques.


1) Undercoat and Main Block Colour


I started with a white spray undercoat because painting clean white with a brush is hard. If you build up to white from a darker undercoat you can end up overworking it; the finish is rough. Spraying it using a rattlecan or airbrush is best, but then you have to be willing to work with white as the undercoat for things like metallics (black is much better for these) and you have to preserve that white surface during all of the other painting steps. As I went through these steps I put a lot of care into not getting anything on the white, leaving a final clean up of that part until the end (after all other mistakes have been made!). I then added some leadbelchers around the symbol, which went on like hot rubbish.


2) Bronze and Red


I have been using bronze and red as accents on my other Iron Snakes miniatures. The bronze is a little more complicated, as I also need to weather it using turquoise, but I don't do that in this step. I did the one on the left first, before I was really awake, so my brush control was off. Back in the day, I would have tried to fix this up immediately, but I just let it dry now and tidy it up later. When it is dry, you can paint over the top with a thin correcting coat. If you do it wet you may end up blending it in, requiring more coats to fix. By resisting the urge to fix something straight way, you end up fixing it more efficiently, giving a better finish.


3) Quick Blue Coat


Using a Size 2 flat brush, I added the first coat of blue to the snake motif. This is just a quick, time saving coat. Back in the day, I would have painted the whole thing in a 10/0 or 20/0 (fine detail) brush, but you only really need a small brush for the space between the snake and the white of the shield (protect that white!). One of the major changes to my painting technique has been using the biggest brush possible for each job. It speeds things up, you end up with less brush strokes and bigger brushes have a bigger paint well, allowing you to paint longer without reloading the brush.


4) More Blue


Using a smaller brush (Size 0), I painted the rest of the snake in blue. My brush control was ok, with only two major mistakes; the first top loop I flicked a small stripe of blue on the white, the second loop on the second door actually flicked up into my brush when I applied pressure to the wrong spot whilst holding it. That put a thick blue splodge on the white. This was something that I know is better to start fixing immediately, but not by adding paint. I immediately took a clean Size 1 brush, loaded it with water and diluted the blue splodge until it had the consistency of a wash. I then dried the brush quickly and soaked off the blue "wash" with the dry bristles. This works really well sometimes, as long as you are not going to wash the colour somewhere you don't want it to go. You have to think quick, have the equipment at hand, move calmly and get the job done. You can see the rim of the splodge, where it had already started to dry (it was over 35 degree C today). That faint ring would be easy to paint over without over working the white, whereas the original mistake would probably have required a small coat or two of grey over the top, before being covered by white.


5) Nuln Oil Wash


I have heard Nuln Oil being described as "liquid skill". You use it to make up for a lack of skill... apparently. Well, I have been using washes since forever and I (for one) am very happy that I don't have to mix them myself all that much anymore. As you can see, just adding a wash doesn't make things look good. I have done a heavy wash here, paying careful attention to the rim of the shield, around the spear heads and the red cords, as this is where I want definition. I also added it as a glaze to the bottom of each blue snake loop, to add depth. You can see though that the wash has fanned out over the leadbelchers further than it should have. Again, trying to touch this up now would make a mess, the washes and paint don't mix very well when wet, it is better to let the wash dry completely then dry-stipple leadbelchers back into it.


6) Dry Stippling Leadbelchers


Stippling is generally a drawing technique where dots are used to add areas of light and shadow to a picture; the closer the dots are the deeper the shadow. To stipple with a paintbrush, you load it evenly with paint and then, holding the brush perpendicular to the surface, tap the bristles against the surface. The more taps you do the more intense the colour, either light or dark depending on what you have loaded in the brush. The wetter the paint, the less taps you have to do to get the same intensity, though you run the risk of just... splodging. I often use "dry-stippling" when weathering a model, where I remove most of the paint from the bristles as if I was going to dry-brush, but then use a stippling technique to apply it. I used this here to tidy up the previous wash without being too harsh.


7) Verdigris


Starting with a 1:1 light brown/turquoise mix, I pant over the bronze, starting from about halfway up the shield rim. The final colour I use is neat turquoise, followed by a 2:1 turquoise/white mix edge highlight. The edge highlight is where I really pause for a moment, get my breathing steady, give my eyes time to focus on the edge, tilt the piece on the correct angle and exercise my best brush control. This is the first time in the task this morning where I have slowed right down, as getting this right makes all the difference.


8) Weathering and Gold Highlights


A while ago I saw a beautifully weathered Landraider with weathering and dirt all over the top of the assault ramp. At first I was confused, then really excited by the common sense of it. It has stuck with me. It is the top of the door that hits the ground, so I weathered the top of these doors with black, then gradually dry-stippled lighter and lighter black/leadbelchers mixers over the top to blend it in a rough way. I want it to look more like weathering, not perfectly blended shading. With the top of the door getting darker, it raises the opportunity to do some highlights that will really "pop" (I hate that word in the context of painting). Again, I slowed myself right down and edge highlighted the lances and top of the shield rim with gold. I also added highlight to the snake loops with a lighter shade of blue using dry-brushing.


9) Final Touch-Up


If you go back and take a look at each previous photo, you will see that the blue splodge ring has slowly been disappearing. Between each step I added a thinned coat of white over it, gradually blotting it out without overworking the surface. It took patience and time; but get white right and people notice. Now I used some slightly thicker white paint to clean up around the edge of the rim and around the snake. I also added a lighter red highlight to the top half of each red cord and the buttons.

I then dry fitted the doors and took a close look with the rest of the model, to check that the colours and composition I have achieved fit with the overall scheme of the project. At times, this has lead me to strip and re-paint pieces, though not without much soul-searching. If you get to this stage, the paint job is good but it just doesn't seem to fit, I strongly suggest leaving it overnight. If you keep looking at it and asking questions you are better off making a change.


Next step will be the base, which is going to take a lot of structural work. Hopefully, I can also do it justice in terms of... landscaping.

See you across the table,

Marc


Saturday 18 January 2020

Iron Snakes: Storm Eagle Progress 2


Hi folks,

Over the past couple of nights I have been adding some detail to the rear half of my Storm Eagle. To start with I spent some time mixing an interesting blue for the rocket pods. The first mix of Teclis Blue and Kabalite Green was a little too light for my tastes, so I set it aside for the highlights. I used the same 1:1 ratio, this time using Caledor Sky and Kabalite Green, to achieve the colour I wanted. I then weathered it with some Sepia wash and Nuln Oil to give the appearance that the rockets had left some carbon scoring. I used the same technique to carbon score the wingtips, where the thrusters are, as well as sepia for the engine nacelles (though with these I had to drybrush leadbelchers back into it to brighten the edges up a bit).


The engine exhaust got the same treatement, with some added Sepia to the internal workings. For engine parts I like to add a varnish as well, to give it a glossy, metallic appearance. This helps to differentiate between structural parts and weathering.


Here's a good look at the wing detail, including the weathered thrusters and the verdigris on the wing-root.


One of the greatest challenges in painting something this big, in resin, is getting your paint brush where it needs to go. The model is heavy and has plenty of small detail floating around the place. I am finding myself contorting into all kinds of weird shapes trying to get the job done. If I was building one from scratch I would definitely split the job into five sub-assemblies: cockpit/pilot, fuselage, engine wings and rocket pods. You could then bring them all together at the end all done.

As it is, I find myself hovering over the model and touching it with my little finger to stabilise my painting hand, even pressing my other hand into my palm to lighten the touch of the brush on small details.


The final part I have to paint is the area I have been using to grip the model when I lift it, around the side doors. I will leave the doors until the last moment, as these are still separate and I still need that space to put my hand! My son took this photo to show you what I mean, he said it looks like I am playing with the model like a toy aeroplane.


Next step: final fuselage detail and doors! I also need to find a flying base to put it on...


See you across the table,

Marc


Tuesday 14 January 2020

Age of Sigmar: Sisters of the Thorn Progress


Hi folks,

The short story is: I have primed Penny's Sisters of the Thorn in Vallejo surface primer successfully. Using the airbrush to do this was challenging.

The long story goes something like this...

I have four projects on the boil at the moment: an Iron Snakes Storm Eagle, a lance of Draconis Combine 'Mechs, a Gundam with Oscar and Penny's Sisters of the Thorn. I am focusing on Penny's figures the most, as they are long overdue, so I have been trying to push that project forward everyday, at least a little bit. Last night I took Oscar to his fist Kung Fu lesson, at the club I trained with back when I was his age. We got home pretty late, and with just minutes of daylight left, I decided to undercoat Penny's models with my airbrush. It would be a bit of a test to see how quickly I could set it up.

To speed things up, I attached the figures to my priming stick, which (giggle) made it look a lot like 6 witches sharing a broomstick.


I then went through my procedure of testing the airbrush and noticed that the trigger was very loose in its action. I could push down for air but when I pulled for paint (or in this case water), it just flopped back. A close inspection (aim away from face, people) showed that when I was pulling for water the needle was not sliding back to allow the fluid to flow. Damn.

[The last rays of sunlight disappeared behind the wooded ridge and a lone dingo howled]


Five minutes later and I have stripped half the airbrush, with literally no idea. My usual advice to starters, handed down to me from Sgt Waz, is "don't pull your airbrush apart unless you absolutely have to". In our experience, they almost never go back together problem free. If you are thinking of doing this, take a photo with your phone as you remove each part, so that you can reassemble it step-by-step.


The piece that controls moving the needle back/tension on the trigger is in the bottom left-hand corner. It had fallen completely flat inside the airbrush, ostensibly due to me storing the airbrush lying down, though I am guessing this is how they are packed in the box to begin with.

Here is a close look at the piece, which needs to be:

1) dropped through the trigger slot at the top of the brush, in the correct orientation, loose, without it falling over (again).

2) threaded through with the needle without changing the orientation or damaging the needle tip.


Here it is, back in its rightful place, as well as the re-assembled and fully operational battle station air brush.


Well... that was more exciting than I ever expected. I stumbled back into the house, covered in mosquito bites, about 45 minutes later. The priming itself took less than 5 minutes, once everything was working! With that done, I am ready to start blocking in the base colours, though I will probably have a craic at the banner first. It is going to be hard.

See you across the table,

Marc


Sunday 12 January 2020

Iron Snakes: Storm Eagle Progress 1


Hi folks,

This Storm Eagle gunship has been in my "too hard" basket for a couple of years now. In fact, if you have seen my posts showing my hobby table, you will have seen it in the top left hand corner quite a few times already! It is a real fixer-upper. Sgt Waz gave it to me, from possible dubious origins, quite a while back, when I was getting my butt handed to me by flyers every single game. It has been in the too-hard basket because many of the pieces are warped/damaged, there were a heap of really big gaps in the construction, one large piece was missing and the clear cockpit glass was badly frosted.

Filling the gaps and sanding with green stuff took a couple of weeks to do, a couple of years ago. After that I undercoated it in Leadbelchers then set it aside for a rainy day. So... it rained yesterday! I figured I had better mark the occasion with another jolt of progress, giving the front end a lick of paint and some TLC. I painted the minimum of detail in the cockpit, as you couldn't see much through the frosted glass.


I got most of the cockpit assembly bent back into a reasonable shape; as long as you don't look to closely is looks airworthy, kind of. I also improved the frosting with some coats of matt varnish (for those with a knowledge of physics/forensics, I was "trying to make the coin disappear"). It gave me some clarity back, enough for me to reconsider just painting the whole thing. I am not sure what colour and effect I would go for if I was to actually just paint the whole thing. From a tabletop perspective, it is fine and probably not worth the effort.


From the top view you can see the exposed magazine of rockets that I constructed, to replace the triangular hull piece that was missing. Having exposed rockets like that is pretty gangster, I think.


So far so good. The rear end of the ship is where things are going to get tricky. The Iron Snakes paint-scheme is a fine balance between using lots of colours and still making it look like a unified scheme. I feel that I need to add some colour splashes to the fuselage, much like I added a stormy blue to the hurricane bolters on my Centurions, and deep red accents to the armour in places. It is going to go somewhere, but where? Those are the kinds of decisions I would usually sit on and ponder for months. I am not giving myself anywhere near that amount of time though; I wan't this thing finished before Squaduary next month.

See you across the table,

Marc


Sunday 5 January 2020

Age of Sigmar: Wild Riders TO-DONE!!!


Hi folks,

This morning I finished adding the final highlights to the cloaks on some Wild Riders for Penny. The miniatures themselves are stunning sculpts, so I have been a bit stressed about doing them justice. For that reason, it has taken me longer to finish them than I could have ever possibly envisioned. They were worth the effort though, my daughter loves them!


The miniatures have very fine detail, which was difficult to remove from the sprue without breaking and a real challenge to paint. The figures are also (necessarily) mono-pose, which I found very frustrating to construct. If you don't have the right cloak on the right back, you are toast! Just another clear reminder of how important dry-fitting is during the construction phase of a project.


With these three finished, I have six Sisters of the Thorn left to complete, which are still at the (thrice- damned) construction phase. I'm hoping to get the glue out again tonight to put together some sub- assemblies for them, which I never thought I would have to do with something so small.


Overall, I am very happy with how they turned out. I think this is the most effort I have put into painting something well, even if the execution may not entirely represent that; they really did push me to the limits of skill and patience!


See you across the table,

Marc


Thursday 2 January 2020

The Unforgiven: Beyond Duty and Honour


Hi folks,

I have been a fan of the Dark Angels for a long time now, but I have only recently figured out what it is that I actually like about their mythos. This has been on my mind for a while, primarily because Games Workshop has been doubling down on the shadier aspects of their character. I have to admit; I have had concerns that GW was writing the Dark Angels out of my ability to care for them at all.

Still, there is something. A little glimmer that threads its way down through the ages, through every Dark Angels story that I have read. That is what I would like to explore in this post. A few important caveats: I haven't read every Dark Angels story (I am missing about 20 Horus Heresy books... they just keep getting printed...).  If you have read something that you think would expand my horizons, so to speak, let me know in the comments. Also, if you haven't read much but plan to, this post will contain spoilers.

So... let's start at the beginning...

Deathwing


The first Dark Angels story I ever read was Deathwing, by Bryan Ansell and William King. Most of you will know the story, as it is repeated in summary in every Dark Angels Codex. Without having a codex in front of me to repeat it ad verbatim, the armour of the 1st Company used to be black, until a single squad saved its homeworld from a genestealer infestation. The armour was repainted white in honour of their sacrifice. What this doesn't say is that the Terminators in question actually repainted their own armour, with ash, as they accepted that they were stepping out beyond the mandate of the Dark Angels, marching to their deaths to avenge their slain and subjugated tribe members.


This isn't why I love Dark Angels, but we are getting close. The crux of the issue lies in the war council that they hold the night before.

One-by-one the Terminators tell stories around the campfire, making arguments for and against assaulting the genestealers personally. The general consensus is that their duty is to nuke the site from orbit; exterminatus. This is what they are expected to do as Dark Angels of the Imperium. Some want to charge in anyway, as they feel honour-bound to personally avenge the death of their tribe. This would be treason, leaving behind a hidden threat to the Imperium should they fail and be annihilated. Satisfying either their duty or their honour, at the expense of the other, seems to be the wrong choice. The thing that I love is that they choose something else. They choose what is right at a deeper level, beyond both duty and honour. They change the colour of their armour to acknowledge their decision and the entire Chapter eventually follows suit (no pun intended... probably).


There is a prologue at the start of the story that immediately puts its literal veracity into question, i.e. "who can truly know the truth of such matters?". Later codexes have also suggested that it is just allegory, a way of teaching neophytes the central themes that relate to the Fallen. If so, the underlying lesson is this: when it comes to the crunch, there will be a Dark Angel (or Fallen...) willing to make the right decision. It may not be loyal, or honourable, from various points of view. But it will be the right decision.


Lion El-Jonson on Caliban


When Lion El-Jonson is found in the forest of Caliban, the knights of The Order immediately try to kill him. It is their duty to do so. Luther, however, stays their hand, taking a huge risk to do what is right. Knowing that he will become the leader of the Fallen, it does paint them in a different light (at least some of them...).


The Betrayal


When Lion El-Jonson fights Luther in their final battle, he has the opportunity to kill him. In other battles that recount the Lion in combat during the Horus Heresy, he is not portrayed as one to hesitate. In particular, he runs Conrad Curze through pretty callously. With Luther, though, he hesitates. It is his duty to slay this heretic, he is honour-bound to expunge this stain on the Legion, but he can't do it. Think what you like about how cold-hearted and seemingly treacherous the Dark Angels can act, this is their Primarch showing that he is unwilling to strike down his friend, despite suffering the deepest betrayal at his behest. Luther then knocks Lion down, goes for the killing blow and... can't do it either. They both make the right decision, beyond all notions of duty and honour.


The Arrival of Guilleman


When Guilliman gate-crashed a meeting of the Unforgiven, the assembled commanders argued that the Ultramarines fleet should be fired upon, believing either that having a living Primarch around was a bad idea, or that the betrayal of the Fallen had been discovered and they were about to be punished. Destroying the fleet entirely would be treacherous, but maintain the honour of the Unforgiven by keeping their secret safe. Azrael had the opportunity to launch a pre-emptive attack, but chose not to. Like the terminators in Deathwing, he accepts that this course of action will lead to death, but makes the right choice anyway. Thankfully, Guilliman just dumped a load of Primaris on them!


The War of Secrets


More recently I looked for this ongoing theme of choosing right, beyond notions of duty and honour, when I read The War of Secrets by Phil Kelly. The Dark Angels were generally portrayed as being complete jerks, treating their Primaris as cannon fodder unworthy of even remembering their conquests. I hated that aspect of the story, as there was literally nothing to like about the classic marines. It is the Primaris themselves that take an incredible course of action that continues the tradition. Arguably, their duty would be to grin and bear the terrible treatment metered out to them. In terms of honour, they probably should just blow a hole in the whole thing, reporting the actions of the Dark Angels to the Inquisition. Instead, they each pierce one of their own hearts to render themselves immune to being mind-wiped, thus retaining their knowledge of the secrets they are unraveling. For me, it was the best possible thing GW could have done to sell me Primaris models. There was my Dark Angel-shaped diamond in the rough, as the Primaris marines reflect the same spirit of Deathwing revealed in the first story I ever read, so many years ago. Some Dark Angels fiction in a recent White Dwarf cemented it for me, with the first Primaris being inducted into Deathwing, again suggesting that they are worthy of playing a role in the Unforgiven, and that the leadership of the Dark Angels can make the right decision when it comes down to it.


This has, by no means, been an exhaustive argument in defense of the Dark Angels; I can think of plenty of times when they have shown themselves to be really crooked. But I hope it has provided an alternative narrative to the usual "ends justify the means" malarkey. I also will not enter into the imperial loyalty debate ("who are the true Dark Angels?"), as I feel it is most interesting when left ambiguous. Instead, I hope that I have shown that both the Dark Angels and perhaps the Fallen have elements that are loyal in a different way. Not loyal to the Emperor, perhaps, or their brothers, or their Legion, or Chapter, or Allies, but loyal to some deeper sense of what is right. A more meaningful code that transcends any notion of pax imperialis (which only pretends to be good sometimes, anyway). We are talking about a unique, Dark Angels specific, brand of chivalry.


Noun: Chivalry

- the combination of qualities expected of an ideal knight, namely courage, honour, courtesy, justice, and a readiness to help the weak.


As long as this special brand of chivalry keeps threading its way through the Dark Angels' narrative, I'll keep painting my marines green...

And white...

And black...

With some red and blue sometimes...


See you across the table,

Marc