Tuesday, 11 February 2020
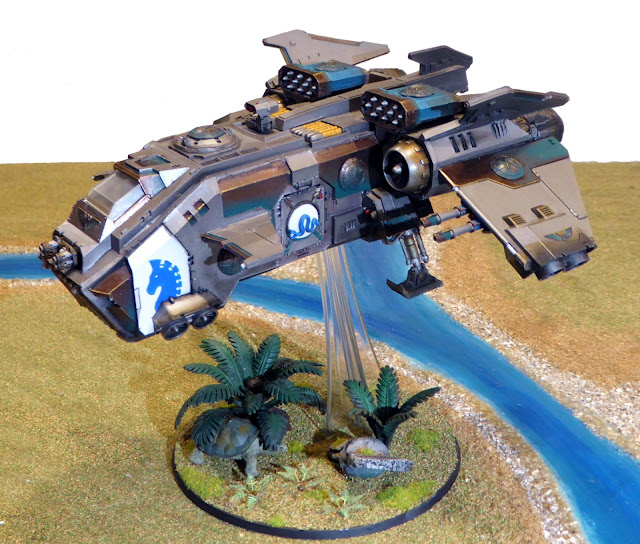
Iron Snakes: Storm Eagle TO-DONE!!!
Hi folks,
My squad of Iron Snakes Sternguard finally has a transport! I have named it the "Ophidian Fist", a Storm Eagle gunship that played a role in a short story I wrote a while ago called Death and Rebirth. The word ophidian relates to snakes, in the same way canine relates to dogs and ursine relates to bears; basically the name means "snake shaped fist". The nose-art was originally meant to represent the Trojan Horse of Terran myth, but my daughter noted that it looks a lot like a seahorse, or perhaps the mythical hippocampus, which I was pretty happy with too.
I had an interesting time photographing it, because it is such a large model and lighting has been problematic with the kind of storm activity we have been having in Sydney the past couple of days. My favourite online digital image processing site has also changed its functionality, which has taken some getting used to. After playing around with it, I can safely say it is much better now; I'll be posting about it little later with a beginners How-To guide. I am definitely no expert with photography, but it does make improving the clarity of photographs easier, particularly if you are using a ghetto lighting/camera setup like I do!
With the Ophidian Fist complete, I am 11 models away from completing a 2000 pt Iron Snakes army, all of which I am working on for Squaduary. Victory is so close, I can taste it...
See you across the table,
Marc
Sunday, 9 February 2020
Iron Snakes: Storm Eagle Basing
Hi folks,
With the underside of the base reinforced, it was time to work on the top surface. In some ways, basing a large model is like producing a piece of battlefield terrain. I prefer to model natural environments, mainly jungles and forests, and my experience with those has highlighted the importance of layering. When you walk through a forest you will often notice that the vegetation occupies the space in layers.
In alpine regions you may find miniature versions of this, entire forests where the emergent is no taller than a few centimetres.
I wanted the base to reflect this, with distinct forest floor and understory layers. Bridging the two I planned a middle layer with some young ferns, a ruined Ithakan statue and a... tortoise. The very nature of a layered project makes the order in which parts are added very important, so I thought it would be interesting to record each of the stages. Once again, it looks very bad for a long time before coming good at the end!
1) Painting
To start with I added to the base any parts that were going to form the base of something else. I painted the base of the ferns brown with a dark green wash. I then spent a considerable amount of time painting the ruined statue to make it look old and weathered, with green shading on the bottom half to represent algae and moss.
2) Large Ferns (well... cycads)
I had some large plastic ferns that the wifey bought me from Schleich. You know you have been in the hobby for a long time when everything looks like 40K terrain. It is even more efficient when your partner starts thinking the same way too! I painted them a little darker than the original green, but with lighter highlights, and a slightly brown underside and on the edges just to be interesting. I also used the top of an old metal spore mine to add a reproductive cone to the top (like a cycad).
3) Flocking
At this stage I glued the flying stand in place using 2-part epoxy resin. The grid on my portable hobby tray really helped with lining it up. After that I flocked the whole base with my special mix, and added the smallest cycad behind the ruined statue.
4) Dressing the Ruined Statue
To make the statue look like it has been in a forest since antiquity (perhaps not that long), I wanted to show some plant material getting caught in the top surfaces. I started with a sprinkle of brown flock on the top surfaces, followed by static grass after the flock had completely dried. Putting flock where it doesn't usually belong is a great trick for making something look like it has been reclaimed by nature. I followed that with static grass clumps around the base to add to the forest floor layer.
5) The Tortoise!
My neighbour gave the kids a big bag of toys the other day, which included this cute tortoise. They were both happy for me to use it on the base (I think it made the giggle on the inside). The only problem was it had a serious mould line running along the head and neck, which would be the most prominent part visible. So I sculpted over the top of it with green stuff and matched the colour with my paints. While he was setting, I did the next step, then tucked him under one of the big cycads.
6) Little Ferns
To fill the flat empty space to the front of the base, and add a final component to my middle forest layer, I added some laser cut ferns. They are, by far, my favourite basing material.
At this stage I let the base dry overnight. The final product has the layers that I wanted, with a mixture of natural and man-made things, some old, some mature and some young.
With the base done, there is nothing more to do except put the Storm Eagle on the flying stand. When that is done I'll take some photos and celebrate the end of an epic project!
See you across the table,
Marc
Friday, 7 February 2020
Squaduary: Squad Damocles Progress
Hi folks,
Well, my projects are starting to overlap with each other again. I was busy painting my daughter's Sisters of the Thorn models and basing my Iron Snakes Storm Eagle when the calendar ticked over to Squaduary. My plan for this year was to use my Conquest models to build Damocles Squad, the main protagonists in Dan Abnett's "Brothers of the Snake" novel.
The first model is the main hero of the story, Sergeant Priad of Damocles, armed with a lightning claw and custom laser-cut boarding shield from ML Shields (who did my Centurion's shields as well).
Etched into each shield is the following:
"Fear the snake, enemies of man. For his coils encircle us and his bright eyes unblinking watch over us forever".
I have also kit-bashed Apothecary Khiron using a lot of pieces from the Ravenwing Knights box. He is one of my favourite characters in the book, so I am pretty chuffed to have a model to represent him now.
 |
| Drill that barrel! |
I have also managed to convert Brother Andromak, the gunner of the squad...
Sergeant Priad stopped Andromak at the bottom of the assault ramp. "Brother, it is customary for Primaris to eschew the use of heavy weaponry. We sacrifice mobility at our peril." Andromak hefted the massive plasma cannon one-handed. "My apologies, Sergeant Priad. It looked small in the armoury...".
I'm hoping to get the rest built during the weekend, which will mean converting four more shield arms and a pair of auxiliary grenade launchers (somehow). Happy Squaduary everyone!
See you across the table,
Marc
Sunday, 2 February 2020
Iron Snakes: Reinforced Flying Bases
Hi folks,
This post won't be showcasing any spectacular modelling or painting work, but I think it will be useful for anyone trying to base a heavy resin flyer. Forgeworld sells some very heavy pieces now and the plastic flying base you are supplied aren't really fit for purpose. The main problem is that they are constructed from thin plastic, with the the supporting structure underneath allowing a lot of flexion (press down on it and the base collapses).
 |
| Press here: the middle goes down to the table surface with little pressure and the outer rim pops up. This is a problem... |
 |
| The supporting structure is a little too thin, extending down only 1/3 of the depth of the rim. That leaves a lot of airspace... |
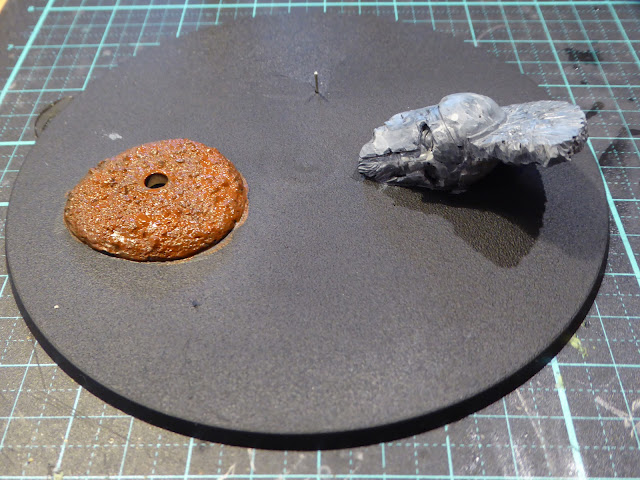
There is a large cavity right where you would want the flying stand to go (you can see where I have drilled the pin-hole already. in the picture above. My worry was that, over time, this would warp the plastic, applying stress on the flying stand and model that would cause it to eventually fail catastrophically. I did some research and found this YouTube clip, which I found very helpful. Essentially, you want to install a decent sized pin that will go up into the flying stand and completely back-fill the void in the center square under the base.
To kick it all off, I bent a paper clip into a pin with a diamond shaped, flat, base. I poked this through the pin-hole and pressed some green stuff in place to secure it. I then trimmed the green stuff into a square shape, ready for the filling process.
Next I cut some pieces of flexible plastic from a black folder. The plan was to glue these together with two-part epoxy resin to form a laminate that fills the void underneath the base. Others use plasticard for this, or even aluminium sheeting. I realised that it doesn't have to be a particularly sturdy material, it just needs to fill the void to stop the plastic from flexing. I could cut this plastic with a pair of scissors in no time and it was very simple to work with. Two-part epoxy is a last resort adhesive for me. It is very time sensitive, after mixing small amounts of the two parts you only have about two minutes to apply it before it gets hard to manage. Once it sets though, it is very strong (the longer it takes to set, the stronger). You don't want to get it on you either; it is hard to get off.
 |
| First layer. |
 | |
| Third layer with resin plug for the green stuff/pin. It isn't going anywhere soon. |
 |
| Fourth layer: flat and sealing the pin assembly in. |
With those layers of plastic and resin, the base can't flex at all. The bottom layer, when right-way up, is just above the level of the table, so any pressure at all brings it into contact and that's as far as it goes. Mission accomplished!
With the underneath reinforced and the pin installed, the next step will be to make the top surface look like an Ithakan forest, with both large and small ferns and some spartan ruins from Scibor miniatures. Before that, though, I left it overnight for the resin to completely set, under significant pressure.
See you across the table,
Marc
P.S. SQUADUARY!!!
Subscribe to:
Posts (Atom)


