Monday, 28 September 2015

Working with Laser Cut Ferns


Hi folks,

I have been experimenting with laser cut ferns for a couple of months, and I thought this would be a good chance to share my experiences. I think they are a fantastic resource for basing miniatures, particularly the larger scenic bases, but they can also be a real pain to work with. I'll go through the process of basing my Ravenwing Attack Bike with you and hopefully provide some helpful insights along the way.   


Step 1: Prepare thyself

Here is a list of stuff I had on-hand when I worked on the base: PVA, green stuff, super glue, 1:1 mixture of spring and winter flock, winter flock (brown), static grass, hobby knife, spear of destiny (ummm...sculpting tool) and, of course a laser cut fern.


The look I was going for was something like the picture below. This is a Birds Nest Fern in my Mother-in-Law's front yard. Note the dead leaves that have collected at the centre of the fern.


Step 2: Planning

The fern component of the base will catch the eye so you need to consider where you are going to put it. When working on a scenic base I suggest you check out some reference photos of how ferns grow naturally. For an example, check out my Iron Snakes Contemptor base. When I was planning the base below I wanted the fern to be in a prominent position, as there wasn't room for anything else interesting. I marked the space out by etching the surface of the base with my sculpting tool and drilling a small hole where the fern was to be placed.


Step 3: Flock it

I flocked the base with my spring/winter mix, with pure winter around the hole I drilled. This lighter patch acted as a highlight, providing greater contrast between the green of the fern and the base.


Step 4: Shaping the Fern

This is the tricky bit, so I took a few extra photos to help illustrate the process.


The fern will probably be flat and mangled when you take it out of the packaging.


Very gently open the fern completely and press it flat. Note the centre of the fern with the pinhole.


Hold the centre of the fern between thumb and forefinger, using your other hand to bend down the fronds very gently.


Add shape to the fern by pinching the centre gently. The petioles should fold up.


Invert the fern on something (Spear of Destiny, perhaps...) and add a tiny ball of green stuff to the bottom.


Use the tool to poke the fern down where you want it, fixing it in place by squashing down on the ball of green stuff. You can change the angle of the fern by moving the tool. If the tool sticks (thanks to green stuff coming through the pin hole), use a toothpick or pin to push down on the base of the fern as you pull the tool up and away (this has happened to me twice).


Step 5: Gluing the Fern

Apply a drop of super glue to the centre of the fern, it will overflow and fix the fern to the base while the green stuff cures. I put a pinch of winter flock on top of the glue to hide the pin hole and give the impression of the leaves collecting. I also added small amounts of static grass to add more texture to the flock finish.


Step 6: Finishing Touches

Finally I added the actually bike to the base. Et viola!


That's it! I have used this technique enough times now that I am quite confident that it gives the best results. Just trying to superglue the fern to the base is fiddly as hell and usually ends with glued fingers and broken fronds. Similarly, unless you spend the time shaping the fern yourself, the finished product looks unnatural and flat. I hope some more people give these a go and if you have any questions let me know.

See you across the table,

M4cr0

Monday, 21 September 2015

Ravenwing: Highlighting Black


Hi folks,

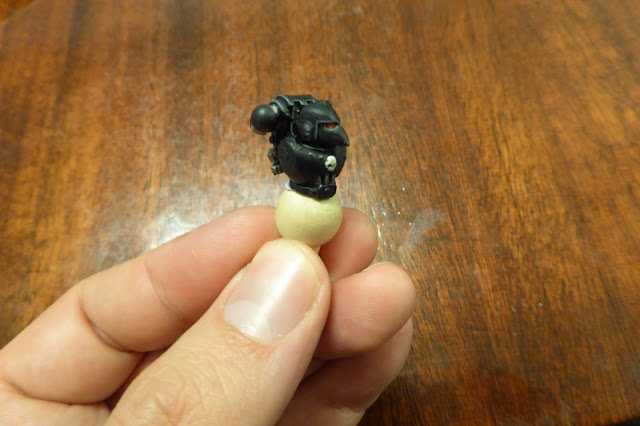
As I mentioned in my last post, I really haven't been looking forward to doing the next part of my Ravenwing project. Unfortunately, it happens to be a critical part! I haven't had much experience with painting things black; when it comes to achromatic shades I tend to favour browns and metallics. The primary exceptions in the past have been Ravenwing landspeeders, none of which I painted particularly well. I have painted one Ravenwing bike before, using blue/grey highlights, but that was a long time ago (late 90's). The effect was quite nice, nice enough in fact that I have used it on my Tyranids. I wanted to move away from that technique for my new Ravenwing squad, though, and have settled on the following witches brew:


Dawnstone, Eshin Grey, Abaddon Black and Nuln Oil

I start the process by hard-lining with Eshin Grey, which I then wet-blend with Abaddon Black all the way back to the undercoat shade. I repeat the process with a thinner line of Dawnstone, wet-blending it back to Eshin Grey if I paint the line too thick (...within the space of a gnats hair). This part was the hardest; I was fervently lamenting the amount of caffeine consumed during the day when I did it!  I then knock back the highlights with Nuln Oil because I prefer them to be subtle. Here is how it looks:


I am happy enough with the result to use this method on the other marines, hopefully I will get the highlights even tighter as I warm up to the task. All going well, I should also be able to transfer the skill over to the Nephilim Jetfighter I have waiting in the wings.

See you across the table,

M4cr0

Saturday, 19 September 2015

Ravenwing: SNAFU


Hi folks,

When painting Space Marine bikes, conventional wisdom suggests that you should paint the rider and bike separately, particularly with the robed Dark Angels sergeant, as it can be hard to get the shades in the robes right. After assembling the sergeant though, I had this terrible suspicion that he wasn’t going to fit back on the seat! To save myself the pain of having an unusable painted miniature, I decided to attempt a dry fit straight after the undercoat. As suspected, the rider didn’t fit:


Here he is, in all his not-fitting glory...


The main problem was the thickness of the robes where they had to slide over the bikes exhaust. Somewhat dejected, I plonked myself down on the lounge room floor and mulled over what I should do. One option would be to use a spare set of robed legs to assemble the bottom half on the bike, then saw the top half off the undercoated figure and re-use it. I didn't like this option because it felt like too much fiddling and back-peddling. As always, Gypsy the Wonderdog offered her unconditional support.


To fix the problem I used a file and my hobby knife to reduce the thickness of the robes at the back. After an hour of careful shaving and repeated failed dry fit attempts: click, he was in. Now… getting him back out again so that I can paint him…


To finish off this stage of modelling I removed one of the bolguns and converted it into a meltagun, to represent a bike mounted combi-melta. I also added some Ravenwing kit to the back of the bike and started the long process of turning his black robes to the bone colour required. After the assembled parts are completed I'll finish this guy off with a steering arm and a thunder hammer.


I also painted all of the chest-eagles on the rest of the squad members. My technique for this is quick and nasty: a Bleached Bone layer followed by a Nuln Oil wash, then highlighted again with Bleached Bone. To finish it off I highlight with Skull White. The only tricky bit was painting the assembled marine handling the raven, as it was hard to get my brush in the best position to do the highlights.


I'm hoping that tonight I'll find some time to do some highlights on the black armour, a job I have been secretly dreading. Seriously, give me anything to highlight except black, please...

See you across the table,

M4cr0

Friday, 11 September 2015

X-wing: Cutting the Cord


Hi folks,

I realised a while back that, after 12 months of playing X-wing, my gaming group has never played a scenario from an expansion. Usually I prefer games with a strong narrative, but we have been using X-wing as more of a pick-up game, with the exception of the big Death Star Trench scenario we played in May. To remedy this I teamed up with KuriboGoomba and Wade to give the scenario from the Imperial Aces expansion a go: Cutting the Cord.

The scenario adds a lot of complexity to the usual game of X-wing and gives the Imperial player/s a chance to fly a powerful prototype TIE around ganking people. For those not familiar with the expansion, the scenario includes 6 small research facilities which can provide special bonuses to one TIE in the Imperial fleet within range 1. The rebel force includes two operatives on a single ship, which can be delivered to a facility in order to sabotage it, though this renders the ship transporting them defenseless for a turn. The facilities are very hard to destroy any other way (4 defense dice), unless they are actively providing a bonus to the TIE (2 defense dice).

The Imperial fleet consisted of Carnor Jax (Elusiveness, Stealth Device, Royal Guard TIE and Autothrusters), a prototype Royal Guard Pilot (Wingman, Stealth Device, Royal Guard TIE and Autothrusters) and Colonel Jendon (Accuracy Corrector, Hull Upgrade, Darth Vader and ST-321).


"Apology accepted, Colonel Jendon..."

The Rebel fleet had an extra 10 points to spend. I considered rolling with one of my usual B-wing lists but ended up with my "A-wing Mafia" list: Corran Horn (Stay on Target, Advanced Proton Torpedoes, R7-T1 and Munitions Failsafe), Jake Farrell (Wingman, Proton Rockets, Munitions Failsafe, A-wing Test Pilot and Opportunist) and Green Squadron Pilot (Wingman, Proton Rockets, Munitions Failsafe, A-wing Test Pilot and Opportunist).


Early in the game KuriboGoomba and I banked our ships right, away from the shuttle, so that we could minimise the number of Imperial ships firing at us. We misjudged by the merest fraction though and Colonel Jendon stripped Goomba's A-wing of its shields, with the help of accuracy corrector, followed by a critical hit from Darth Vader. Apart from reducing our ship down to one hull point, it also damaged the weapons system.


Unfortunately for our heroes, the shuttle is closer than it looks...

The Interceptors skillfully dodged most of our firing arcs, really threading the needle between the asteroids and ships. Corran took a shot at the prototype but failed to make an impact. We felt that we wouldn't survive very long by ignoring the shuttle, as its ability to harass was greatly enhanced by Darth Vader and A-wings simply can't take that many hits. So we prepared to take it out, even as our red A-wing was vapourised.


Corran and Jake brought their weapons to bear on the shuttle, with Corran firing twice and removing its shields. Jake launched a proton rocket which caused a further 5 hits, including 2 critical hits. With a single hull point remaining due to the Hull Upgrade, I was relieved to pick up a damage card that counts as two damage to finish it off!


I didn't realise it at the time, but by maneuvering to avoid the shuttles firing arc, I actually lined up an asteroid instead. The next turn I was forced to collide with it and lose my action for the round. The alternative would have been to land and deliver a Rebel operative, but the Interceptors were breathing down my neck and I needed the defense dice. Unfortunately it didn't matter, having synchronised with the nearby research facility the prototype unleashed two rounds of firing at the A-wing, wiping it out.


After several very close turns trading fire, I flew Corran into another asteroid (by the merest fraction of a base!) and he was pummeled by fire. The Imperial prototype was safe, but Vader was dead (take that "Ani").

I think if I played the scenario as the Rebels again, I would dedicate a ship to blowing up the facilities when they are easy to hit, i.e. in use. A turreted ship would be great for this; I was thinking a YT-2400. As always, playing to the objective wins games. Goomba and I chose to focus on the Shuttle instead (granted it was causing us a lot of pain) and paid the price for our lack of vision :-)


See you across the table,
M4cr0

Monday, 7 September 2015

Jade Falcon Medium Star - TO DONE!


Hi folks,

Yesterday I put the finishing touches on a new Star of Jade Falcon Omnimechs. Looking at them now, it is really hitting home how far I have come in my Battletech journey. I started playing over 20 years ago with very little in the way of gaming equipment. We had a second-hand rulebook, two mapsheets and a handful of folded cardboard Mechs between us. That was all we needed for a long time.

We would frequently use d8's to represent Mechs, or figures from other gaming systems. I still have an Executioner record sheet that is annotated as 'Grey Ogre', because it was literally represented by a grey ogre model at some stage. We tried to order some miniatures through Ral Partha, but after spending 12 months on backorder we cashed them in for something else. It was only recently that I thought about ordering some miniatures in, and... well... here we are.

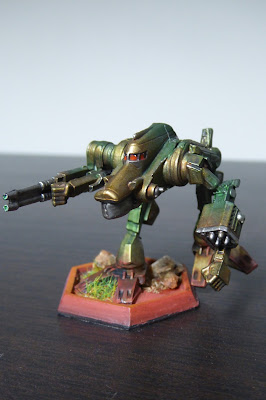
The Mechs that I have painted here are all personal favourites of mine, for one reason or another. They are painted in a metallic camo scheme (sepia and green glaze over Leadbelchers). The laser lenses are all painted in the colours used in the old MechWarrior games, and the bases are a homage to my favourite mapsheet set: Desert Mountains/Sinkholes.


Kit Fox (Alt. Config. B)


I have a real soft spot for Kit Foxes. For a light Mech they are pretty slow but they can pack a mean punch. The Alt. Config. B mounts an Ultra AC 10, which used to be hilarious in the MechWarrior PC game. I would take one as a Starmate, watch him scamper off into the distance and then you would hear "BRAKKA-BRAKKA-BRAKKA!"... you go for it little buddy :-)


Adder (Primary Config.)


Two head-capping particle projector cannons and a targeting computer on a 35 ton Mech: brilliant!


Viper (Primary Config.)


Viper's are ridiculously agile Mechs, which makes them great for transporting Elementals around. I was very tempted to make the Config. with 5 ER medium lasers, but I use the jump jets frequently and the pulse lasers of the Primary Config. help mitigate the 3+ movement modifier.


Nova (Alt. Config. A)


I can remember reading about Diana Pryde winning her Bloodname in one of these. I really enjoy using this Mech to transport Elementals around; it has pretty good armour, good movement and a  pair of head-capping PPCs. I like this Config. much better than the Primary, which struggles with damage output due to heat management issues. This guy: 15 to the 12 all the way baby.


Hellbringer (Custom Config.)


Based on the Alt. Config. C, I modify the load-out slightly to include an LB-20X AC (12 ton shotgun anyone?), Streak SRM 6 (MOAR holes in your internals), two medium pulse lasers and an ER Large Laser. This Mech is a close range brawler, and my MVP in Alpha Strike.

So that brings my Jade Falcon force up to Binary level, when added to the Heavy Star I painted previously. It is also the first project I have completed on my 2015/16 To-Do list!


See you across the table,

M4cr0

Saturday, 5 September 2015

Imperial Assault: Sniping at Vader


Hi folks,

We have two missions left before the finale in our current Imperial Assault campaign, but before we could make our move on the final objective, Jimmy sprung this side-mission on us. Every now and then we have been given the opportunity to complete a mission to prevent him from getting a shiny new Imperial thing. Most of these missions have ended in failure, most notably the one where Jimmy obtained Darth Vader. This time around he was gunning for an upgrade to his stormtroopers, which can only mean trouble considering the number of the blighters we always face. Along for the mission we had Wade's Wookie tank, Heinz's speedy Jedi apprentice, Joe's human commander dude and my Bothan sniper, "Mak":


The weapon I have is a DXR-8 disruptor rifle. It is outrageously good. The Marksman Barrel and Tactical Display aren't equipped, they are just spare bits of kit.

Most games I have played move at a blisteringly desperate pace; you don't have any time to muck about (...or miss). If you want to win you need to kill things dead the first time and run like hell. My new weapon, a disruptor rifle, finally allows me to one-shot stormtroopers. This is a massive improvement, which I hoped would allow me to clear a path for the Jedi or Wookie to run through and complete the objective. We had the opportunity to take Han Solo, but decided not to; having Darth Vader appear right in front of us on the first turn would just slow us down. Besides, we all know what happens when Han brings a blaster to a lightsaber battle:


Denied.


As always, the map was deceptively small. The briefing warned us that the base had a "reactive defense mechanism", whatever that means. We had to get through a door within five turns and destroy a mainframe computer. There were two ways to get to the objective, the long way (through a hairpin corridor) and the short way (by blowing up a door). Knowing that speed wins games, we all agreed that the shortcut through the door was our Plan A. We also wondered what horrible thing was going to happen to us as soon as that door was destroyed!


The setup. This post was proudly brought to you by lemon Solo, bananas, green tea pocky and baby monitors.

Turn 1: Our Wookie brawler charged forwards and smashed a Stormtrooper, cleaving into his squad mates in the process. The Jedi moved up as well preparing for a mad dash through the door next turn. I used my first action of the game to snipe the probe droid into oblivion. It was a lucky hit, managing enough damage to one-shot him: priceless.

Turn 2: I used my disruptor rifle to target the door and blast it apart with the help of an extra action, provided by Joe's commander. Blowing up the door increased the defense value of the objective door by 10 points; there's the reactive defense mechanism. Heinz's Jedi bolted through into the next room to confront an E-web gunner, while the Stormtroopers shot up the Wookie a bit before he pulled their arms off. We later figured out that the second shot I put on the door could not have happened, as the card I used to shoot past the blocking Stormtrooper had to be exhausted and didn't cover both shots. After playing through the game though it was decided that the effect of this was negligible, putting the second shot on a stormtrooper would have been just as helpful in the grand scheme of things.


Turn 3: The Wookie charged the Plan A door and cleaved the wounded E-web gunner in the process, killing him. Heinz's Jedi skipped through the destroyed doorway and headed for the objective door, which increased in defense value to 30. The Jedi started dealing damage to the door immediately but took damage in return thanks again to its reactive defense mechanism. During his turn, Jimmy brought another E-web gunner in directly behind us, pouring shots into my Bothan (owwww). Oh... and Darth Vader appeared at the start of the objective corridor. I positioned my Bothan and took a shot at Vader doing 5 damage! Do you think I got his attention?


Turn 4: Both the Jedi and the Wookie were now pounding on the objective door, taking damage from the door and from Vader's Force Choke. The Jedi survived the onslaught but our Wookie friend died a horrible death-by-doorframe. I moved Mak out of the line-of-sight of the E-web gunner and positioned him in the objective corridor. Our strategy now was target saturation to slow down Vader and put as many characters in position to win the game as possible.

Turn 5: We get the door down to 1 hit point and we are all held our breath. Surely we couldn't lose from here...


...Heinz makes his roll and it looks absolutely rubbish, but with some creative use of his special abilities he manages to put exactly one hit on the door. We scraped through with a win as Darth Vader breathed down our necks!


As the dust settled we organised our loot for the mission, deciding to buy a force pike for Wade's Wookie. It took a group effort and the selling of some excess kit, but he really needed it. Early in the game he struggled to finish off some Stormtroopers in the same way I used to struggle with my old rifle. As I have mentioned before, in such a fast paced game, you really do have to take things out quicker than that.

To finish the session off Jimmy gave us the briefing for the next mission, something about plans for a secret weapon. Sounds like the kind of thing "many Bothans" are going to die to neutralise, if you know what I mean ;-)

See you across the table,

M4cr0