Thursday, 5 February 2015

Iron Snakes: Storm Eagle Progress


Hi folks,

As soon as I received my Storm Eagle from the guys at Christmas, I began referring to it as the "Trojan Horse". For those unfamiliar with Homer's works, the Trojan Horse was a large wooden horse the Greeks used to deliver soldiers into Troy by subterfuge, thereby ending a ten year siege.

There have been many depictions of the Trojan Horse in classical and modern art, ranging from the decidedly gummy to the downright sinister:


A grim/dark Trojan Horse from the movie "Troy".


For my Storm Eagle I went with a more classical look, which has more of the appearance of a chess piece in my opinion. I used the artwork below as a reference to make a simple paper stencil, which I could use to transfer the basic shape onto the fuselage of the model. I don't usually make stencils for this sort of the thing, but I was finding the Storm Eagle very hard to hold steady whilst simultaneously getting the dimensions right.


The first step was to tape the stencil to the fuselage as securely as possible, which was difficult due to all of the irregular surfaces. I used green tape which doesn't damage the paint job when you remove it; it does not adhere very strongly.


Next, I pressed the stencil down with the fingers on my left hand whilst I painted over it with my right. I used a large flat brush and fairly dry paint (Enchanted Blue), as I didn't want it to "bleed" under the stencil.


Having removed the stencil, you can see how rough the shape was, but at least the dimensions were correct. The next job was to add a second coat of blue to improve the coverage, add some detail and use white to sharpen up any weak lines.


I extended the neck of the horse down towards the landing gear housing, added another section to the head plume/mane as well as a line between the plumes. This last bit of detail was to make it look less like a living horse and more like a construct. I also added an eye, to make it consistent with the other freehand work I have been doing on the shields (though this makes it look more like a living horse again). I showed it to my muse, who is an avid horse rider, and got her nod of approval. That's good enough for me!


Here is a final look at the Storm Eagle as a whole. I need to repeat the symbol on the other side, but after this test I am fairly confident I can pull it off. Nothing else is anywhere near as difficult as this symbol on the fuselage, so I am feeling very positive about the project now. It's only a matter of time before I'm dropping plasma behind enemy lines...


See you across the table,

M4cr0

Sunday, 1 February 2015

Iron Snakes: Verdigris


Hi folks,

I haven't had much time to myself over the past couple of weeks, so my glacial rate of painting is even slower than usual. Work is back with a vengeance; at the moment I am teaching nuclear chemistry to my seniors and it requires a lot of preparation. Likewise, my social calender is bursting like an over-ripe watermelon. Yesterday I went to a Greek Orthodox Christening which was far more elaborate than my wedding was 10 years ago.

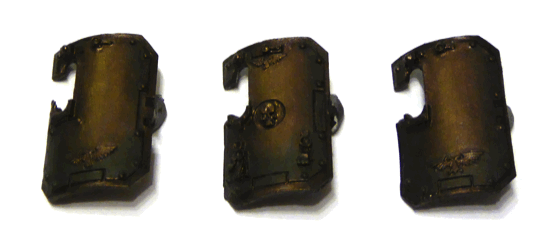
Nevertheless, I have managed to finish the plain siege mantles for my Sternguard (they will be getting a name change soon...). Quite a few people have commented on the corrosion effect I have used, so I thought I would show the technique step by step, in case people want to try it out. Over the past 20 years there has been a big move towards the realistic depiction of weathering and corrosion in the 40K hobby. These days, some miniatures are weathered so much you wonder how they are still functional ;-) The shields start very dark, so bear with me for a while; I have lightened them up as much as I can!


The real thing: verdigris on ancient Greek helmets

To begin with, verdigris is a form of patina you can find on copper, or the alloys of copper (such as bronze or brass). Patina itself is a word used to describe any layer that forms on a surface due to exposure to reactive substances in the environment (be they atmospheric or geological), whether it be rock, metal, wood or anything else you can imagine. Verdigris, when it forms near the sea, is usually a layer of copper(II) chloride.


Copper(II) chloride

My Iron Snake veterans have a very good reason to spend lots of time at sea (more on that later...), so it is feasible that they would have some verdigris forming on the bronze portions of their armour (let's assume the bronze is purely decorative, I don't see it stopping a bolt gun round).

Before the following pictures were taken, I prepared by siege mantles by undercoating them using Chaos Black spray, followed by a layer of Warplock Bronze. A black wash was gradually added to the left and right edges until the very edge was completely black, with a gradient towards the middle (it gets lighter and lighter). I then dry brushed Warplock Bronze back into this gradient to blur the interface. I mixed some Auric Armour Gold and Warplock Bronze in a 1:1 ratio and drybrushed it on the centre-line of the shield. Again, I drybrushed Warplock Bronze into the gold mix to blur the interface. All of this basically accentuates the curvature of the shield. Next step:


3:1 Mournfang Brown/Kabalite Green
 
I dull down the bottom quarter of the shield with a 3:1 Mournfang Brown/Kabalite Green mix. Later on in the process I drybrush Warplock Bronze back into this to blur the interface, using circular brush strokes.


1:1 Mournfang Brown/Kabalite Green

I add 1:1 Mournfang Brown/Kabalite Green to about 2/3 of what I just dulled down. To neaten it up, I wet blend the original mix back in.


1:3 Mournfang Brown/Kabalite Green

I add 1:3 Mournfang Brown/Kabalite Green to about 1/2 of what I originally dulled down.


Straight Kabalite Green

I drybrush straight Kabalite green over the top, blending in some of the previous mix to neaten it up. You can see the middle shield got a little more than the others, but this kind of inconsistency isn't much of a problem; it could just be an older shield ;-)


1:3 White Scar/Kabalite Green


I drybrush a 1:3 White Scar/Kabalite Green to provide a rough highlight. I knock this highlight back with a Kabalite Green glaze. You can see that I tilted the shields a bit further in this photo and caught the reflection off that Auric Gold on the centre-line.


3:1 White Scar/Kabalite Green

I pick out the extreme edge of the detail by hard-lining with a 3:1 White Scar/Kabalite Green mix. These shields had a couple more hours of detail left before they were finished, but the verdigris at this stage is complete. So there you have it!

Good luck with your own weathering projects; I look forward to seeing them.

See you across the table,

M4cr0

Wednesday, 28 January 2015

Game Review: Xia - Legends of a Drift System


Hi folks,

My mate Wade picked this game up a few weeks ago and we have had the chance to play a few games so far. It is a hard game to describe, mainly because it has so many different playable aspects. It can quite literally be a different game for each player, with some necessary commonalities. It is a swashbuckling exploration and adventure game, where players take on one or more roles during the game (smuggler, thief, bounty hunter, space taxi driver, trader, researcher etc) with the aim of becoming famous.

You start the game by choosing a Level 1 space ship. The ships are lovably dorky, reminding me a lot of the shuttles in the Sci-Fi comedy Red Dwarf (I am this close to pursuing a custom 3D printed Star Bug for the purposes of playing this game. Seriously!). Apparently, a lot of the templates for the ship cards are free to download, so you can make your own custom ships. We had a little wistful chat about using some appropriate X-wing ships and turning it into a Star Wars scum game. More on that sometime later...


Lovable, but dorky. The paint job on these prototypes does not match the ones in the box...


My ship of choice, the Easy Tiger. Full leather interior (slightly stained).

You can spend credits to upgrade your ships with shields, engines, cannons or missiles, which take up cargo space. Obviously, limiting cargo space reduces your ability to win fame through trading, so ship customisation reflects the kind of role you want to play. The upgrades themselves are different shapes that you have to fit on your ship like Tetris blocks, which is a great mechanic. Sometimes you have to buy a bigger ship to fit the stuff that you want. Damage that you receive is taken onto your cargo spaces as well and can render upgrades inactive.


Upgrades. Cue the Tetris music.

To activate your upgrades you need to spend tokens, which must be bought back at the end of the turn with energy points. Running out of energy leaves you slow and defenseless; meat for thieves and bounty hunters.

When you explore new areas you randomly place space tiles down which contain planets, asteroid fields, rubble fields, nebula and stars. You can spend energy to scan a new tile before you place it and fly into it... or you can just fly in blind like my wife did every turn. Her tactic works just fine until you fly into a star, which ends your trip real quick. You can score fame points by destroying other ships, buying and selling goods, transporting people from planet to planet, performing heroic deeds and conducting research in far flung locations. I chose the research route and geared my little ship up with a powerful engine and shield system. I spent an awful lot of time disabled inside Nebula I was trying to research! My wifey took MOAR GUNZ and used them ruthlessly, eventually winning the heroic title of "Viking" for her skills at ramming. The eventually winner of the game, KuriboGoomba, took a bit of everything and won most of his fame transporting wedding parties from one planet to another.


I'm pretty sure Kuribo is cheating right here.

Easy Tiger wins a fame point for being the first to use a gate to travel through space more rapidly. One of the gates is faulty and transports you randomly, which is great for escaping Bounty Hunters.

Your fame points are recorded on a Fame Point Track, which includes such inspiring levels of achievement as "Space Scum", "Rubbish Runner", "Courageous Corsair", "Renowned Starfarer" and ultimately, "Legendary Legend".


We only played to 10 fame points, which was a shorter game, but if you play it to twenty points you have a good chance to upgrade your ship and try out a few different routes to fame. This is a four star game in my opinion, with plenty of room for improvement and customisation.

See you across the table,

M4cr0

Tuesday, 27 January 2015

Game Review: TMNT (1987!)


Hi folks,

A couple of weeks ago my wife discovered this gem in her parents garage, in fantastic condition. It is her copy of the 1987 Teenage Mutant Ninja Turtles: Pizza Power board game and our collective hearts did flip-flops when we found it. Both of us were big TMNT fans "back in the day" and have even imparted some of this half-shell love onto our children. After finally tucking them away for the night we cracked open the box for a gaming hit of nostalgia.


The point of the game is to collect four different "good guy" cards and beat four different "bad guys", then make your way to the Technodrome for a final showdown. You spend good guy cards to get a chance to fight bad guys, and use a "flipper" to determine the outcome of the battle. This final gaming mechanic is a supposed to "inject an element of skill" for "fast paced action." In reality, it is as frustrating as balls. Honestly, we had to laugh because otherwise we would cry.


Wifey takes a krak at the "Battle Flipper". It is a gaming torture device.

Early on we found it almost impossible to beat any bad guys, until we started to get the hang of the flipper. You need to catapult the dice into the correct section of the flipper, which corresponds with the level of the enemy, in order to beat them. Getting a three was easy, one was hard and two was utterly beyond me until later in the game. Then all I could get was twos and I sat in the middle of the board for half an hour unable to close out the match.


My nemesis, Krang, required a two to beat. Looks like it's punks for breakfast again...

Eventually, though, my bodacity won out. In the final battle I had to flip one of each number on the flipper consecutively, which took me ages to do. It gave wifey plenty of time to catch up and we were both in terrible pain from laughing at my ineptitude. By shear luck I managed to flip what I needed to win, and we packed the game away for another 20 years. Let's hope the kids never find it...


Raphael is victorious... eventually, due to no skill of his own and with many tears of frustration/hilarity.

Next post I'll do a short review of a cool little game we have been playing called Xia, which I think has a lot of potential. It is dorky in a very charming way, with a dash of resource management, character progression and space combat.

See you across the table,

M4cr0